There is a great difference between painting in production and repair painting.
In production, only the bodyshell is painted, it has no trim, upholstery or assemblies. Because of this, other paints, tools and processing techniques can be used.
In contrast to that used in production, paint used in the workshop must dry at low temperatures. Plastics and the vehicle electronics must not be subjected to temperatures greater than 70°C.
The precondition for a professional paint finish on a vehicle is the permanently maintained cleanliness of work spaces, tools and equipment,
Original materials must be worked according to the manufacturer's instructions, so that no problems arise in the processing nor during drying.
The room temperature must be 20 - 25°C and the humidity must be low. Temperatures which are too low or too high can lead to porosity, poor flow and boiling. High humidity leads to paint damage such as tarnishing of the paint film (matt film), adhesion problems and craters.
Perfect preparation of the subsurface is the precondition for a brilliant paintwork result. Faults in the preliminary stages delay completion and cause unnecessary extra work. The working steps described here demonstrate how important it is to follow these instructions step by step.
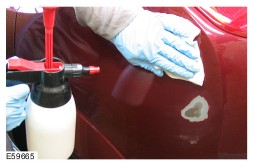
Clean the damaged surface thoroughly, to allow the extent of the damage to be seen. Use silicone remover to produce a grease-free surface.
NOTE:The treated surface must be rubbed with a clean dry cloth before the solvent evaporates, otherwise there will be no cleaning effect.
Effective de-greasing is important not only before the application of paint, but also before all sanding stages, for two reasons:
- During sanding of grease contaminated surfaces, globules may form with the sanding dust. Sanding marks will occur and the sanding medium quickly becomes unuseable.
- Oil and grease are embedded by the action of the abrasive particles, and are then very difficult to remove.
Establish the area of damage and the repair stages. In doing so, establish how much disassembly work must be undertaken. Perform a color test at this stage.
Mask off the area of the repair ready for preparatory work.
Sand out the damage location
The surface which has been repaired and then prepared according to the manufacturer's instructions is now ready for basic paint application.
Top coat application
It is important for a good paint result that the recommended process data is adhered to, i.e. mixture proportions, layer thickness, viscosity, drying time etc.
First of all the work area is carefully masked ready for paint application. The correct adhesive materials and techniques must be used so that no hard transitions and edges are created during painting.
NOTE:The chapter "Tips and Tricks" gives in-depth information on masking work.
Thoroughly check the surface once more and rub-off with a dust-bonding cloth.
NOTE:Once more check the paint material and that the spray gun is correctly adjusted before applying the paint.
Paint application
Allow the paint application to flash off until the surface has a matt appearance. So that the transition to the original paint is optimally created, the next paint application is applied to a wider area.
After the base paint has dried for the specified time, the clear lacquer is applied. Next the transitions to the original paintwork are treated with fade-out remover. This removes the spray mist and forms an ideal paint surface.
Repair stages for repair painting
The required time and material data is divided into four painting levels for calculations concerning repair painting. Proceed according to these divisions for every calculation.
Level 1 - Painting of new components
On new components, all inner surfaces, seams and edges which will no longer be seen after assembly must be primed and pre-painted.
NOTE:The cathodic dip primer must not be sanded away. Cleaning with silicone remover or light sanding of the primer is all that is required.
Job steps:
- Wash off, prime and pre-paint inner surfaces, seams and edges which cannot be reached at all or only partly after the component is installed.
- Sand new component with P280 - P320 or a fine sanding pad.
- Clean subsurface with silicone remover.
- Carry out masking work (when painting an installed component).
- Apply one spray run of filler, dry.
- Sand the filler. P1200 wet or P500 dry.
- Clean filler application with silicone remover.
Then the prepared surface can be painted with solid or 2-component paint.
If the new part has mild transport damage, this must be rectified beforehand.
To do so, add the following steps:
- Grind out the scratch.
- Finely sand the surrounding surfaces.
- Use a steel cleaning agent to thoroughly clean and then rub dry.
- Apply corrosion protection primer to the bare areas.
Level II - Top surface painting (color tone matching)
Complete bodywork surfaces which are to be painted without the need to apply stopper belong to this group. In addition, surfaces with faults in the top coat surface which cannot be removed by polishing.
Level III - Repair painting with stopper applied to up to 50% of the surface.
If in addition to painting, work with stopper application must be performed, then the repair levels III or IV must be used.
In repair level III, apart from painting the complete bodywork surface, partial stopper work is carried out on up to 50% of the surface to be painted. The necessary primer and filler work are also included.
Level IV - Repair painting with stopper applied to more than 50% of the surface.
In repair level IV, apart from painting the complete bodywork surface, partial stopper work is carried out on more than 50% of the surface to be painted. The necessary primer and filler work are also included.
The scope of the work is different to level III because of the partial application of stopper to more than 50% of the area to be painted. In addition, more extensive sanding work is usually required.
Polish
In order to achieve faultless quality, it is sometimes necessary afterwards to polish a newly painted surface.
Even after the most careful painting, it sometimes happens that dirt inclusions and paint runs occur in work with top coat or clear lacquer. Before polishing, such paint faults must be removed with the sanding cylinder ("Finiball") and hand sanding or eccentric sander in a wet sanding process.
Sanding cylinder