| Removal and Installation Hot air gun Direct glazing cutter for bonded glass Direct glazing adhesive kit Direct glazing adhesive oven Glazing suction cups Removal | | -
NOTE:If the ambient temperature falls below 10ºC, use a hot air gun and apply warm air (25ºC) continuously for 15 minutes (inside or outside the vehicle). Remove the polyurethane (PU) adhesive cap and heat the PU adhesive for a minimum of 30 minutes. | | | -
Remove the rear wiper arm assembly. | | | -
Detach the high level brake lamp. | | | -
Disconnect the multiplug. | | | -
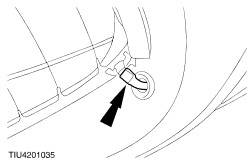
Disconnected the heated rear window connector and remove the earth connection screw. | | | -
Pull off the two liftgate side mouldings. | | | -
Apply protective fabric tape to the liftgate. | | | -
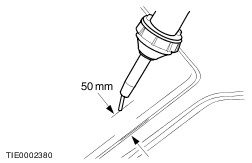
WARNING:Always wear gloves and eye protection when working with the glass cutting tool as the cutting operation may produce splinters. NOTE:Some resistance may be encountered when cutting through the glass locating pegs in the corners of the glass. - Cut the PU adhesive from inside the vehicle to a maximum depth of 25 mm.
| Installation | | -
Carefully remove the remaining part of the locating pegs from the window glass flange. | | | -
CAUTION:Avoid touching the trimmed surface as this will inhibit the new adhesive from bonding. Carefully trim the remaining PU adhesive from the window aperture to leave approximately 1 mm of trimmed PU adhered to the bodywork. | | | -
Check the window glass flange for damaged sheet metal, rust or foreign material which may have caused, or may cause, glass breakage. | | | -
If the original glass is to be refitted, remove the excess PU adhesive from the glass as described in the previous step. | | | -
Fit the two side weatherstrip moulding to the glass. | | | -
Check the condition and positioning of the rubber trim moulding on the inside bottom edge of the liftgate glass aperture and renew if necessary. | | | -
WARNING:To make sure that the PU adhesive cures, it is essential that all bonding surfaces are free of all moisture. Using a heat gun, apply warm air (25ºC) to the window aperture and glass bond line to remove all traces of moisture. | | | -
Prepare the glass, window aperture and trimmed PU adhesive in accordance with the instructions supplied with the adhesive kit. | | | -
NOTE:Discard the first 100 mm of PU adhesive as this may be partially cured and have a reduced working time. NOTE:To avoid water leaks, any breakage in the continuous bead should be overlapped by 20 mm. Apply the PU adhesive in a continuous bead of between 8 and 10 mm height to the liftgate flange along the bond line. | | | -
CAUTION:During the curing period of the PU adhesive, the door windows must be left open to avoid a build up of pressure when the doors are opened or closed. Fit the liftgate glass. - With the aid of another technician use glazing suction cups to carefully lift the glass and align it in position over the window flange.
- Press firmly and evenly into position.
| | | -
Refit the remaining components in reverse order. | | | -
Check for leaks and correct as necessary. | | |