| Removal and Installation Hot air gun Direct glazing cutter for bonded glass Mixing/applicator gun Direct glazing adhesive oven Glazing suction cups Materials Name Specification Windshield Adhesive Kit WSK-M11P57-A1 Removal | | -
Remove the polyurethane (PU) adhesive cap and heat the PU adhesive for a minimum of 30 minutes. | | | -
With the aid of another technician remove the backboard (if equipped). | | | -
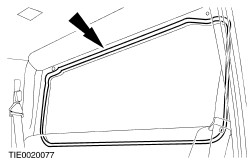
Remove the rear window glass weatherstrip. | | | -
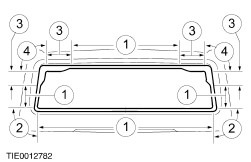
WARNING:Wear gloves and eye protection when working with the glass cutting tool as the cutting operation may produce splinters. When using the cutter wear ear protectors. Failure to follow these instructions may result in personal injury. CAUTION:Make sure the cutting blades are changed where the cutting depth changes to avoid damage to the body and trim panels. NOTE:Some resistance may be encountered when cutting through the glass locating pegs in the upper corners of the glass. - Cut the PU adhesive from inside the vehicle to the given maximum depths.
- 30 mm.
- 40 mm.
- 50 mm.
- 65 mm.
| Installation | | -
Carefully remove the remaining part of the locating pegs from the rear window glass flange. | | | -
CAUTION:During the curing period of the PU adhesive, the door windows must be left open to avoid a build up of pressure when the doors are opened and closed. CAUTION:Do not touch the adhesive surface as re-bonding will be impaired. NOTE:Make sure the spacers located at the lower corners of the rear window glass flange are secure. Carefully trim the remaining PU adhesive from the rear window glass flange to leave approximately 1 mm of trimmed PU adhesive adhered to the flange. | | | -
Check the rear window glass flange for damaged sheet metal, rust or foreign material which may have caused, or may cause, glass breakage. | | | -
CAUTION:To make sure that the PU adhesive cures, it is essential that all bonding surfaces are free of moisture. Using a hot air gun, apply warm air (25°C) to the rear window glass flange and glass bond line to remove all traces of moisture. | | | -
Prepare the glass, rear window glass flange and trimmed PU adhesive in accordance with the instructions supplied with the adhesive kit. | | | -
Install the rear window glass weatherstrip. | | | -
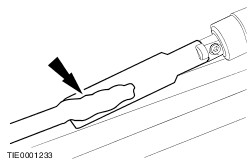
NOTE:Discard the first 100 mm of PU adhesive as this may have a reduced working time. NOTE:To avoid water leaks, any breakage in the continuous bead must be overlapped by 20 mm. Using the mixing/applicator gun, apply the PU adhesive in a continuous bead of between 8 and 10 mm in height to the rear window glass flange along the bond line. | | | -
- Press firmly and evenly into position.
| | | -
Using suitable tape, secure the rear window glass in the correct position until the PU adhesive has cured. | | | -
If the ambient temperature falls below 10°C, use a hot air gun and apply warm air (25°C) continuously for 15 minutes (inside or outside the vehicle). | | | -
With the aid of another technician install the backboard (if equipped). | | |