L322 Range Rover Service Procedures

ENGINE - V8
REPAIRS 12-2-43
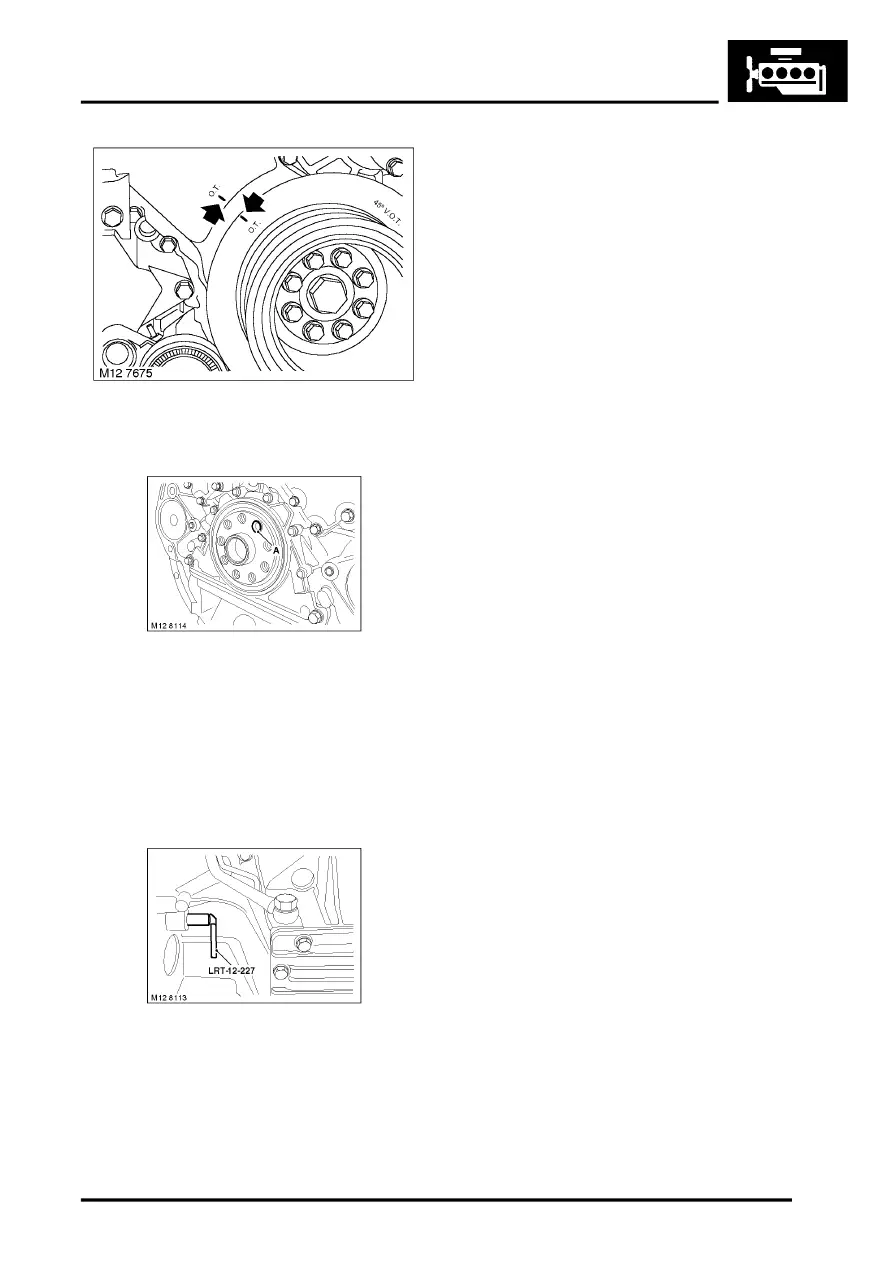
3. If necessary, continue to rotate crankshaft
slightly to align TDC timing marks
4. Temporarily fit drive plate ensuring that hollow
bush in drive plate securing bolt hole, is aligned
with bolt hole 'A' in crankshaft boss.
5. Fit and lightly tighten 8 drive plate securing
bolts.
Do not fit a bolt in drive plate hole with hollow
bush.
6. Fit timing pin LRT-12-227 ,ensuring that it is
inserted in hole in drive plate.
If necessary, rotate crankshaft slightly to
enable timing pin to be inserted.
7. Check that TDC timing marks are still aligned
and that hole with hollow bush is still in position
'A'.
8. Remove timing pin LRT-12-227, and remove
drive plate.
9. Fit crankshaft dowel into securing bolt hole at
position 'A'.
10. Fit RH camshaft cover gasket.
11. All engines: Clean torque converter and drive
plate mating faces.
12. Clean gearbox to engine mating faces, dowels
and dowel holes.
13. Clean differential and engine sump mating
faces.
14. Fit new 'O' ring to differential and lubricate with
clean oil.
15. With assistance, carefully fit engine to gearbox.
Ensure engagement of torque converter spigot
and location onto dowels.
NOTE: When fitting engine, guide the engine
past differential mating face.
16. Ensure torque converter is fully engaged with
gearbox.
17. Fit 8 Torx bolts securing automatic gearbox to
engine, tighten to 45 Nm (33 lbf.ft)
18. Align starter motor to engine and tighten
securing bolts to 45 Nm (33 lbf.ft).
19. Fit 2 top bell housing Torx bolts and tighten to
25 Nm (18 lbf.ft).
20. Remove support from gearbox.
21. Lower engine onto mountings.
22. Disconnect lifting chains.
23. Fit 2 nuts securing engine mountings to engine
mounting brackets and tighten to 100 Nm (74
lbf.ft).
24. Remove engine lifting bracket.
25. Fit bolts securing drive plate to torque converter
and tighten to 45 Nm (33 lbf.ft)
26. Fit grommets to bell housing.
27. Clean mating faces of exhaust front pipes and
exhaust manifolds.
28. Align exhaust front pipes to exhaust manifolds.
29. Fit 4 new nuts securing exhaust front pipes to
exhaust manifolds and tighten to 45 Nm (33
lbf.ft).
30. Carefully align differential to sump. Fit bolts, but
do not tighten at this stage.
31. Align differential to transfer box front output
flange. See Technical Bulletin, Final Drive
section No: 0014
32. Tighten differential to engine sump securing
bolts to 110 Nm (81 lbf.ft).
33. Connect breather hose to differential.
34. Connect engine earth lead to engine and
tighten securing nut and bolt.
35. Fit differential air flow panel to sub-frame and
tighten bolts to 45 Nm (33 lbf.ft).
36. Fit RH front drive shaft.
