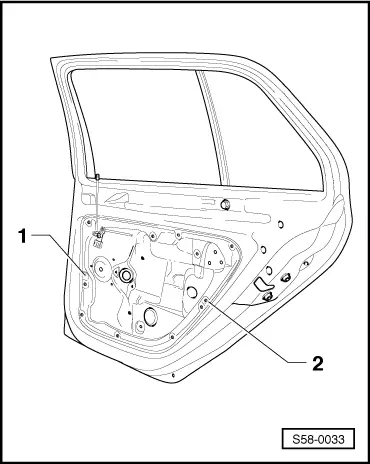
skoda Workshop Repair Guides

Skoda Workshop Service and Repair Manuals

Removing and installing door window > < Removing and installing the door lock
Removing and installing assembly carrier
Removing
  Note
t  The assembly carrier is removed together with the door lock.
t  Removing and installing window lifter motor → Chapter.
–  Remove rear door trim panel → Chapter.
–  Removing the door handle → Chapter.
   
–  Release cap -1-.
–  Lower door window until adjusting pin -2- and straddling dowel -3- can be reached in the window lifter opening.
  Note
If this operation cannot be performed due to a failure at the power-window lifter, unscrew the power-window motor and then push the window down.
–  Screw an M5 (about 70 mm long) into straddle pin -2-.
–  Pull the straddle pin -2- with the screw from the straddling dowel -3-.
–  Now screw an M8 screw (approximately 80 mm long) into the straddling dowel -3-.
  Note
Do not use excessive force when screwing the screw into the straddling dowel as it may fall into the door.
–  Withdraw the straddling dowel from the window lifter guide and hence from the door window pane.
–  Push the door window up and secure with adhesive tape.
For vehicles ? 11.03
  S58-0031
–  Release screws -arrows-.
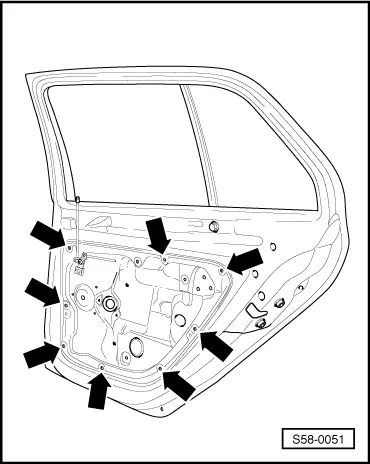
For vehicles 12.03 ?
–  Bore out rivet heads -arrows-.
  Note
t  After drilling open the rivets of the assembly carrier carefully remove the remaining rivets inside the doors, in order to avoid corrosion and noises.
t  Carry out protection against corrosion on both damaged points.
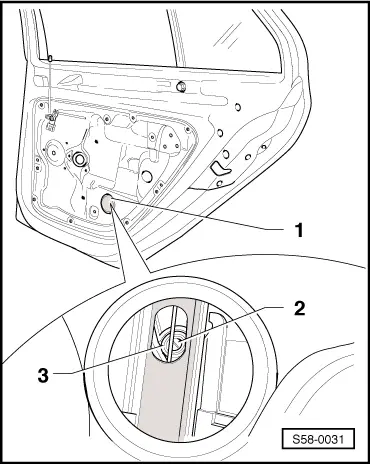
For all vehicles
–  Separate the electrical plug connections.
–  Subsequently release the wiring loom from the inside panel of the door and remove ducts.
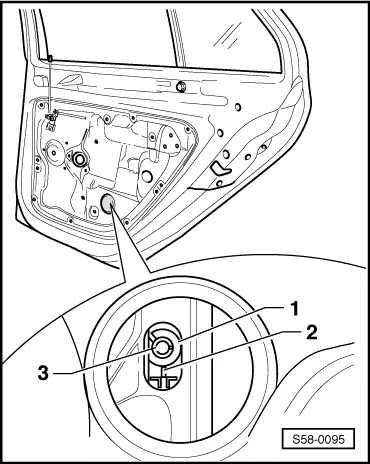
–  Disconnect the plug connection from the complete door lock (on vehicles with convenience system).
–  Separate the assembly carrier from the door, at the top, lift and remove towards the hinge.
Install
–  Position the assembly carrier in the door.
–  Attach wiring loom to assembly carrier and plug in all the plug connections.
For vehicles ? 11.03
  S58-0051
–  Insert all screws. First tighten screws -1- and -2- → Anchor.
–  Tighten the remaining screws.
For vehicles 12.03 ?
–  Install assembly carrier on the centering pin in the area of the holes -1- and -2-.
–  First of all rivet the assembly carrier on the centering pin -1- and -2- and then in random sequence.
  Note
When installing the assembly carrier use original replacement parts only (tear-off rivets).
For all vehicles
–  Installing the door handle → Chapter.
–  Lower window in the slot of the window lifter guide.
–  Insert the straddling dowel and adjusting pin in the window.
  Note
  S58-0033
When securing the window pane in the power-window lifter observe the fitting position of the straddling dowel -1- and the straddle pin -3-. The straddling dowel -1- and the straddle pin -3- must be on the same line with the lug -2-.
–  Gently tap by hand the top of the pane to lock the pane into the window lifter.
–  Install rear door trim panel → Chapter.
  Note
Perform a functional check because the door cannot be opened if the adjustment is not accurate and the Bowden wire is not clipped on correctly.
  S58-0095
Tightening torque
ComponentTightening torque
Assembly carrier to door8 Nm, observe screw sequence


Removing and installing door window > < Removing and installing the door lock