Fabia Mk1
| Removing and installing rear brake - Disc brake |
| Special tools, test and measuring equipment and aids required |
| t | Brake pedal load, e.g. -V.A.G 1869/2 - |
| t | Brake filling and bleeding device, e. g. -VAS 5234- |
| t | Bleeding bottle (commercially available) |
| t | Brake fluid → Chapter |
 Note
Note| t | Observe the instructions for changing the pad → Chapter. |
| t | After replacing the brake pads, depress brake pedal firmly several times when the vehicle is stationary to ensure the brake pads are properly seated in their normal operating position. |
| t | Generally tighten the brake line pipe screws to a tightening torque of 14 Nm. |
| t | Use brake pedal loader, e.g. -V.A.G 1869/2- before removing a brake caliper or separating a brake hose from the brake caliper |
| t | Already used brake fluid must never be used again. |
| t | Tightening torque of the wheel screws: 120 Nm. |

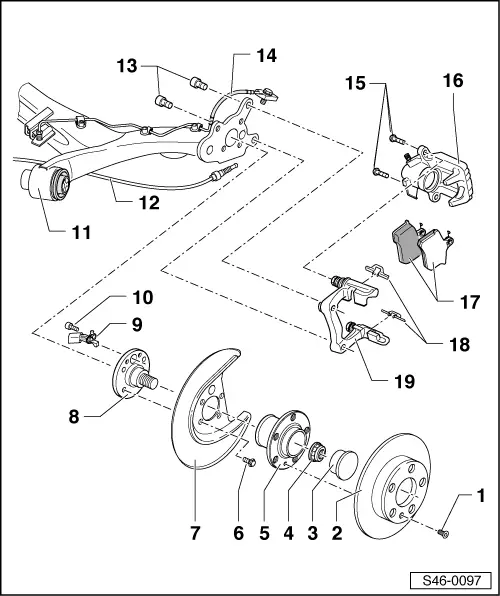
| 1 - | 4 Nm |
| 2 - | Brake disc |
| q | Thickness: 9 mm |
| q | Wear limit: 7 mm |
| q | if worn replace axle-wise |
| 3 - | Cap |
| q | replace after each removal |
| q | extracting and inserting → Chapter |
| 4 - | Self-locking twelve-point nut 70 Nm 30° |
| q | replace after each removal |
| 5 - | Wheel hub with wheel bearing |
| q | must be replaced completely |
| q | removing and installing → Chapter |
| q | Assignment → Electronic Catalogue of Original Parts |
| 6 - | 30 Nm + 90° |
| q | replace after each removal |
| 7 - | Cover plate |
| 8 - | Axle stud |
| 9 - | ABS speed sensor |
| 10 - | Allan screw, 8 Nm |
| q | for speed sensor ABS |
| 11 - | Welded axle |
| 12 - | Hand-brake cable |
| q | Setting the hand-brake → Chapter |
| 13 - | Allan screw, 30 Nm + 30° |
| 14 - | Brake line with supports, hollow screw and seal |
| q | must be replaced completely, do not dismantle |
| q | Tightening torque of the hollow screw: 38 Nm |
| q | do not unscrew when replacing the brake pad |
| 15 - | Self-locking screw, 35 Nm |
| q | replace after each removal |
| 16 - | Brake caliper |
| q | removing: |
| – | Use brake pedal load |
| – | Unscrew brake line from brake caliper |
| q | Installing: |
| – | Screw the brake line onto the brake caliper |
| – | Remove brake pedal load |
| – | Bleeding Brake System → Chapter |
| – | repairing → Chapter |
| – | One must first adjust the hand-brake cable after undertaking repair or replacement work |
| – | Setting the hand-brake → Chapter |
| 17 - | Brake pads |
| q | Thickness: 16.9 mm (including the support plate) |
| q | Wear limit: 2.0 mm without supporting plate |
| q | Inspect thickness → BookletFabia |
| q | always replace axle-wise |
| q | removing and installing → Chapter |
| q | Observe the instructions for changing the pad → Chapter |
| 18 - | Pad retaining spring |
| q | always replace when changing the brake pads |
| q | Observe the instructions for changing the pad → Chapter |
| 19 - | Brake carrier with guide bolts and protective caps |
| q | must be assembled with sufficient grease on the guide bolt, supplied as a spare part |
| q | fit a repair set if there is any damage to the protective caps or guide bolts; (use the enclosed grease packing to lubricate the guide bolts) |
