skoda Workshop Repair Guides

Skoda Workshop Service and Repair Manuals

Assembly bracket > < Securing the engine to the assembly stand
Installing the engine
  Note
t  Always replace the seals and gaskets during assembly work.
t  Always replace self-locking nuts.
t  Coat stud bolts of exhaust manifold with hot bolt paste -G 052 112 A3- before installing.
t  Tightening torques → Anchor.
t  Assembly bracket → Chapter.
Procedure
Installation is performed in the reverse order. Pay attention to the following points:
–  Check whether the dowel sleeves for centering the engine/gearbox are present in the cylinder block; insert if necessary.
   
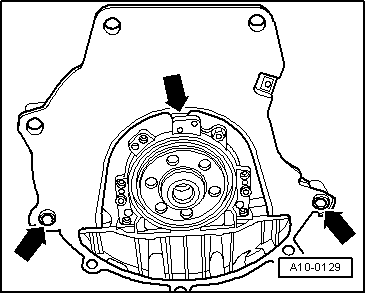
–  Check whether the intermediate plate has been inserted on the sealing flange and rests on the dowel sleeves -arrows-.
–  If necessary check the centering of the clutch driver disc.
–  Inspect clutch release bearing for wear, replace if necessary.
–  Grease the drive shaft serration with grease -G 000 100-.
–  Assemble together the engine with gearbox → Manual gearbox 02R; Rep. Gr.34.
–  When installing engine/gearbox unit, ensure adequate clearance to neighbouring components.
–  Align the engine/gearbox unit free of stress and attach firmly.
   When tightening the bolts for engine and gearbox mounts, engine and gearbox support brackets must be resting fully against mount.
   Tightening torques → Anchor.
–  Install the slave cylinder of the hydraulic clutch → Gearbox 02R; Rep. Gr.30.
–  Adjust the gearshift mechanism and the shift cables → Gearbox 02R; Rep. Gr.34.
–  Install the right drive shaft and screw the left drive shaft onto the gearbox → Chassis; Rep. Gr.40.
–  Install the front exhaust pipe with catalytic converter and the exhaust system so that they are not under tension. → Chapter.
–  Install the lock carrier with component parts → Body Work; Rep. Gr.50.
For vehicles with air conditioning
Instructions and work procedures → Heating, Air Conditioning; Rep. Gr.87.
–  Disconnect the refrigerant lines.
–  Replacing dessicator insert.
–  Filling the refrigerant circuit.
For all vehicles
–  Install front bumper → Body Work; Rep. Gr.63.
–  Electrical connections and proper routing → Current flow diagrams and Fitting locations.
–  Fit coolant hose → Chapter.
  Note
Only re-use drained coolant if none of the following components has been replaced: Engine block, cylinder head, radiator, heat exchanger.
–  Filling system with coolant → Chapter.
–  Check oil level before starting the engine.
–  Interrogate fault memory and erase → 1.9/74 TDI Engine, Fuel Injection; Rep. Gr. 01.
–  Perform a test drive.
Tightening torques
  Note
t  Tightening torques apply only for lightly greased, oiled, phosphatized or blackened nuts and screws.
t  Other lubricants such as engine and gearbox oil are allowed. Do not use Molykote.
t  Do not use degreased parts.
t  Unless otherwise indicated the following tightening torques apply:
  A10-0129
ComponentNm
Screws/nutsM69
 M713
 M820
 M1040
 M1270


Assembly bracket > < Securing the engine to the assembly stand