skoda Workshop Repair Guides

Skoda Workshop Service and Repair Manuals

Testing oil pressure and oil pressure switch > < Disassembling and assembling oil filter holder
Removing and installing oil pan
Special tools and workshop equipment required
t  Hinged wrench -3185-
t  Socket insert -3249-
t  Gasket remover Gasket Stripper (storage code GST, position no. R 34402), manufacturer Retech s.r.o.
t  Cleaning and degeasing agent e.g. -D 000 401 04-
t  Protective goggles and gloves
t  Torque wrench 5 to 50 Nm (e.g. -V.A.G 1331-)
t  Silicone sealant D 176 404 A2
Removing
   
–  Remove noise insulation -arrows-.
–  Drain engine oil.
–  Unbolt oil pan.
  Note
Slacken oil pan bolts at flywheel side with hinged wrench -3185- and unscrew with wrench socket -3249-.
–  Remove oil pan, if necessary release by applying slight blows with a rubber-headed hammer.
  WARNING
Wear protective gloves and goggles when working with gasket remover and degreasing agent!
–  Clear sealing surface on the oil pan and on the cylinder block from gasket residues with chemical sealant remover.
–  Degrease the sealing surfaces.
Installing
  Note
t  The oil pan must be installed within 5 minutes after applying the silicone sealant.
t  Use wrench socket -3249- to insert the oil pan bolts at flywheel side and tighten with hinged wrench -3185-.
  S10-0114
–  Cut off nozzle tube of the silicone sealant D 176 404 A2 at the front marking (Ø of nozzle approx. 3 mm).
t  Thickness of sealant bead: 2...3 mm
t  Run past the area around the bolt holes on the inside -arrows-.
  Note
The sealant bead must not be thicker than 3 mm otherwise excess sealant may get into the oil pan and clogg the strainer in the oil suction pipe.
  N17-0019
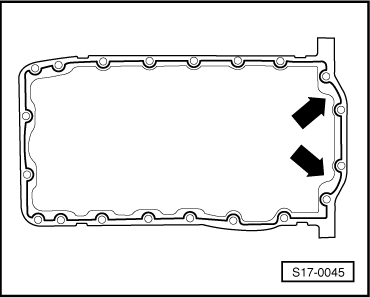
–  Apply silicone sealant to the clean sealing surface of the oil pan, as shown in the illustration.
  Note
Take particular care when applying sealant bead in the area of the sealing flange at the rear -arrows-.
–  Fit on oil pan immediately and tighten the bolts as follows:
1 - Tighten all the bolts of oil pan/cylinder block slightly diagonally across.
2 - Tighten the three bolts of oil pan/cylinder block slightly.
3 - Tighten all the bolts of oil pan/cylinder block slightly diagonally across.
4 - Tighten the three bolts of oil pan/gearbox to 45 Nm.
5 - Tighten all the bolts of oil pan/cylinder block diagonally across to 15 Nm.
  Note
t  When installing the oil pan with the engine removed, ensure that the oil pan is flush with the cylinder block at the flywheel side.
t  After installing the oil pan, allow the sealant to dry for about 30 minutes. Only then may engine oil be filled in.
  S17-0045

Testing oil pressure and oil pressure switch > < Disassembling and assembling oil filter holder