Important: Please
also note: specifications for welded, brazed and riveted
connections !
Basic bonding technique
Important: In
order to ensure optimal bonding, the assembly components must fit
well, the joint flanges must be clean, the prescribed application
technique must be followed and working conditions must be good and
at the right temperature.
Adhesive is a non-metallic material that joins two assembly
components through surface bonding (adhesion) and inner
cohesiveness (cohesion). An important element of this process is
following the prescribed application technique whether in
production or for body repair.
Upon application of the fluid adhesive, the adhesion and
cohesion forces are still low. Curing is complete once the adhesive
has become solid. The joint withstands loads in accordance with its
design.
Good adhesive application (smooth application of adhesive on the
surface) on the joint flanges ensures good bonding and
adhesion.
Poor adhesive application on the joint flanges leads to poor
bonding and adhesion.
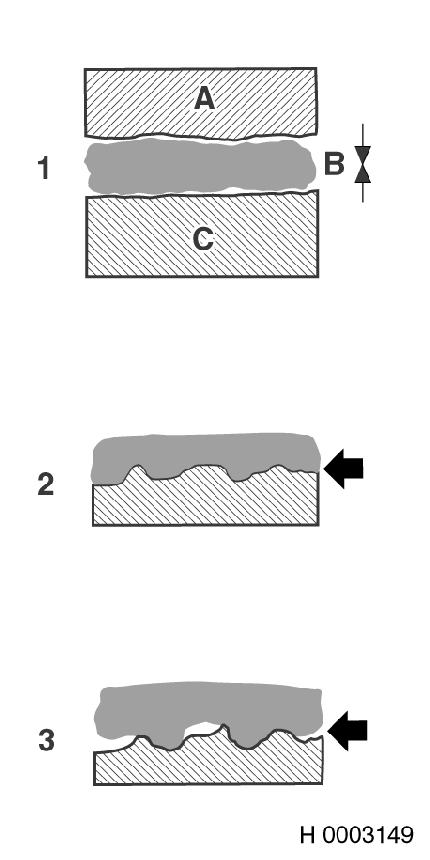
Adhesive joint principles
1
Depiction of adhesive forces
A chain is formed from:
A-
Adhesion of the adhesive to the top plate
B-
Cohesion within the adhesive layer
C-
Adhesion of the adhesive to the bottom plate
2
Depiction of good bonding
Good coating of assembly components with adhesive
3
Depiction of poor bonding
Poor adhesive coating on assembly component surfaces (for
example, due to poor preparation or contamination).
Adhesive in the area of connection flanges to the
body
Important:
Knowledge of the stress placed on the joint locations is paramount
to achieving optimal adhesive joints.
The following applies as a rule of thumb:
Permissible types of stresses on adhesive joints: tensile
force, shearing force and compression force
Peel forces work negatively on the adhesive joint. Use
constructive measures to prevent peeling.
Effects of peeling forces
1.
Depiction of typical unwanted, linear separation of
the adhesive layer (peeling).
2.
Remedies:
•
Fixing with resistance spot-welds or rivets with a
spacing of 150 mm
•
Use of waterproof steel rivets, if there is access
to the body flange
Rivet length
Rivet diameter
Clamping area (sum total of sheet thicknesses to be
joined together)
Part no.
Catalogue no.
8 mm
4 mm
1.5 - 3.0 mm
93184033
1 84 983
9.5 mm
4 mm
3.0 - 5.0 mm
93184034
1 84 984
12 mm
4 mm
6.5 - 8.5 mm
93174636
1 88 890
Stresses to which components/adhesive joints are
subjected
1.
Peeling stress
2.
Tensile stress
3.
Compression stress
4.
Tensile shearing stress
5.
Compression shearing stress
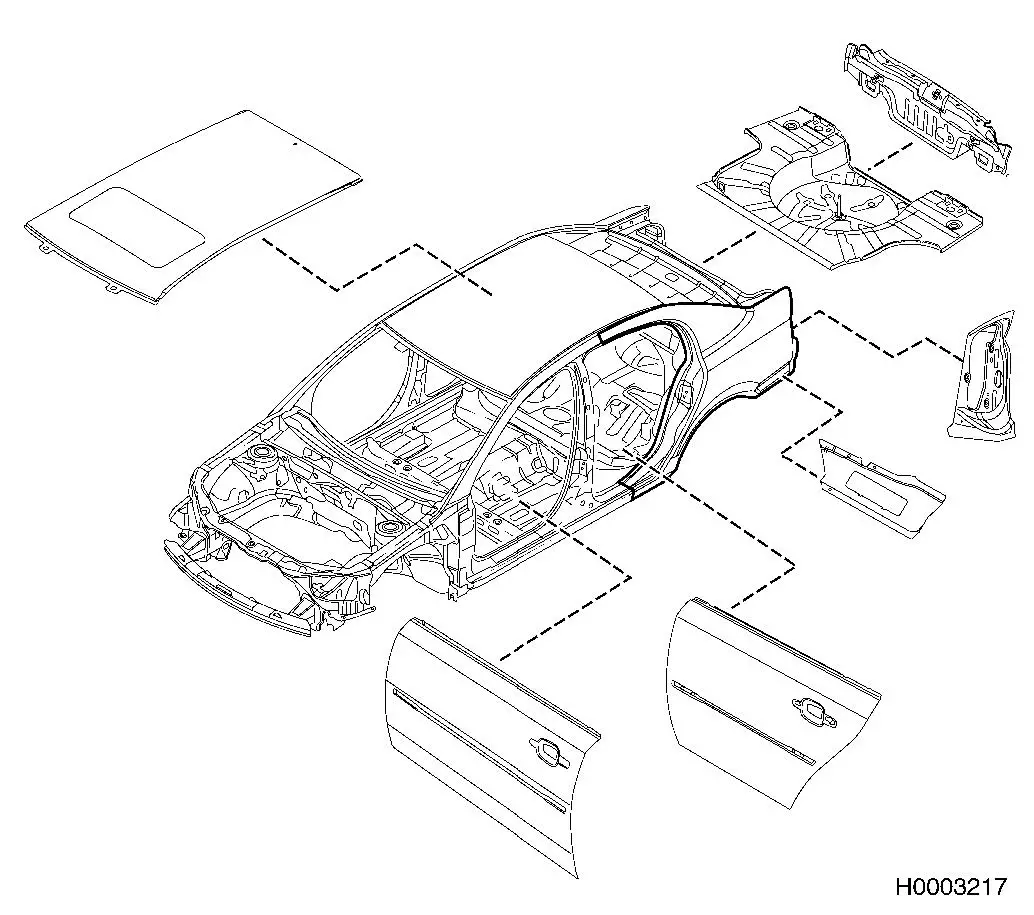
Depiction of flange joints
1.
Offset flange
2.
T-shaped joint
3.
Bracing (U and L flanges)
4.
Scarf joint (cover plate ground to 30° to
70° angle)
5.
Double lashings
6.
Combination with different profiles
7.
Offset angle profile
8.
Bracing with 3-layer plate
Preparation of bonding flanges to be connected
1.
Grind flange
•
Remove primer at spot welds using Körnung
P100.
•
When assembling with steel rivets, slightly strip
primer from the remaining flanges using Körnung P360.
2.
Cleaning
•
Clean/de-grease bonding surfaces before and after
grinding (use cleaner from adhesive kit).
Note: Dirt (X) leads
to problems.
Use of structural adhesive systems in production
– consequences in service
Choice of adhesives for use in body shells is based on
structural calculations and tests. The approved adhesives must be
harmonised with the entire manufacturing process.
The following guidelines apply:
Short application times
Use of single-component adhesive systems
High hardening temperatures (approx. 180 °C) circulating in
the drying kilns
The Service department cannot use the adhesives/adhesive systems
from Production. Completely new systems must be developed, tested
and approved for Service.
Thus, adhesive systems and application techniques will be used
that are tailored to repairwork. The bonding technique developed
for Service shall be the logical result of a modern, economical,
safe joining system for body repair at the dealership.
This is beneficial to our ability to compete in the bodywork
repair market. The goal is to further develop and refine work
methods in order to generate cost effective solutions and maintain
a competitive edge – without sacrificing quality.
Overview of areas in which the adhesive technique
is already used for bodywork repair
Adhesive kit for bodywork repair in Service
We carry the adhesive kit for this purpose in the product range
as anti-corrosion adhesive sealing system.
Adhesive kit content
Description
Colour
Container
Part no.
Catalogue number
Storage stability
(Best-before date is specified on the cartridge)
Anti-corrosion adhesive sealing system (kit)
Blue
310 ml
93 160 535
15 05 000
12 months
The anti-corrosion adhesive sealing kit contains a dual
component epoxide adhesive.
After hardening, the adhesive has good resistance to tensile
shearing, impacts and peeling. The adhesive can be welded with a
resistance spot welding machine when wet (observe setting
time).
It has excellent bonding properties with properly prepared,
clean surfaces (body sheet metal, pre-treated aluminium).
Watch information on handling adhesive systems in videos VT-41
and VT 54.
•
Adhesive systems are to be bonded to:
Body sheet metal, ground to bare metal
Primer of our metal Service parts, ground primer.
Warning: Do not use
spot welding paint, glass primer or paint primer in the adhesive
application area (poor adhesion)!
•
Depending on the installation tolerances of the assembly
components, adhesive beads between 0.2 mm and 3 mm can be
adjusted.
•
Soldering and welding must be done at a safe distance of at
least 50 mm outside of the adhesive zone (to prevent the adhesive
from catching fire or damage to the joint due to burnt
adhesive).
•
When installing new body parts, such as taillamp corner inserts,
apply the bead of adhesive (diameter - min. 4 mm) to both the body
flange and the new part.
•
For large components, such as the roof, apply the bead of
adhesive (diameter - min. 6 mm) to the new part.
•
Do not work with adhesive at temperatures is below 15
°C.
•
Apply and work with the adhesive as quickly as possible.
•
The adhesive is compatible with Opel-approved sealing and
painting material.
•
After application, the adhesive system can be handled for up to
2 hours (at 23 °C) in order to join, handle, resistance spot
weld or secure fixing rivets to sheet metal parts.
Note: The higher the
ambient temperature, the shorter the handling time.
Note: Use of
pneumatic guns without plunger could lead to the incorrect mixture
of adhesive during application.
Before application, the adhesive components are mixed together
in a static mixer in the emulsion tube. The second generation of
static mixers, which can be screwed onto the cartridge, have
considerable reduced the time needed for adhesive application (see
data on time).
Increased durability and corrosion protection.
Better shielding and sealing of the bonded body flange.
•
Forced mixture of adhesive components in an emulsion tube before
application (static mixer).
•
Increased durability and corrosion protection of joints.
•
Shielding and sealing of the bonded body flange.
•
Reduction of noise emission and vibrations.
•
Prevention of electrochemical corrosion.
•
Compatible with Opel/Vauxhall-approved sealants and paints.
•
Reduction of the number of spot welds on the joint flanges
through use of adhesive as opposed to conventional resistance spot
welding without adhesive.
On average, the spacing is 150 mm.
This spacing also applies when fixing with our special steel
rivets.
Time studies were performed to determine the application rate
with the adhesive and static mixer. The data in the table is based
on application at 21 °C with a pneumatic gun - with mechanical
plunger only.
Adhesive bead diameter
5 mm
8 mm
10 mm
Application time for 1 metre
1/2 minute
1 minute
1 1/2 minutes
Application time for 3 metres
1 minute
2 1/2 minutes
4 minutes
Application time for 5 metres
2 minutes
4 1/2 minutes
6 1/2 minutes
Application time for 7 metres
2 1/2 minutes
6 minutes
8 1/2 minutes
Aids in preventing use of incorrect adhesive
mixture
•
Ensure there are equal levels of the two adhesive components
(see handling instructions)
•
Note the colour of the adhesive mixture:
Light blue (homogeneous)
Correct mixture
- Continue procedure without interruption
White or dark blue:
Incorrect mixture
- Remove applied material immediately
•
Handling instructions
Application at room temperature - 21 °C to 23 °C
Below 15 °C, application is difficult; the viscosity of the
adhesive is too high
15 °C to 30 °C is the optimal range for handling
Never heat the adhesive cartridge (heat gun) or place it in hot
water
•
Hardening of the mixed adhesive
Drying temperature:
/
Handling time of the attached body piece:
at 60 °C
30 minutes
at 30 °C
~ 1 hour
at 23 °C
~ 2 hours
at 13 °C
~ 4 to 8 hours
at 3 °C
~ 16 to 32 hours
Adhesive kit content 93 160 535 / 15 05 000
1x
Adhesive cartridge with dual component adhesive
Component A (resin) ~ 122 ml
Component B (hardener) ~ 73 ml
3x
Static mixer, screwable (white)
1x
Cleaner ~ 100 ml
3x
Cleaning cloth (green)
3x
Drying cloth (blue)
1x
Handling instructions
1x
Kit packaging
Note: The cartridge
gun is not included in the kit.
Application notes
Application devices
In the course of our studies, we focused on 3 types of guns for
troublefree handing of adhesive:
Cordless guns - infinitely adjustable
Manual guns
Pneumatic guns - with mechanical plunger only.
Average adhesive bead length/cartridge
capacity
The cartridge contents of anti-corrosion adhesive sealant kit
93160535 / 15 05 000 provide an adhesive bead that is about 3.50 m in length on average, depending on
the bead thickness.
The cartridge contents of single-component window adhesive
93165025 / 15 04 815 provide an adhesive bead that is about 3.00 m in length on average, depending on
the bead thickness.
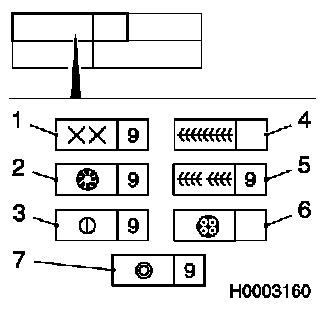
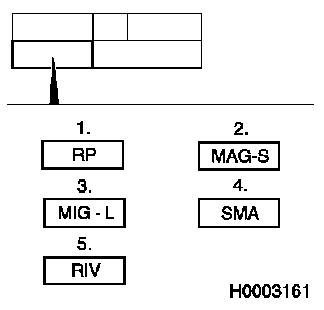
Explanation of designations for joining
techniques
1. "Seam form" field
2. "Seam quantity" field
1.
Resistance spot welding (e.g. 9 for quantity)
2.
Plug spot welding, gas-shielded arc welding (e.g. 9
for quantity) slot brazing, gas-shielded brazing (e.g. 9 for
quantity)
3.
Quilting seam spot welding/spot brazing with sheet
metal overlap, gas-shielded arc welding and gas-shielded brazing
(e.g. 9 for quantity)
4.
Full seam, gas-shielded arc welding and
gas-shielded brazing
5.
Full seam, interrupted, gas-shielded arc welding
(e.g. 9 for quantity)
6.
Structural metal adhesive (adhesive, part no. 93
160 535)
7.
Rivets (steel rivets, part no. 93 174 636, e.g. 9
for quantity)
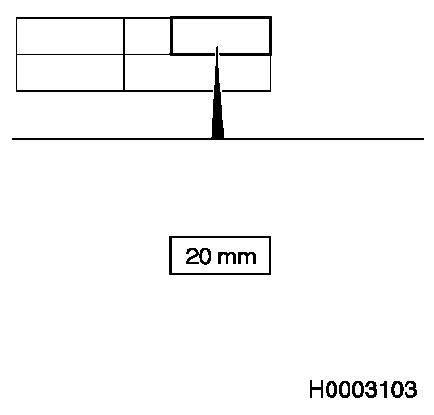
3. "Seam length" field
Example for seam length:
1.
Seam length is always specified with measurement
and unit (mm).
2.
The minimum seam length (lower limit) for appling a
full seam is always to be set to 15 mm.
3.
The following apples to plug welds:
3.1.
Seam length is not applicable, i.e. the seam length
is always matches the shape of the round hole or slot.
3.2.
The hole must be completely filled, i.e. the seam
must completely cover the hole.
3.3.
In the event of top bead depression, rewelding is
required (thickness of the seam)