|
Tailgate Screen, Remove and Install (Models F08,
F48)
 Remove Remove
Note: When carrying
out the operation, the general information in particular is to be
noted – see "General instructions on bonded panes".
Tailgate inner panelling – see operation "Tailgate Inner
Panelling, Remove and Install" (Models F08, F48). Remove heated
rear screen wiring harness plug, centre brake light - see operation
"Centre Brake Light, Remove and Install – Models F08/F48" in
group "N". Remove rear wiper.
Remove glass using Oscillating Knife MKM-846-1E or
MKM-846-1P.
Remove load compartment cover plate.
Caution
Cut out tailgate glass from inside.
|
Blade types
|
|
–
|
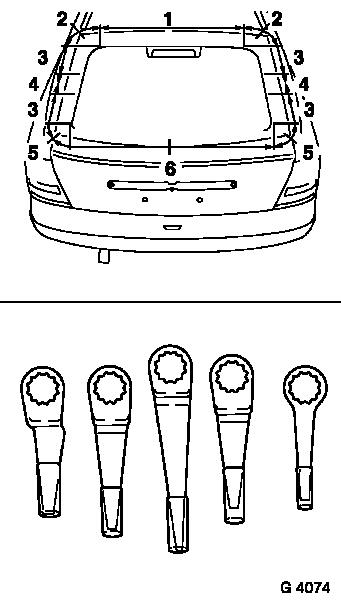
Step 1 MKM-846-24
|
for cutting in lower area (6)
|
|
–
|
Step 2 MKM-846-22
|
for cutting in side area (3)
|
|
–
|
Step 3 MKM-846-10
|
for cutting in left and right upper radius area (2)
|
|
–
|
Step 4 MKM-846-2
|
for cutting in upper area (1)
|
|
–
|
Step 5 MKM-846-23
|
for cutting in left and right lower radius area and for cutting
in vicinity of heated tailgate screen plug contacts (4, 5)
|
|
|
Remove
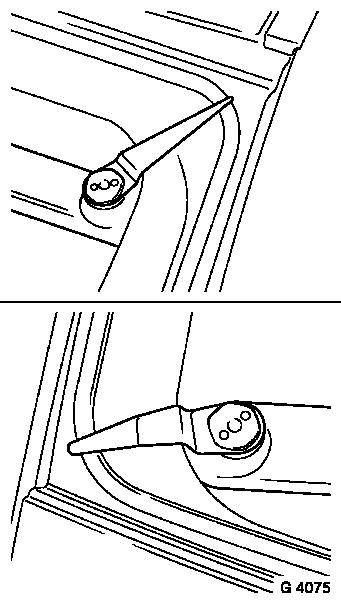
Remove glass in the lower radius:
|
Cutting is begun in the centre of the radius using Cutting Knife
MKM-846-23. Mount the oscillating knife in the cutting machine so
that an angle of approx. 135° exists between the centre line of
the cutting knife and the cutting machine. The cutting knife is
inserted in the centre of the radius so that the cutting machine
runs parallel to the lower body edge.
Remove glass in upper radius:
Cutting is begun in the centre of the radius using Cutting Knife
MKM-846-10. Mount the oscillating knife in the cutting machine so
that an angle of approx. 135° exists between the centre line of
the cutting knife and the cutting machine. Do not damage
polyurethane sprayed surrounding. The cutting knife is inserted in
the centre of the radius so that the cutting machine runs parallel
to the upper body edge.
|
|
Caution
Do not damage the insulation of the plug connection for the
heatable tailgate window. Never damage the plug contacts by
incorrectly handling the cutting blade (cut off).
Remove
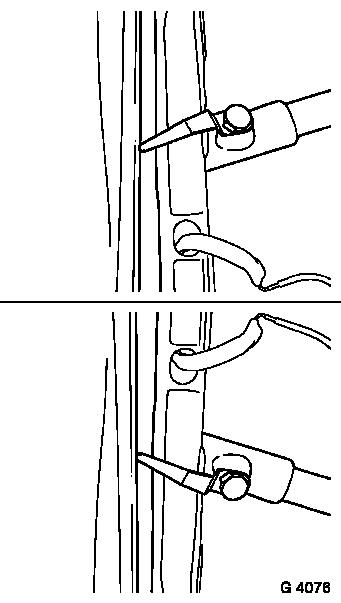
Glass removal in upper side area:
|
The MKM-846-22 Cutting Knife is inserted into the upper side
area. The cement bead is cut up to the heating connection.
Glass removal in lower side area:
The MKM-846-22 Cutting Knife is inserted into the lower side
area. The cement bead is cut up to the heating connection.
|
|
Caution
Do not damage the insulation of the plug connection (1) for the
heated screen. On no account damage (cut off) the plug contacts (2)
through incorrect handling of the cutting knife.
Remove
|
Glass removal in vicinity of heated tailgate screen plug
connection (3):
The Cutting Knife MKM-846-23 is inserted below the rear screen
heating connection. The cutting knife is mounted along the
longitudinal axis of the cutting machine and the cutting machine is
then turned so that the blade penetrates and cuts the still uncut
bead behind the connection.
|

|
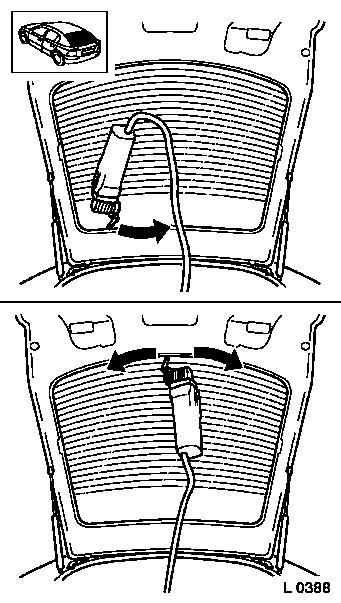
Glass removal upper area:
|
The MKM-846-2 Cutting Knife is inserted into the upper right
area. Place cutting knife in position on frame and cut along the
edge.
Glass removal in lower area:
The Cutting Knife MKM-846-24 is inserted in the lower centre
position. Position cutting knife against centre of frame and cut
along edge to the right and to the left.
Lift tailgate window with Suction Lifter MKM-641 from frame of
tailgate.
|
|
 Install
Note the lay-over time for freshly cemented glass panes.
For repair, the following situations
arise from practice:
| 1. |
Reuse of removed glass panes in connection with
painting, working of the tailgate. |
| 2. |
Fitting of a new glass pane on account of a fault
(scratch, crack, break). |
| 3. |
Fitting of a new glass pane in connection with the
fitting of a new tailgate (body repair). |
|
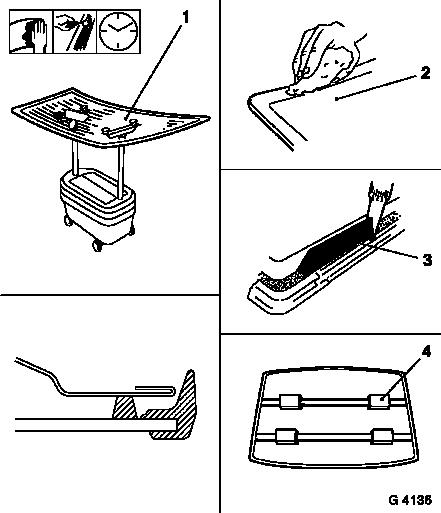
Reuse of removed glass panes:
Place glass screen on holder (1). Prepare screen. Re-cut
residual adhesive bead with Cutting Knife MKM-846-70 to approx. 1
mm/0.04 in. thickness. Activate residual bead with activator.
Apply adhesive with pre-cut triangular nozzle of adhesive kit
(2). Apply adhesive only on the screen. Insert screen (3). 2nd
mechanic required. Apply only slight pressure (hand or tensioning
belt).
|

|
Install
|
Fitting a new glass pane: place tailgate window on holding
device (1). Clean adhesive area (2). Apply "black" glass primer.
Apply adhesive (3). Insert pane. Apply only slight pressure (hand
or tensioning belt (4)).
|
|
Install plug connection for heated tailgate window, tailgate
inner panelling.
|
