|
Rear Cover with Piston C1, Disassemble and
Reassemble (AF 20)
Survey
|
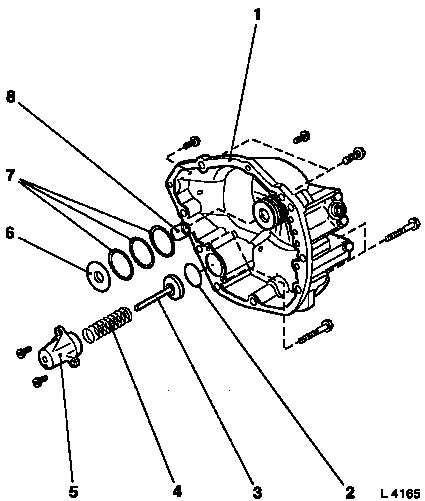
1
|
Rear cover
|
|
2
|
Seal ring
|
|
3
|
Piston C1
|
|
4
|
Spring
|
|
5
|
Cover for piston C1
|
|
6
|
Race
|
|
7
|
Seal rings (cut)
|
|
8
|
Needle bearing
|
|
|
 Remove Remove
Remove transmission – see operation "Transmission, Remove
and Install (AF 20)". Secure converter against falling out.
|
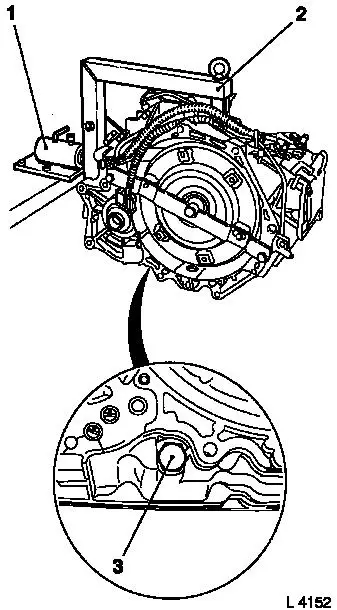
Attach transmission to KM-694-A (2). Attach assembly to KM-113-2
(1).
Remove fluid drain bolt (3), drain transmission fluid and
collect for damage diagnosis – see operation "Transmission
Fluid Condition, Check (AF 13-II/AF 17/AF 20/AF 22)".
Remove converter – see operation "Converter and/or Fluid
Pump Seal Ring, Replace (AF 13-II/AF 17/AF 20/AF 22)".
Remove rear cover – see operation "Rear Cover with Piston
C1, Remove and Install (AF 20)".
|
|
 Disassemble
|
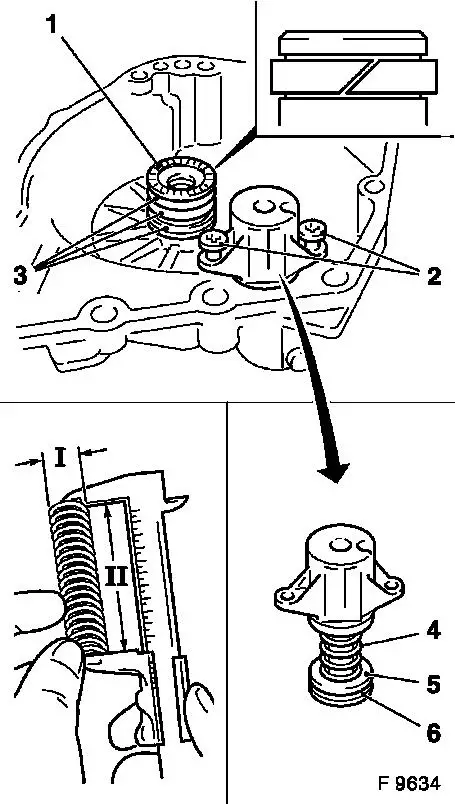
Remove thrust bearing (1). Remove 3 cut seal rings (3) from
bearing journal.
Remove fastening bolts (2) and remove cover for piston C1.
Remove spring (4) and piston C1 (5) – replace O-ring (6) at
piston C1.
 Measure
Measure outside diameter (I) and
length (II) of spring C1 – replace spring, if necessary.
|
Measurement values:
|
|
Outside diameter (I): 20.7 mm
|
|
Spring length (II): 66.6 mm.
|
|
|
Remove
|
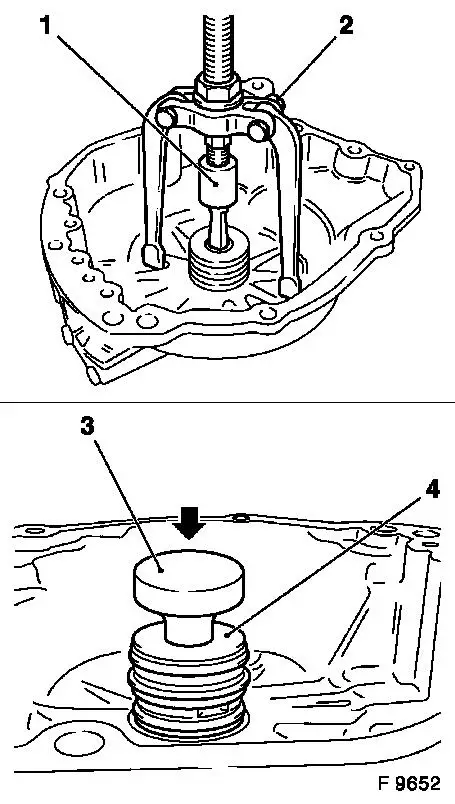
Pull needle bearing with MKM-691 (1) and KM-556-1 (2) from
journal in rear cover. If necessary (remover arm from KM-556-1 too
short), place KM-502-A under the remover arm from KM-556-1.
 Install
Press in needle bearing with KM-711-2 (3) until tool comes to
stop at journal (4).
Insert piston and spring into rear cover. Attach cover C1 to
rear cover – tightening torque 10 Nm / 7.5 lbf. ft.
Attach new cut seal rings to bearing journal – do not
expand seal rings more than necessary. Position thrust bearing.
|
|
Install
Install rear cover – see operation "Rear Cover with Piston
C1, Remove and Install (AF 20)".
Install converter – see operation "Converter and/or Fluid
Pump Seal Ring, Replace (AF 13-II/AF 17/AF 20/AF 22)". Secure
converter against falling out.
|
Attach fluid drain bolt (3) with new seal ring to transmission
– tightening torque 40 Nm / 29.5 lbf. ft.
Remove transmission assembly from KM-113-2 (1) with KM-694-A
(2). Remove transmission from KM-694-A.
Install transmission – see operation "Transmission, Remove
and Install (AF 20)". Fill up transmission fluid
 Inspect
Check and correct level of transmission fluid – see
operation "Transmission Fluid Level, Check and Correct (AF 13-II/AF
17/AF 20/AF 22)".
|
|
|
