|
Valve Body, Remove and Install –
Transmission Removed – (AF 20)
 Remove Remove
Remove transmission – see operation "Transmission, Remove
and Install (AF 20)". Secure converter against falling out.
|
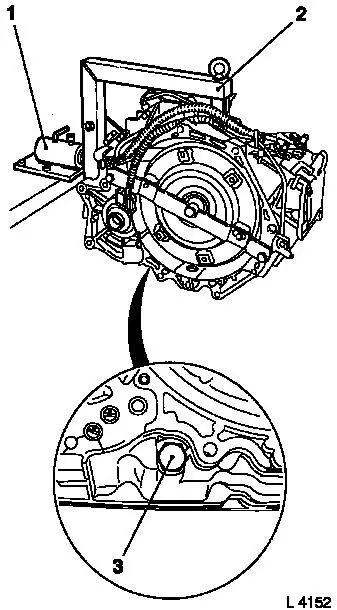
Attach transmission to KM-694-A (2). Attach assembly to KM-113-2
(1).
Remove fluid drain bolt (3), drain transmission fluid and
collect for damage diagnosis – see operation "Transmission
Fluid Condition, Check (AF 13-II/AF 17/AF 20/AF 22)".
Remove converter – see operation "Converter and/or Fluid
Pump Seal Ring, Replace (AF 13-II/AF 17/AF 20/AF 22)".
|
|
|
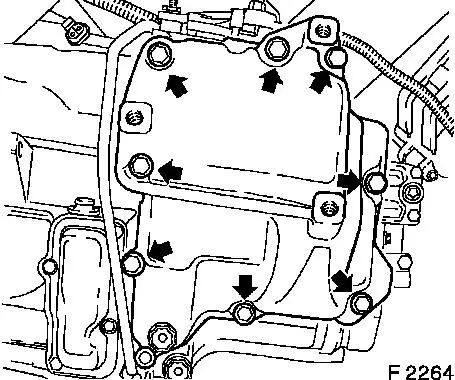
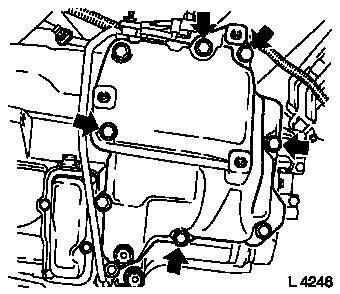
Remove side cover from transmission – 8 fastening bolts
(arrows).
Caution
Fluid escapes – place pan underneath.
|
|
Remove
|
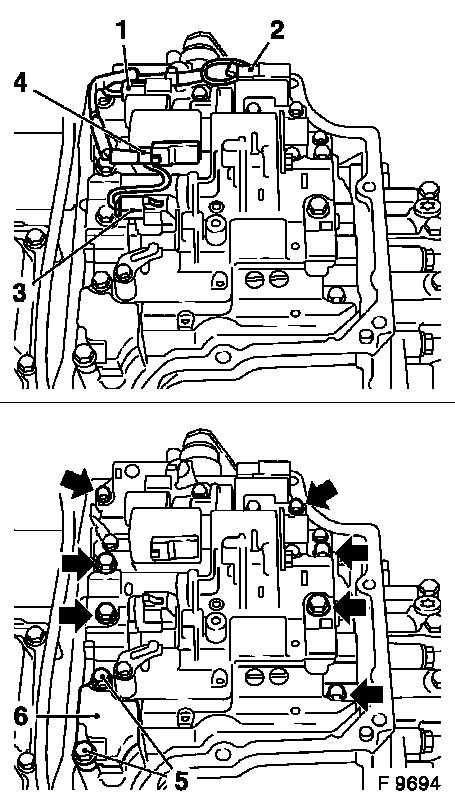
Detach wiring harness plug (1) from solenoid valve for 1-2/3-4
shift. Detach wiring harness plug (2) from solenoid valve for 2-3
shift. Detach wiring harness plug (3) for converter clutch solenoid
valve. Detach wiring harness plug (4) for pressure regulator.
Pull wiring harness out of retainers and lay aside.
Remove fastening bolts (5) and carefully remove intake cover
(6).
Remove fastening bolts (arrows) – note different bolt
lengths. Carefully plug back valve body and detach connecting rod
from toothed segment. Remove valve body.
|
|
 Install
Insert new seal rings in transmission housing with assembly
grease.
|
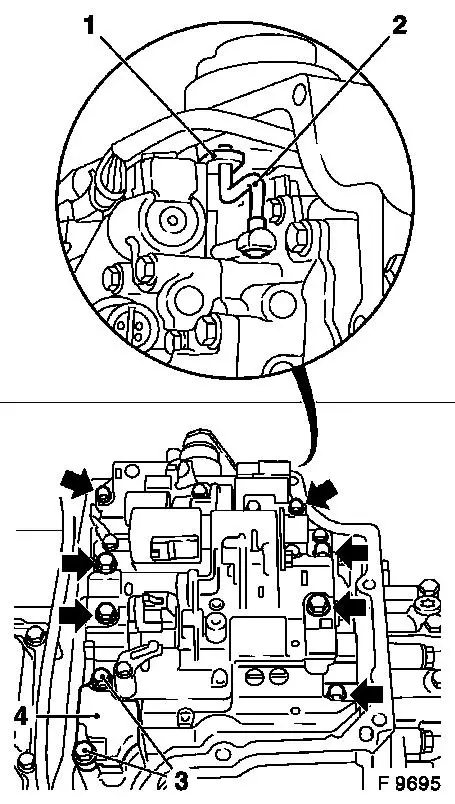
Insert valve body in transmission housing – attach
connecting rod (2) to ratchet (1).
7 fastening bolts (arrows).
Attach valve body to transmission – tightening torque 7 Nm
/ 5 lbf. ft. Note different bolt lengths.
Place intake cover (4) with new gasket on valve body. Install
fastening bolts (3) – tightening torque 7 Nm / 5 lbf. ft.
Connect wiring harness plug to solenoid valves and pressure
regulator. Insert wiring harness into retaining clips.
 Clean Clean
Clean sealing surfaces on side cover and transmission.
|
|
Install
|
Re-cut thread for fastening bolts (arrows) in transmission
housing. Clean thread of fastening bolts (arrows) and coat with
locking compound.
Coat side cover with sealing compound and attach to transmission
– tightening torque 25 Nm / 18 lbf. ft.
|
|
Install converter – see operation "Converter and/or Fluid
Pump Seal Ring, Replace (AF 13-II/AF 17/AF 20/AF 22)". Secure
converter against falling out.
|
Attach fluid drain bolt (3) with new seal ring to transmission
– tightening torque 40 Nm / 29.5 lbf. ft.
Remove transmission assembly from KM-113-2 (1) with KM-694-A
(2).
Remove transmission from KM-694-A.
Install transmission – see operation "Transmission, Remove
and Install (AF 20)".
 Inspect
Check and correct level of transmission fluid – see
operation "Transmission Fluid Level, Check and Correct (AF 13-II/AF
17/AF 20/AF 22)".
|
|
|
