Field Remedy: 2426
| Subject: |
Tank filler neck - Corrosion |
| Models: |
Engines: |
Option: |
| Corsa-C 2001... |
All |
|
| Complaint: |
Corrosion in the area around the tank filler
neck. |
| Cause: |
|
| Production: |
|
Remedy:
In case of customer complaint the inset for tank filler neck in
the side panel has to be replaced. If the contact face of the inset
on the side panel is damaged through corrosion too it has to be
replaced by a individual made repair panel. This repair panel
has to be attached by adhering and tack welding.
Working procedure:
1. Tailor inset for tank filler neck (picture I)
- Cut inset on dashed lines (arrows).

2. Paint inset for tank filler neck in body colour
    Note:
    Attend to specifications for paint repair in service literature.
 3. Mask side panel in outer area around tank filler neck with
    protective foil.
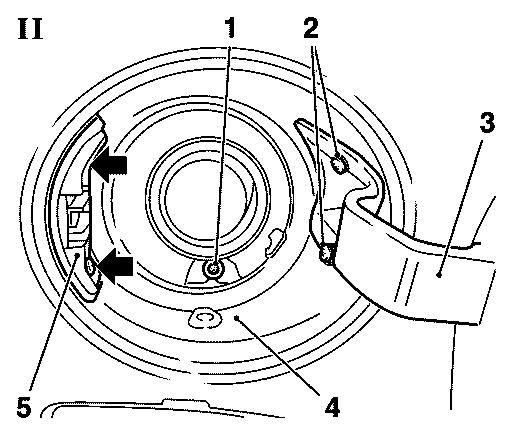
4. Release tank filler neck (picture II)
    - Unscrew 2x screw (2)
    - Remove lid tank filler neck (3)
    - Unscrew 2x screw (arrows) from latch lid tank filler neck
    - Remove latch (5)
    - Remove sleeve (4)
    - Unscrew tightening screw tank filler neck (1)
    - Raise vehicle up to half height
    - Remove rear wheel on right side
    - Raise vehicle up to whole height
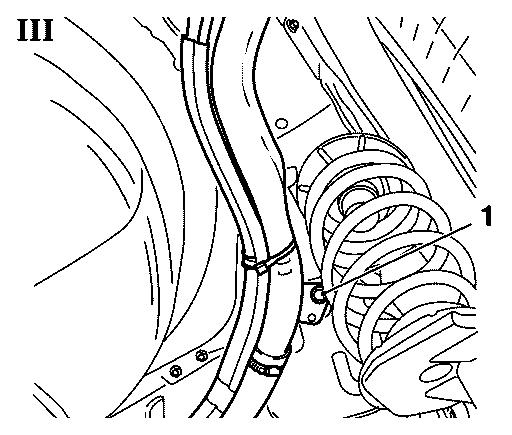
    - Unscrew lower tightening screw tank filler neck (1, picture III)
    - Turn tank filler neck down and to the side.
5. Lower vehicle.
6. Remove inset tank filler neck
- Cover tank filler neck with a fire-extinguishing blanket
      Note:
      Use flame-retardant material
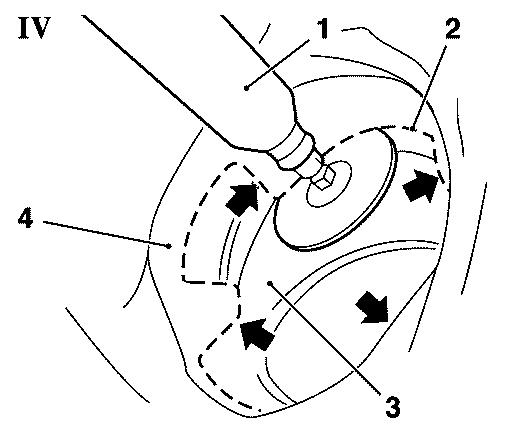
    - Detach inset tank filler neck (3, picture IV) with parting
      grinder (1) on overlap (2) of outer side panel (4)
      Note:
      Do not damage shackles (arrows)
- Remove inset with pliers
      Note:
      Inset is bonded to inner side panel and must be pulled off
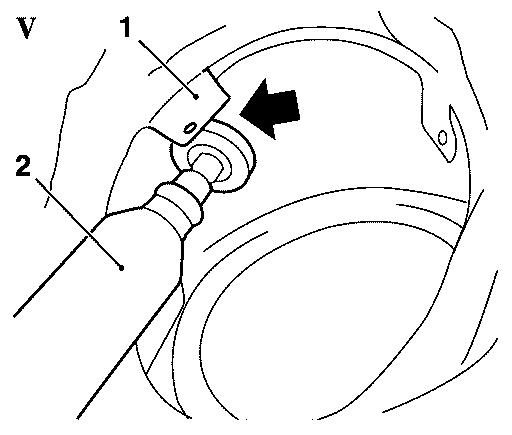
    - Bend shackles (1, picture V) outwards and detach tacking from
      rear side with grinder (2)
      Note:
      Carry out procedure in succession on all shackles
    - Heat up bonding for inset tank filler neck with hot-air blower
      and remove rest of sheet panel
    - Deburr shackles.
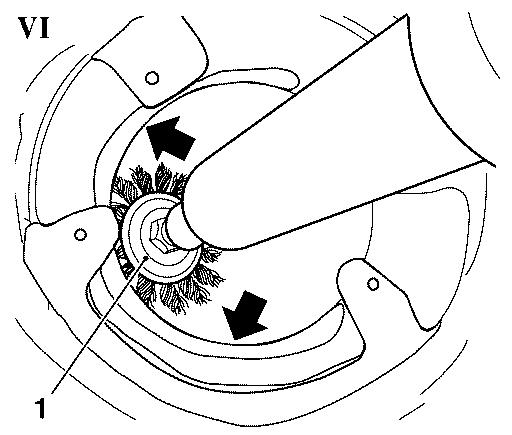
7. Clean bonding points (picture VI)
    - Grind surface of bonding points (arrows) on inner side panel
      and on shackles with grinding machine (1) until they are bright.
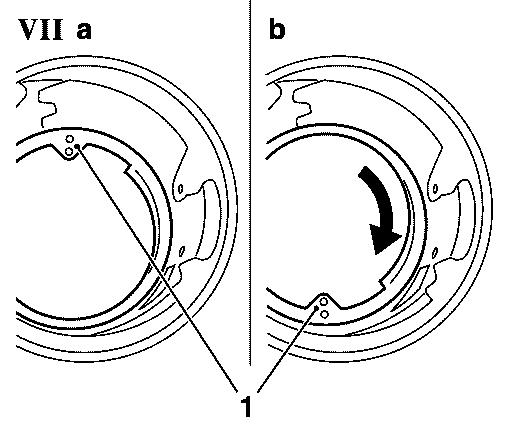
8. Match new inset tank filler neck
- Insert inset from wheelhousing (picture VII)
      Note:
      Bore for tightening screw tank filler neck (1) must show
      upwards (a) during insertion. After insertion turn inset
      for 180°, the bore (1) has to show downwards (b)
    - Bring shackles in original position
    - Align inset on shackles and check alignment (picture VIII).
      Both cutouts (2) of inset must respectively align flush (arrow)
      between shackles (1)
      Note:
      If the alignment is not okay correct with suitable equipment
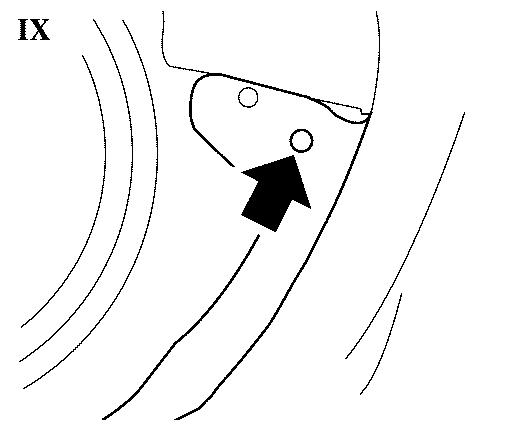
    - Make drillings (4,1 mm) for rivets on old tackings
      (arrow, picture IX)
    - Remove inset.
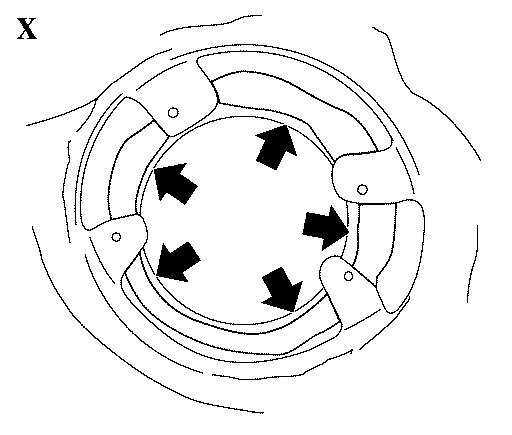
9. Bond in new inset tank filler neck
    - Clean all bonding points
    - Apply adhesive as shown onto inner side panel
      (arrows, picture X), inset (arrows, picture XI)
      and rear sides of shackles
      Note:
      Use protective gloves
    - Insert inset tank filler neck
    - Align inset on shackles and check alignment. Both cutouts
      (2, picture VII) of inset must respectively align flush
      (arrow, picture VII) between shackles (1, picture VII)
    - Tighten rivets
      Note:
      Use exclusive watertight steel rivets listed below
    - Straighten shackles with hammer and align to inset for tank
      filler neck
    - Apply adhesive on outer side of shackles and contact faces of
      side panel to inset
    - Smear all bonding points even with brush (smear adhesive also
      between inset and side panel)
      Note:
      Smear inner bonding point from wheelhousing (arrows)
- Clean drillings for tightening screws from adhesive.
Note:
Implicitly wait at least 2 hours to let adhesive harden before
starting further working procedures.
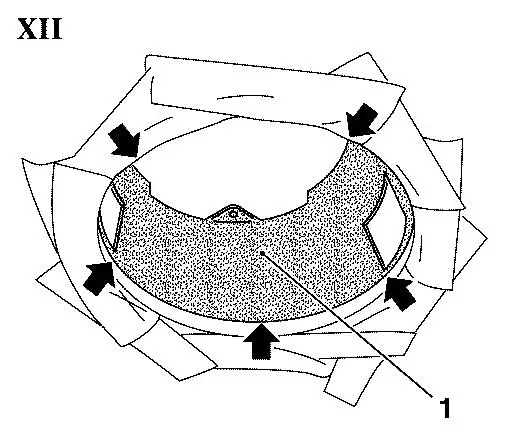
10. Make corrosion protection for inset tank filler neck (picture XII)
    - Mask area around inset on contact areas to side panel with tape
      (arrows)
    - Apply sprayable seam seal on whole surface of inset (1)
    - Paint inset in body colour
      Note:
      Attend to specifications for paint repair in service literature.
11. Raise vehicle
12. Apply sealing wax on bonding points on inner and outer side panel
    Note:
    From wheelhousing.
13. Insert tank filler neck into inset and screw in lower tightening
    screw and tighten
14. Lower vehicle to half height
15. Install rear wheel on right side
16. Lower vehicle
17. Screw in upper tightening screw for tank filler neck and tighten
18. Insert sleeve tank filler neck
19. Install latch for lid tank filler neck
    - Insert latch
    - Screw in 2x screw and tighten
20. Install lid tank filler neck
    - Insert lid
    - Screw in 2x screw and tighten
Spare-Parts: Part-No.: Catalogue-No.:
Inset for tank filler neck 93196539 01 82 341
Adhesive kit 93160535 15 05 000
Rivet 93184033 01 84 983
Sprayable seam seal 90543279 15 03 176
Labour Times: TC: Hours:
U3 242 60      Replacement inset         75             2.9
               tank filler neck
001 Make repair panel 75 SA
The costs for this repair will be covered during the normal corrosion
warranty. The regular warranty procedure will apply.
| FunctionalGroup: |
A - Body |
| Complaint Group: |
03 - Corrosion |
| Trouble Code: |
None |
|
