Field Remedy: 1828
| Subject: |
Front door - Cracks in check link
area |
| Models: |
Engines: |
Option: |
| Corsa-C 2001...,Corsa-C Combo 2002... |
All,All |
|
| Complaint: |
Cracks in check link area. |
| Cause: |
Front door check link bracket cracks due to
overloading. |
| Production: |
|
Remedy:
In case of customer complaint reinforce the front door with
two reinforcement plates in the check link area and replace
the door check link.
Additional check the door hinge at the A-pillar and repair it
if necessary.
Note:
If a repair is necessary, the end of the cracks have to be
drilled first.
Working procedure:
 1. Disconnect battery.
 2. Remove inner front door panelling
    - see working procedure "Inner Panelling – Front Door, Remove
      and Install", group "C", Service Instruction Corsa-C
      (Document-Number 00030432).
3. Remove speaker
    - see working procedure "Wideband Loudspeaker – Front Door,
      Remove and Install", group "N", Service Instruction Corsa-C
      (Document-Number 00030374).
    - see working procedure "Treble Loudspeaker – Front Door,
      Remove and Install", group "N", Service Instruction Corsa-C
      (Document-Number 00030375).
 4. Remove check link - front door.
 5. Remove front door
    - see working procedure "Front Door, Remove and Install",
      group "A", Service Instruction Corsa-C
      (Document-Number 00030226).
6. Lay front door on a suitable installing device and fix it.
    Important:
    Be careful not to damage the paintwork on the door!
7. Align the repair area of front door.
8. Clean the repair area of front door.
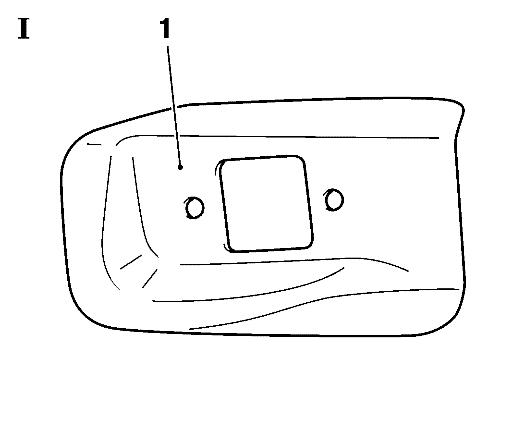
9. Deburr inner reinforcement plate (Picture I, 1).
10. Prime inner reinforcement plate.
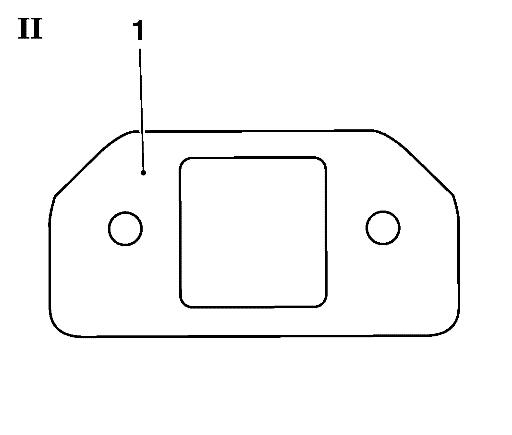
11. Check contour of outer reinforcement plate and rework it if
necessary (Picture II, 1).
12. Deburr outer reinforcement plate.
13. Paint inner reinforcement plate (e.g. spray).
14. Clean and degrease inner reinforcement plate, outer reinforcement
    plate and repair area of the front door.
15. Lay outer reinforcement plate onto repair area and mark contours
    for adhesive layer.
16. Remove outer reinforcement plate.
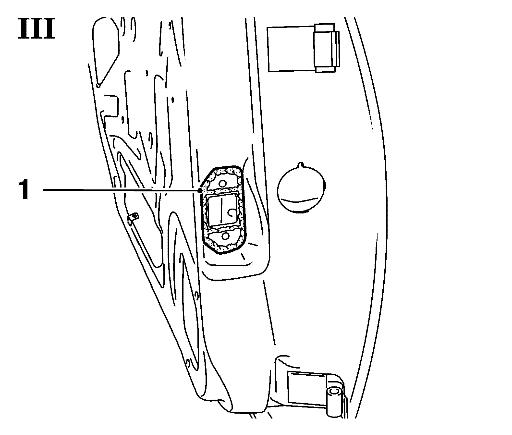
17. Apply adhesive onto outer repair area of front door
    (Picture III, 1).
    Note:
    Apply adhesive along the marked contour and also above and below
    the check link opening.
    Important:
    Please pay attention to processing notes and hardening time
    of adhesive!
18. Apply adhesive onto inner reinforcement plate.
19. Attach inner reinforcement plate and outer reinforcement plate.
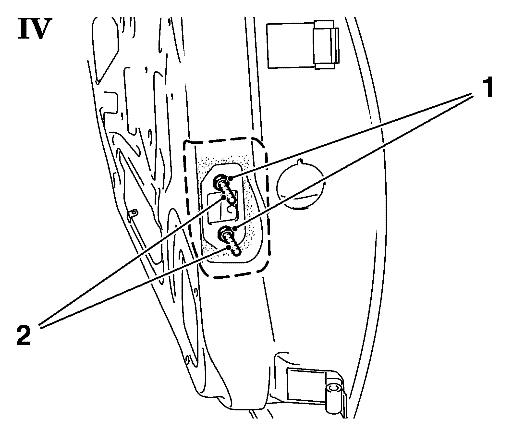
20. Fix inner reinforcement plate and outer reinforcement plate
(Picture IV).
    Note:
    Tighten 2x screw M5 (2) with nut (1) (max. 6 Nm).
21. Remove surplus adhesive and seam seal and corrosion protection
    with a filler knife or a brush.
22. Let adhesive harden.
23. Remove 2x screw M5 with nut. Extend bore diameter for M6 screw.
24. Paint repair area.
25. Apply cavity protection/protection wax.
26. Install front door
    - see working procedure "Front Door, Remove and Install",
      group "A", Service Instruction Corsa-C
      (Document-Number 00030226).
27. Install new check link - front door.
    Note:
    Apply screws with locking compound.
    Tightening torque max. 9 Nm.
28. Install speaker
    - see working procedure "Wideband Loudspeaker – Front Door,
      Remove and Install", group "N", Service Instruction Corsa-C
      (Document-Number 00030374).
    - see working procedure "Treble Loudspeaker – Front Door,
      Remove and Install", group "N", Service Instruction Corsa-C
      (Document-Number 00030375).
29. Install inner front door panelling
    - see working procedure "Inner Panelling – Front Door, Remove
      and Install", group "C", Service Instruction Corsa-C
      (Document-Number 00030432).
30. Connect battery.
31. Program volatile memories.
Spare-Parts: Part-No.: Catalogue-No.:
Corsa-C (3- door / 5- door / Combo):
Repair Set left door 93186607 90 97 865
Repair Set right door 93186606 90 97 866
Opening check link 09229750 51 60 245
Nut check link 11094425 20 64 884
Adhesive corrosion protection             93160535       15 05 000
adhesive system
Labour Times: TC: Hours:
U3 182 80        Repair front door with   90             2.1
                 reinforcement plates
U3 182 81        Painting an finishing    90             1.7
                 work
U3 182 80 - 001  Welding door hinge       90             0.7
                 (both, door removed)
                 +: attachment parts A-pillar - remove and install
U3 182 81 - 001  Painting A-pillar        90             0.7
                 below
The costs for this repair will be covered for vehicles not older than
3 years and a mileage lower than 100.000 Km.
The regular warranty procedure should be used for claiming Set-up-time.
93186607       90 97 865
Reparatursatz Tür rechts 93186606 90 97 866
| FunctionalGroup: |
A - Body |
| Complaint Group: |
01 - Broken or Cracked |
| Trouble Code: |
None |
|
