volkswagen Workshop Repair Guides

Volkswagen Workshop Service and Repair Manuals

Renewing crankshaft oil seal - pulley end > < Adjusting V belt tension for alternator
4 cyl. carburetor engine, mechanics (1.5, 1.6 and 1.8 litre engine)
Dismantling and assembling cylinder block, crankshaft and flywheel
 
V13-0720

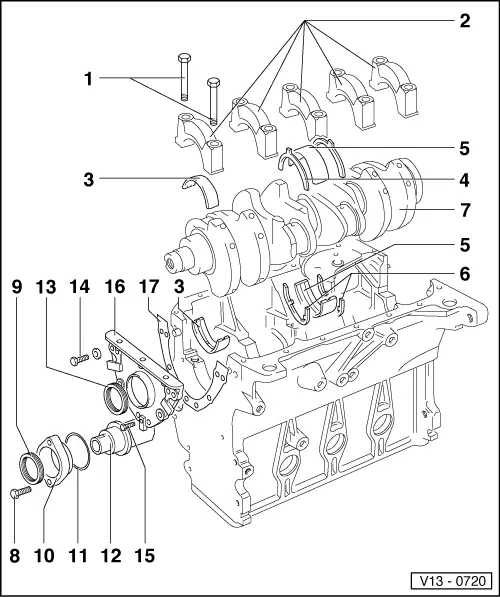
Dismantling and assembling cylinder block and crankshaft

Note:

Short engines are supplied with a needle bearing in the crankshaft.

Before being installed in vehicles with automatic gearbox the needle bearing should be removed.

  • 65 Nm
  • Bearing cap
    • ◆ Bearing cap 1 - pulley end
    • ◆ Retaining tabs of shells must be above one another
  • Bearing shells 1, 2, 4 and 5
    • ◆ With no oil groove for caps 1, 2 and 5
    • ◆ With oil groove for cap 4 and cylinder block
    • ◆ Do not interchange used shells
 
V13-0720
  • Thrust washer
    • ◆ For cap
    • ◆ Note location
  • Bearing shell 3
    • ◆ Fitting bearing
    • ◆ For cap without oil groove
    • ◆ For cylinder block with oil groove
  • Thrust washer
    • ◆ For cylinder block
  • Crankshaft
    • ◆ Axial clearance
      New: 0.07...0.17 mm
      Wear limit: 0.25 mm
    • ◆ Check radial clearance with Plastigage
      New: 0.03...0.08 mm
      Wear limit: 0.17 mm
    • ◆ Do not turn the crackshaft when measuring the radial clearance
    • ◆ Crankshaft dimensions => page13-25
  • 25 Nm
 
V13-0720
  • Oil seal
    • ◆ Take sealing flange off to remove
    • ◆ Install with 10-203
    • ◆ Slightly lubricate sealing lip and outer edge prior to installation
  • Sealing flange
  • O-ring
    • ◆ Renew if damaged
  • Intermediate shaft
    • ◆ Remove distributor and fuel pump first
    • ◆ Axial play max. 0.25 mm
  • Oil seal
    • ◆ Renew
  • 20 Nm
  • 10 Nm
  • Front sealing flange
    • ◆ With additional toothed belt cover => Fig. 1
  • Gasket
    • ◆ Renew
 
V13-0711

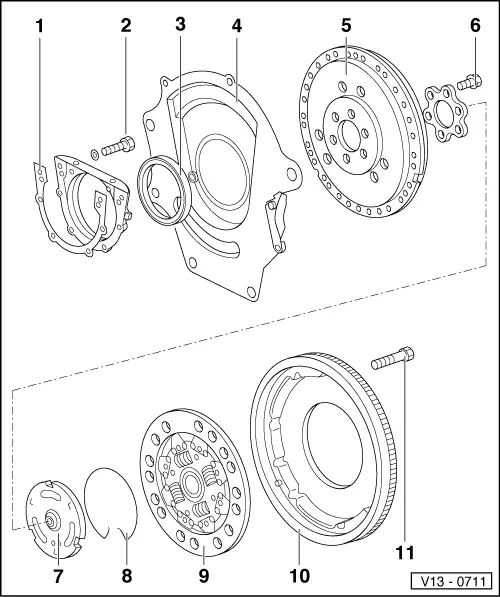
Removing and installing pressure plate and sealing flange

Note:

Clutch repairs

=> Repair Group 30

  • Gasket
    • ◆ Renew
  • Bolt
    • ◆ M6 = 10 Nm
      M8 = 20 Nm
  • Oil seal
    • ◆ ä07.90
    • ‒ Remove with 10-221
    • ‒ Slightly lubricate sealing lip and outer edge before installing
    • ‒ Position using fitting sleeve 2003/2A
    • ‒ Insert as far as stop with 2003/1
    • ◆ 08.90 ä
    • ‒ Completely renew sealing flange with oil seal
 
V13-0711
  • Intermediate plate
    • ◆ Must fit on dowel sleeves
  • Pressure plate
    • ◆ Removing and installing => Fig. 2
    • ◆ Installing drive plate for automatic gearbox
  • 60 Nm + 1/4 turn (90°) further
    • ◆ Renew
    • ◆ Turning on by 90° can be done in several steps
  • Release plate
    • ◆ Ensure that retaining lugs are fitted properly
  • Retaining ring
    • ◆ Lever out with screwdriver
    • ◆ Watch location => Figs. 4, 5 and 6
  • Clutch plate
    • ◆ Centre with VW 547
 
V13-0711
  • Flywheel
    • ◆ Can be renewed with engine in situ after taking gearbox out
    • ◆ Removing and installing =>Fig. 3
    • ◆ Subsequent machining of ignition timing notch =>page13-29
  • 20 Nm
 
U13-0011

→ Fig.1     Front sealing flange with toothed belt cover

01.76 ä up to introduction of fully enclosed toothed belt guard 02.79 äthe front sealing flange was installed with an additional belt cover to prevent belt jumping under unfavourable conditions.

 
V30-0025

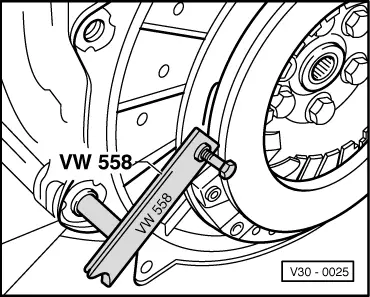
→ Fig.2     Removing and installing pressure plate

 
V30-0023

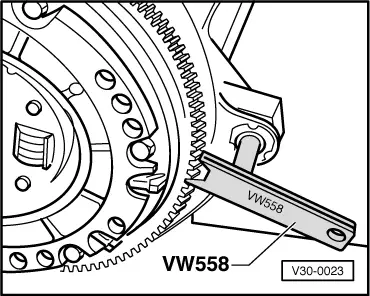
→ Fig.3     Removing and installing flywheel

 
V30-0283

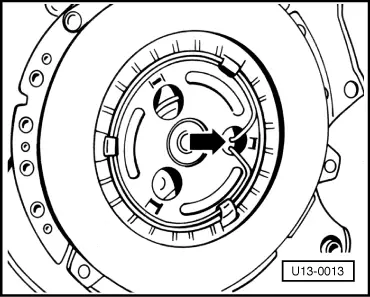
→ Fig.4     Installing retaining ring for the release plate, version A

Pay attention to wire ends -arrow-.

 
U13-0012

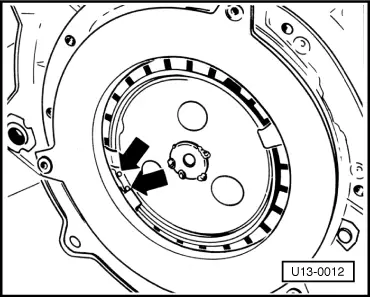
→ Fig.5     Installing retaining ring for the release plate, version B

Pay attention to wire ends -arrows-.

 
U13-0013

→ Fig.6     Installing retaining ring for the release plate, version C

Pay attention to wire ends -arrow-.

Renewing crankshaft oil seal - pulley end > < Adjusting V belt tension for alternator