
Golf Mk6
| Dismantling and assembling heater and air conditioner unit -VX1-„Climatic“ |

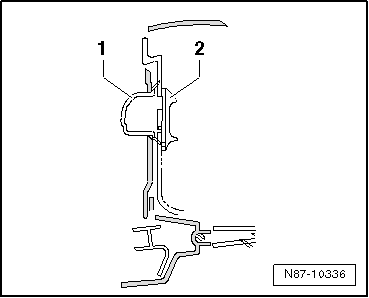
| 1 - | Air intake housing |
| q | With air recirculation flap |
| q | Removing and installing → Chapter |
| 2 - | Air recirculation flap control motor -V113- |
| q | Checking: Vehicle diagnosis, testing and information system -VAS 5051B- (or later model). |
| q | Removing and installing → Chapter |
| q | Renewing: initiate basic setting using vehicle diagnosis, testing and information system -VAS 5051B- (or later model) → Chapter. |
| 3 - | Cover |
| 4 - | Upper part of evaporator housing |
| q | Dismantling and assembling evaporator housing → Chapter |
| 5 - | Bracket |
| 6 - | Evaporator |
| q | Removing and installing → Chapter |
| 7 - | Evaporator temperature sensor -G308- or evaporator output temperature sender -G263- |
| q | Checking: Vehicle diagnosis, testing and information system -VAS 5051B- (or later model). |
 Note
Note| One of the two component designations is displayed depending on software version. The functions are identical. |
| q | Removing and installing → Chapter. |
| 8 - | Air distribution housing |
| q | Removing and installing → Chapter |
| 9 - | Auxiliary air heater element -Z35- |
| q | Only in vehicles with diesel engines without supplementary heater. |
| q | Checking: with vehicle diagnosis, testing and information system -VAS 5051B- (or later model), under Heating, ventilation, air conditioning; Systems capable of self-diagnosis; Auxiliary heating; Electrical components. |
| q | Removing and installing → Chapter |
| 10 - | Heat exchanger |
| q | Removing and installing → Chapter |
| 11 - | Heat exchanger trim |
| 12 - | Cover |
| q | For dust and pollen filter. |
| 13 - | Dust and pollen filter |
| q | With activated charcoal filter |
| q | Removing and installing → Chapter |
| 14 - | Fresh air blower -V2- |
| q | Removing and installing → Chapter |
| 15 - | Cooling hose for glove compartment cooling |
| q | To remove, glove compartment must be removed → General body repairs, interior; Rep. gr.68 |
| 16 - | Connections for glove compartment cooling |
| q | To remove, glove compartment must be removed → General body repairs, interior; Rep. gr.68 |
| q | Installation position of connections for glove compartment cooling → Fig. |
| 17 - | Temperature flap control motor -V68- |
| q | Checking: Vehicle diagnosis, testing and information system -VAS 5051B- (or later model). |
| q | The removal and installation is the same as for the left temperature flap control motor -V158- → Chapter. |
| q | Renewing: initiate basic setting using vehicle diagnosis, testing and information system -VAS 5051B- (or later model) → Chapter. |
| 18 - | Lower part of evaporator housing |
| q | Dismantling and assembling evaporator housing → Chapter |
| 19 - | Air distribution flap control motor -V428- with potentiometer for air distribution flap control motor -G645- |
| q | Checking: Vehicle diagnosis, testing and information system -VAS 5051B- (or later model). |
| q | Removing and installing → Chapter |
| q | Renewing: initiate basic setting using vehicle diagnosis, testing and information system -VAS 5051B- (or later model) → Chapter. |
|
|