volkswagen Workshop Repair Guides

Volkswagen Workshop Service and Repair Manuals

Adjustment overview > < Renewing oil seal on gearboxes with springs behind flanges
5-Speed manual gearbox 02A
Dismantling and assembling differential
 
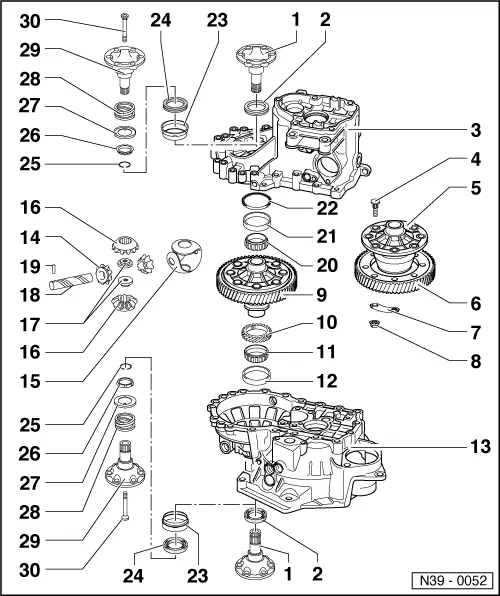
N39-0052

Notes:

  • ◆ Heat taper roller bearing inner race to
    100 °C before installing.
  • ◆ Always renew both taper roller bearings together as a set.
  • ◆ If differential housing, gearbox housing or clutch housing taper roller bearings are renewed adjust differential .
  • Flange shaft
    • ◆ For gearboxes without springs behind flange shafts
    • ◆ Removing and installing
      => Page 39-1
 
N39-0052
  • Oil seal
    • ◆ For gearboxes without springs behind flange shafts
    • ◆ Renewing => Page 39-1
  • Gearbox housing
  • Bolt
  • Differential cage
    • ◆ Bolt to final drive gear
    • ◆ Both sides are chamfered to accept taper rings (item 26 ) in gearboxes with springs behind flange shafts
      => Fig.7
 
N39-0052
  • Final drive gear wheel
    • ◆ Rivetted in production
    • ◆ Bolted => Fig.11
    • ◆ Heat to 100 °C before installing
    • ◆ Pressing off => Fig.9
    • ◆ Fit to differential housing
      => Fig.10
    • ◆ Is paired with output shaft, only renew as a set
  • Packing plate
  • Nut, 70 Nm
 
N39-0052
  • Differential housing
    • ◆ With rivetted final drive gear
    • ◆ When renewing final drive gear drill out rivet heads => Fig.8
    • ◆ Attaching final drive gear with bolts
      => Fig.8
    • ◆ Both sides are chamfered to accept taper rings (item 26 ) in gearboxes with springs behind flange shafts => Fig.7
  • Speedometer drive wheel
    • ◆ Fit on differential housing before pressing on inner race
 
N39-0052
  • Taper roller bearing inner race
    • ◆ Pulling off => Fig.3
    • ◆ Pressing on => Fig.4
  • Taper roller bearing outer race
    • ◆ Knocking out => Fig.1
    • ◆ Pressing in => Fig.2
  • Clutch housing
  • Planet pinion
    • ◆ Installing in gearboxes without springs behind flange shafts
      => Fig.14
    • ◆ Installing in gearboxes with spring behind flange shaft => Fig.15
  • One-piece thrust washer
    • ◆ Coat with gearbox oil when installing
 
N39-0052
  • Sun wheel
    • ◆ Distinguishing sun wheels => Fig.13
    • ◆ Installing in gearboxes without springs behind flange shafts
      => Fig.14
    • ◆ Installing in gearboxes with springs behind flange shafts => Fig.15
  • Threaded piece
    • ◆ Installed in conjunction with springs behind flange shafts => Fig.15
 
N39-0052
  • Planet pinion axis shaft
    • ◆ Knock out with drift
    • ◆ Installing in gearboxes without springs behind flange shafts
      => Fig.14
    • ◆ Installing in gearboxes with springs behind flange shafts => Fig.15
  • Spring pin
    • ◆ For securing planet pinion axis shaft
    • ◆ Removing and installing => Fig.12
  • Taper roller bearing inner race
    • ◆ Pulling off => Fig.3
    • ◆ Pressing on => Fig.4
 
N39-0052
  • Taper roller bearing outer race
    • ◆ Pulling out => Fig.5
    • ◆ Pressing in => Fig.6
  • Shim
    • ◆ For differential
    • ◆ Determining thickness => Page 39-26
  • Sleeve
    • ◆ Installed in conjunction with springs behind flange shafts
    • ◆ To accept oil seal (item 24 )
    • ◆ Removing and installing
      => Page 34-89
  • Oil seal
    • ◆ In conjunction with springs behind flange shafts
    • ◆ Renewing => Page 39-4
 
N39-0052
  • Circlip
    • ◆ Installed in conjunction with springs behind flange shafts
    • ◆ Ensures taper ring, thrust washer and spring are held in position when flange shaft is removed
  • Tapered ring
    • ◆ Installed in conjunction with springs behind flange shafts
    • ◆ With grooves to secure thrust washer
    • ◆ Installation position: Taper towards differential housing
  • Thrust washer
    • ◆ Installed in conjunction with springs behind flange shafts
    • ◆ Installation position:
      Shoulder towards spring, tongue to tapered ring
 
N39-0052
  • Spring for flange shaft
    • ◆ Installed behind flange shafts
    • ◆ Allocation to gearbox with springs behind flange shafts => Page 00-3
  • Flange shaft
    • ◆ With drilling for cone head bolt
    • ◆ Installed in gearboxes with springs behind flange shafts
    • ◆ Removing and installing
      => Page 39-4
  • Cone head bolt, 25 Nm
    • ◆ Installed in conjunction with springs behind flange shafts
    • ◆ Bolt into threaded piece (item17 )
 
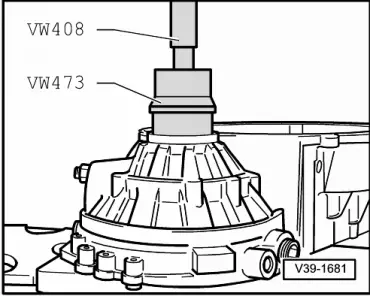
V39-1681

→ Fig.1     Knocking taper roller bearing outer race out of clutch housing

  • ‒ First remove flange shaft seal mounting sleeve on gearboxes with springs behind flange shaft.
 
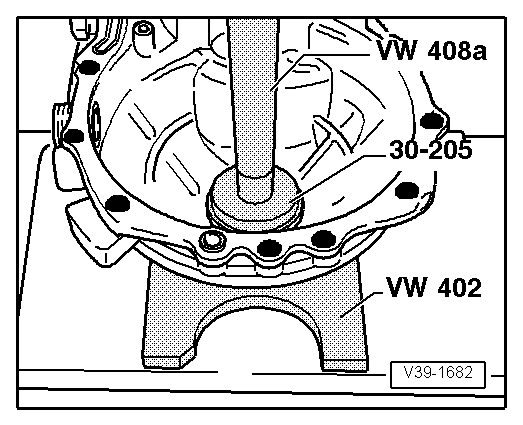
V39-1682

→ Fig.2     Pressing taper roller bearing outer race into clutch housing

No shim is installed in the clutch housing end.

 
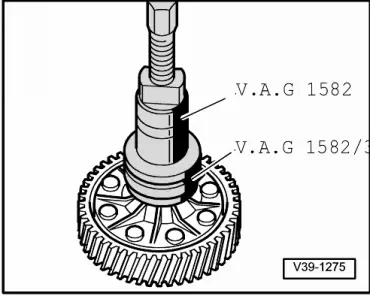
V39-1275

→ Fig.3     Pulling off taper roller bearing inner race

  • ‒ Before fitting the extractor position press piece 40-105 on differential housing.

Note:

Both both taper roller bearing inner races are pulled off the differential housing in the same way.

 
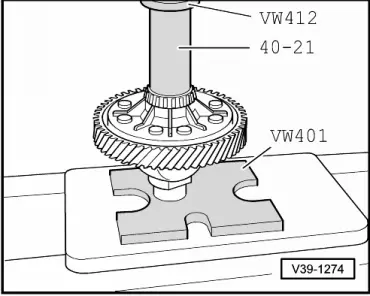
V39-1274

→ Fig.4     Pressing on taper roller bearing inner race

Note:

The taper roller bearing inner races for gearbox housing and clutch housing are pressed on with the same press tools.

 
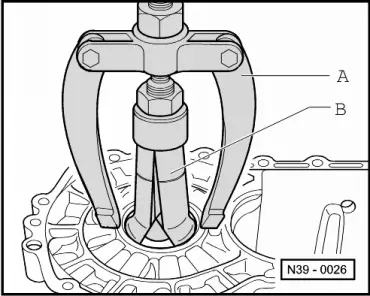
N39-0026

→ Fig.5     Pulling taper roller bearing outer race out of gearbox housing

A - Counter support, e.g. Kukko 22/2

B - Internal puller 46...58 mm, e.g. Kukko 21/7

 
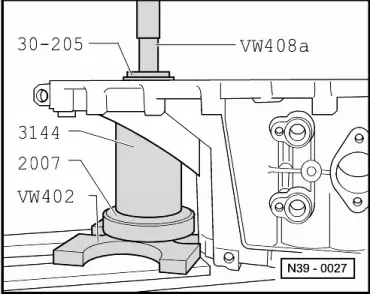
N39-0027

→ Fig.6     Pressing taper roller bearing outer race into gearbox housing

  • ‒ Fit shim under outer race.
  • ‒ Support gearbox housing with sleeve 3144 directly below bearing mounting.
 
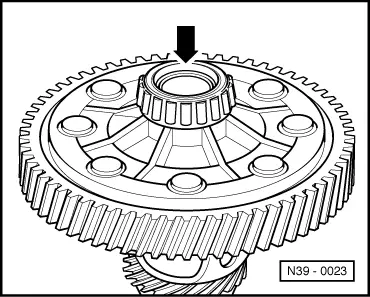
N39-0023

→ Fig.7     Both sides of differential housing are chamfered (arrow) to accept tapered rings/springs

 
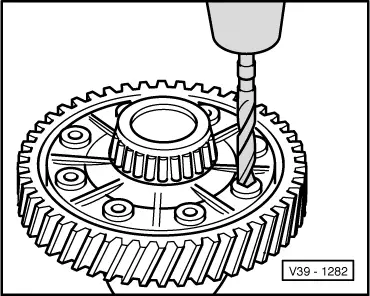
V39-1282

→ Fig.8     Drilling out rivet heads

  • ‒ Drill out rivet heads with 12 mm drill from countersunk side
    and knock-out with drift.
Warning!
Clean differential before and after drilling and protect taper roller bearings from swarf.
 
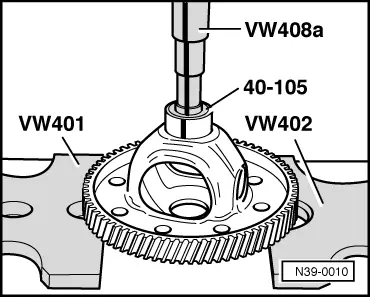
N39-0010

→ Fig.9     Pressing off final drive gear

  • ‒ Place thrust piece 40-105 on differential housing.

Note:

Thrust piece 40-105 can be used with all differential housings.

 
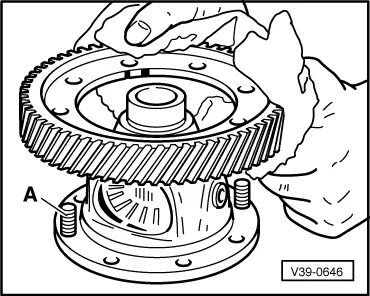
V39-0646

→ Fig.10     Heating final drive gear wheel to approx. 100 °C and installing

  • ‒ Use bolts -A- from repair kit to guide final drive gear into position during installation.
 
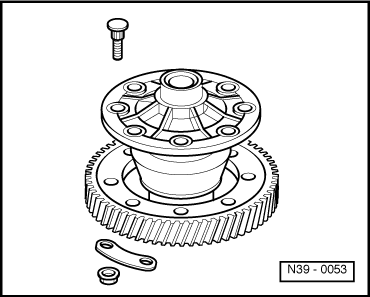
N39-0053

→ Fig.11      Bolting final drive gear and differential housing together

Use special bolts Part No. 02A 498 088 A with plates and nuts.

 
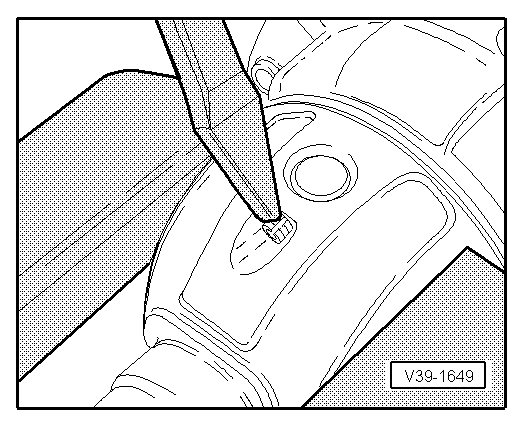
V39-1649

→ Fig.12     Removing and installing planet wheel axis shaft spring pin

Removing

  • ‒ Cover taper roller bearing inner race and speedometer drive gear to avoid possible damage and ingress of metal particles.
  • ‒ Knock-out spring pin with chisel, inserting chisel into circumferential groove.

Installing

  • ‒ Knock fully into the differential housing.
 
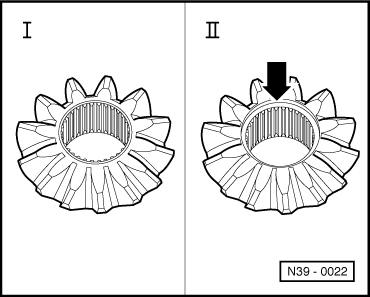
N39-0022

→ Fig.13     Distinguishing sun wheels

Gearbox with springs behind flange shafts

Sun wheel without recess ( I )

Gearbox without springs
behind flange shafts

Sun wheels
with recess ( II )

 
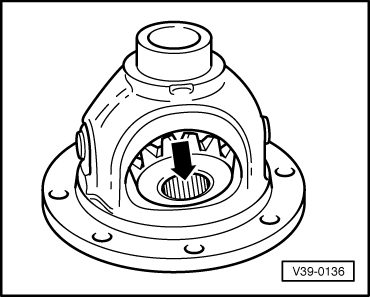
V39-0136

→ Fig.14      Installing sun and planet wheels in gearboxes without springs behind flange shafts

  • ‒ Lubricate one-piece thrust washer with gearbox oil and install.
  • ‒ Insert planet pinions, knock-in planet pinion axis shaft
  • ‒ Drive in new spring pin => Fig.12
  • ‒ Insert sun wheels turned through 180°and pivot into position (arrow).
 
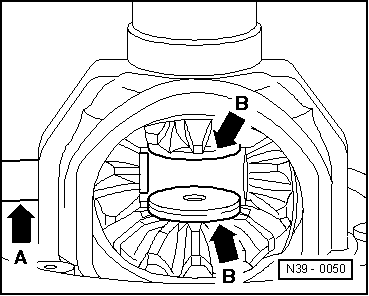
N39-0050

→ Fig.15     Installing sun and planet wheels in gearboxes with springs behind flange shafts

  • ‒ Lubricate one piece thrust washer with gearbox oil and install.
  • ‒ Install both sun wheels and secure (e.g. with flange shaft).
  • ‒ Insert planet wheels turned through 180°and pivot into position.
  • ‒ Push planet wheel axis shaft (arrow -A-) in until first planet wheel.
  • ‒ Position threaded piece (arrow -B-) in sun wheels
    Installation position: step towards sun wheel
  • ‒ Drive planet wheel axle into final position and secure with spring pin.

Adjustment overview > < Renewing oil seal on gearboxes with springs behind flanges