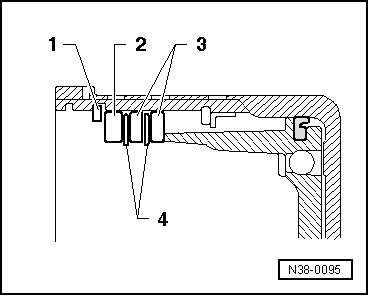
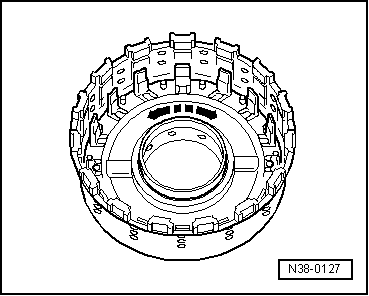
volkswagen Workshop Repair Guides

Volkswagen Workshop Service and Repair Manuals

Dismantling and assembling 3rd and 4th gear clutch -K3- > < Dismantling and assembling 1st to 3rd gear clutch -K1-
Automatic gearbox 001
Dismantling and assembling reverse gear clutch -K2-
 
N38-0159

Functional check of clutch

=>Fig.4

  • Circlip
    • ◆ Mark after removing and insert in same position
  • Thrust plate
    • ◆ Installing => Fig.2
    • ◆ Determining thickness => Fig.3
  • Inner plate
    • ◆ Installing => Fig.2
    • ◆ Quantity
  • Outer plate
    • ◆ Installing => Fig.2
    • ◆ Quantity=> Page 00-4
  • Circlip
    • ◆ Lever out with screwdriver
    • ◆ Installing => Fig.1
 
N38-0159
  • Spring supporting plate
    • ◆ With springs
    • ◆ Installing => Fig.1
  • Oil seal
    • ◆ Always renew
  • Piston
    • ◆ Spare part is allocated according to gearbox code letters
    • ◆ Installing => Page 38-13
  • Oil seal
    • ◆ Always renew
    • ◆ Sealing lip faces to clutch housing
  • Clutch housing
 
N38-0094

→ Fig.1     Removing and installing circlip

  • ‒ Place spring supporting plate on the piston of the -K2- clutch.
  • ‒ Place circlip on spring supporting plate.
  • ‒ Carefully press down circlip with spring supporting plate using press piece T 10002 until the circlip audibly locates in the groove.
 
N38-0095

→ Fig.2     Installing outer and inner plates

The sealing lip of sealing ring faces to clutch housing.

  • ‒ Install outer plates -3- and inner plates -4- in clutch housing.
  • ‒ Place pressure plate -2- on the last inner plate.
  • ‒ Fit circlip -1- in the groove in the clutch housing.
 
N38-0097

→ Fig.3     Determining thickness for the pressure plate.

  • ‒ Measure play between pressure plate and circlip using a feeler gauge "A".

Component

Installed dimen.

Wear limit

Clutch K2

0.5 ... 0.8 mm

1.0 mm

  • ‒ If the wear limit is reached on a used clutch, the plates must be replaced and the thickness for a new pressure plate must be calculated.
  • ‒ Allocate plates and pressure plate according to gearbox code letters.
 
N38-0127

→ Fig.4     Functional check of clutch

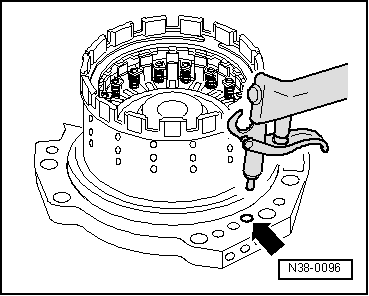
  • ‒ Before installing the piston moisten the sealing lips and sealing rings with ATF.

Sealing lip faces to clutch housing.

  • ‒ Turn piston slightly when installing.
  • ‒ It must be possible to turn the piston by hand in both directions (arrows) after it has been installed into clutches or brakes.
  • ◆ If this is not the case, the sealing lips or sealing rings may catch or become damaged.
  • ‒ If this defect occurs, remove piston again.
  • ‒ Check sealing lips or sealing rings for damage, renew if necessary.
  • ‒ Install piston again and check.
 
N38-0096
  • ‒ Place shim between -K2- clutch and ATF pump.
  • ‒ Place clutch -K2- on ATF pump and press downwards.
  • ‒ → Blow compressed air into the pressure channel -arrow-.
  • ‒ The clutch piston must press the plates together.
  • ‒ Allow compressed air to escape. The set of plates must return to its rest position.

Dismantling and assembling 3rd and 4th gear clutch -K3- > < Dismantling and assembling 1st to 3rd gear clutch -K1-