
Maintenance
- Make
- Aston Martin
- Model
- V8 Vantage Factory Workshop Manual
- Year
- 2005–2010
- Section
- Air Charging › Maintenance
03 EngineMaintenance
Maintenance
Clean Air Duct - Remove and Install
| Item | Code |
|---|---|
| Clean Air Duct - Right Side - Remove and Install | 03.12.BC |
| Clean Air Duct - Left Side - Remove and Install | 03.12.BD |
Remove
- Raise the vehicle and make it safe.
- Remove the front road wheel at the side for the clean air duct to be removed.
- Apply protective tape to the wheelarch area of the front wing to prevent damage.
- Remove the front outside screw that attaches the valance.
- Move the valance away to get access to the wheelarch liner attachment screws (refer to Figure 1).
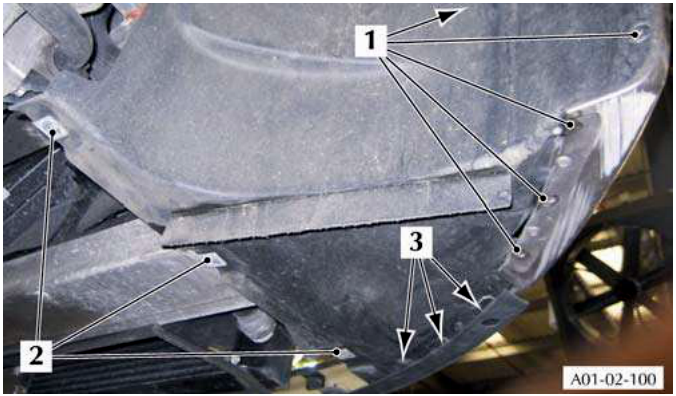
- Remove the five screws (1) that attach the wheelarch liner to the bumper.
- Remove the three M6 Torx screws (2) that attach the wheelarch liner to the front undertray.
- Remove the three screws (3) that attach the wheelarch liner to the front valance.
- Move the wheelarch liner away to get access to the clean air duct (duct).
- Disconnect the clip that attaches the duct to the mass air-flow meter.
- Remove the duct from the mass air-flow meter.
- Lower the vehicle.
- Disconnect the clip that attaches the duct to the throttle body adaptor.
- Remove the duct from the throttle body adaptor.
- Remove the duct from the support clip.
Install
- Install the duct into the support clip.
- Install the duct to the throttle body adaptor.
- Install the clip to attach the duct to the throttle body adaptor.
- Raise the vehicle and make it safe.
- Connect the duct to the mass air-flow meter.
- Install the clip to attach the duct to the mass air-flow meter.
- Connect the duct to the mass air-flow meter.
- Install the clip that attaches the duct to the mass air-flow meter.
- Put the wheelarch liner into position.
- Install the three screws (3) that attach the wheelarch liner to the front valance.
- Install the three M6 Torx screws (2) that attach the wheelarch liner to the front undertray.
- Install the five screws (1) that attach the wheelarch liner to the bumper.
- Make sure that the valance is in the correct position.
- Install the front outside screw that attaches the valance.
- Remove the protective tape from the wheelarch area of the front wing.
- Install the front right road wheel.
- Lower the vehicle.
Engine Air Filter - Remove and Install
| Item | Code |
|---|---|
| Engine Air Filter - Right Side - Remove and Install | 03.12.CB |
| Engine Air Filter - Left Side - Remove and Install | 03.12.DB |
Remove
- Raise the vehicle and make it safe.
- Remove the front road wheel at the side of the air filter to be removed.
- Apply protective tape to the wheelarch area of the front wing to prevent damage.
- Remove the front outside screw that attaches the valance.
Parts & tools for this job For 2005 Aston Martin V8 Vantage
- PARTOil filterSearch: Aston Martin V8 Vantage 2005 oil filter
- TOOLOil filter wrenchSearch: oil filter wrench
- FLUIDEngine oilSearch: Aston Martin V8 Vantage engine oil
Links open Amazon search results in a new tab. As an Amazon Associate I earn from qualifying purchases.