
Removal
- Make
- Aston Martin
- Model
- V8 Vantage Factory Workshop Manual
- Year
- 2005–2010
- Section
- Fuel Charging System › Removal
03 EngineRemoval
| Repair Operation Time (ROT) | |
|---|---|
| Item | Code |
| Fuel Injector Engine Set-Renew | 03.04.FB |
Removal
- Remove LH injectors (see Workshop Manual procedure 03.04.GH Injector - Fuel - LH Bank - Engine Set - Renew).
- Remove coils (see Workshop Manual procedure 03.07.HC Coil Assembly - Engine Set - RH - Renew).
- Disconnect breather hose (quick fit) move aside.
- Release harness fir tree clips (x3) from cylinder head and move aside.
- Remove fuse box bracket fixings (bolt and nut) (allows movement).
- Remove ECM (see Workshop Manual procedure 03.14.BB Engine Control Module - RH Renew).
- Remove battery lead (1x nut and rubber cover) from fuse box (2x leads).
- Remove multiplugs (x10) from fusebox.
- Remove earth terminal (1x nut and rubber cover) from fusebox.
- Remove fuse box from bracket (bolt x2).
- Release harness fir tree clips (x3) from engine bracket.
- Feed harness from inner wing and over engine to gain access to cam cover.
- Remove purge pipe P-clip (bolt x1) and move pipe aside.
- Remove harness bracket from engine (bolts x2, nut x1).
- Release fuel feed hose from rail (clip x1) and move aside.
- Disconnect heater hose from pipe (quick fit).
- Release heater hose (clips x2) and EGR vacuum line (clips x2) from bracket.
- Release harness from coolant pipe bracket (fir tree x3).
- Disconnect EGR (x1), fuel rail pressure sensor (x1) and injector multiplugs (x4), move harness aside.
- Remove coolant pipe bracket (nuts x2 and bolts x2).
- Disconnect EGR vac pipe from sensor and manifold, move aside.
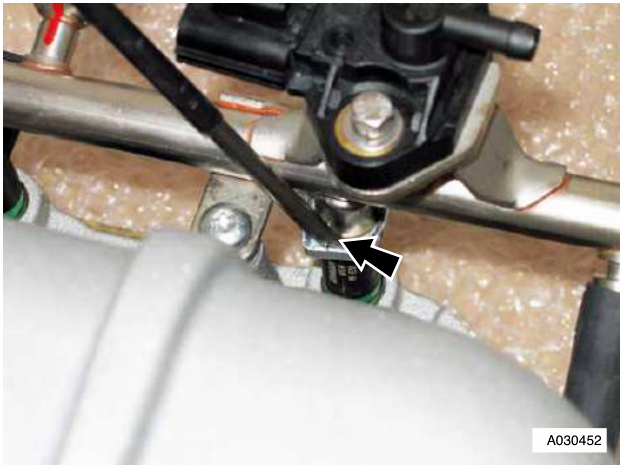
Figure 1
- Remove Injector to rail clips (see Figure 1).
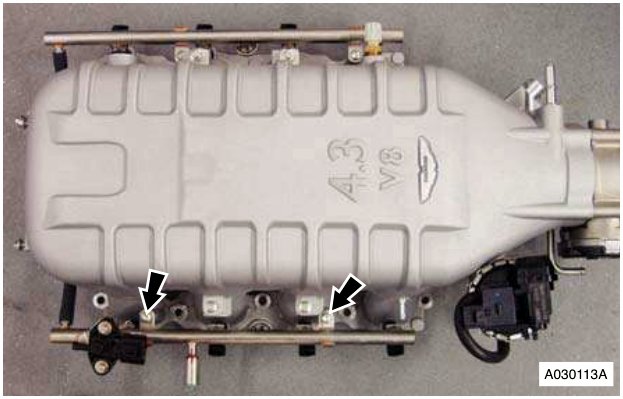
Figure 2
- Remove fuel rail bolts (x2) and lift rail (tie aside) (see Figure 2).
Installation
- Install clips on to new injectors then fit injectors into manifold.
- Install rail onto injectors (taking care each injector is aligned correctly and the clip seats properly) and fit bolts (x2) (torque).
- Connect EGR vac pipe to sensor and manifold.
- Install coolant pipe bracket (bolt x2, nut x2).
- Connect EGR (x1), fuel rail pressure sensor (x1) and injector multiplugs (x4).
- Refit harness to coolant pipe bracket (fir tree x3).
- Connect heater hose to pipe (quick fit).
- Refit heater hose (clipx2) and EGR vac lines (clips x2) to bracket.
- Install fuel feed pipe.
- Install purge pipe P-clip.
- Install harness bracket to engine.
- Feed harness into inner wing area.
- Install fusebox to bracket.
- Install earth lead to fusebox.
- Install battery lead to fusebox (1x nut and rubber cover).
- Install multiplugs to fuse box.
- Remove injectors from manifold.
Parts & tools for this job For 2005 Aston Martin V8 Vantage
- PARTEngine gasket setSearch: Aston Martin V8 Vantage 2005 engine gasket set
- TOOLTorque wrenchSearch: 3/8 inch torque wrench
- TOOLFeeler gauge setSearch: feeler gauge set
Links open Amazon search results in a new tab. As an Amazon Associate I earn from qualifying purchases.