
Maintenance
- Make
- Aston Martin
- Model
- V8 Vantage Factory Workshop Manual
- Year
- 2005–2010
- Section
- Hand Brake › Maintenance
06 Brake systemMaintenance
Maintenance
RH/LH Handbrake Caliper-Renew
| Repair Operation Time (ROT) | |
|---|---|
| Item | Code |
| Handbrake Caliper-Renew | RH 06.05.AB |
| Handbrake Caliper-Renew | LH 06.05.BB |
WARNING BEFORE MOVING OFF, OPERATE THE HANDBRAKE 2 OR 3 TIMES TO ENSURE THE HANDBRAKE WORKS CORRECTLY. HANDBRAKE CALIPER PISTONS MAY REQUIRE TRAVEL TO CONTACT THE BRAKE PADS AND DISC.
Removal
- Raise vehicle on ramp.
- Remove road wheel/s.
- Ensure handbrake lever is fully released.
- Release handbrake adjustment (both sides).
- Release inner cable eyelet from lever, compress ring clip (special tool) and remove cable (see Fig. 1).
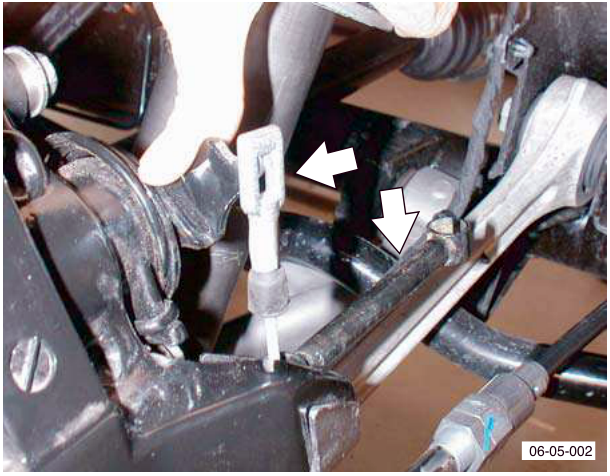
ALWAYS USE A VACUUM BRUSH OR AQUEOUS BRAKE CLEANER TO REMOVE BRAKE DUST. NEVER USE COMPRESSED AIR.
- Remove brake pad retaining pins and anti-rattle spring.
- Remove pads and shims from Caliper.
- Remove Caliper bolts (x2) and Caliper.
Installation
- Clean pads, pins and spring.
- Install new Caliper, secure bolts (x2) and tighten.
- Apply anti-seize compound to pads, pins and shims.
- Install pads into Caliper.
- Install retaining pins and spring to Caliper.
- Operate lever on Caliper until pads contact disc.
- Install cable to Caliper.
Handbrake Lever Assembly-Renew
| Repair Operation Time (ROT) | |
|---|---|
| Item | Code |
| Handbrake Lever Assembly-Renew | 06.05.CB |
Removal
- Remove driver's seat (see Workshop Manual procedure 01.10.AB Seat Assembly - Front - LH - Remove for Access and Refit).
- Raise vehicle on ramp.
- Remove road wheel/s.
- Release handbrake adjustment (both sides).
- Remove warning light switch Lucar connection.
- Remove handbrake lever bracket (4 x bolts).
- Remove clevis pin and clip from lever.
Installation
- Install cable to lever.
- Install lever to body (bolts x4) and tighten).
- Connect warning light switch Lucar connection.
- Install driver's seat (see Workshop Manual procedure 01.10.AB Seat Assembly - Front - LH - Remove for Access and Refit).
- Adjust handbrake cable (see Workshop Manual procedure 06.05.DC Handbrake Cable Assembly - Renew).
Handbrake Pad Set-Renew
| Repair Operation Time (ROT) | |
|---|---|
| Item | Code |
| Handbrake Pad Set-Renew | 06.05.DB |
Removal
- Raise vehicle on ramp.
- Remove road wheel/s.
- Ensure handbrake lever is fully released.
- Release handbrake adjustment (both sides).
- Remove brake pad retaining pins and anti-rattle spring.
- Remove pads from Caliper.
ALWAYS USE A VACUUM BRUSH OR AQUEOUS BRAKE CLEANER TO REMOVE BRAKE DUST. NEVER USE COMPRESSED AIR.
Installation
- Clean pads, pins and spring.
- Install new Caliper, secure bolts (x2) and tighten.
- Apply anti-seize compound to pads, pins and shims.
- Install pads into Caliper.
- Install retaining pins and spring to Caliper.
- Operate lever on Caliper until pads contact disc.
- Install cable to Caliper.
Adjust handbrake cable (see Workshop Manual procedure 06.05.DC Handbrake Cable Assembly - Renew).
- Install road wheel/s.
- Lower vehicle on ramp.
Parts & tools for this job For 2005 Aston Martin V8 Vantage
- PARTOil filterSearch: Aston Martin V8 Vantage 2005 oil filter
- TOOLOil filter wrenchSearch: oil filter wrench
- FLUIDEngine oilSearch: Aston Martin V8 Vantage engine oil
Links open Amazon search results in a new tab. As an Amazon Associate I earn from qualifying purchases.