
A2
| Turbocharger for vehicles with engine code letters ATL, BHC - exploded view |
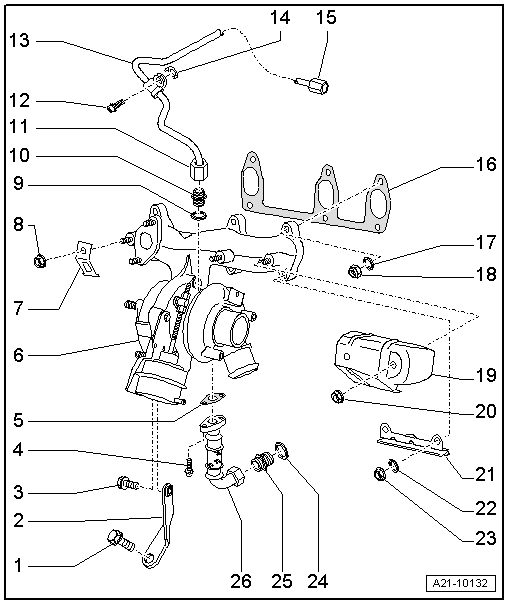
| 1 - | Bolt |
| q | 25 Nm |
| 2 - | Support |
| q | For turbocharger |
| 3 - | Bolt |
| q | 20 Nm |
| 4 - | Bolt |
| q | 15 Nm |
| 5 - | Gasket |
| q | Renew |
| 6 - | Turbocharger |
| q | Checking charge pressure → Chapter |
| q | Removing and installing → Chapter |
| q | Can only be renewed together with exhaust manifold and vacuum unit as one unit |
| 7 - | Bracket |
| q | For oil supply pipe |
| 8 - | Nut |
| q | 10 Nm |
| 9 - | Seal |
| q | Renew |
| 10 - | Connection |
| q | 30 Nm |
| 11 - | Union nut |
| q | 22 Nm |
| q | Note installation sequence: |
| – | First attach both ends of pipe loosely. |
| – | Then tighten connections to final torque. |
| – | Finally, secure bracket. |
| 12 - | Bolt |
| q | 10 Nm |
| 13 - | Oil supply pipe |
| q | From oil filter bracket |
| q | Check for continuity |
| q | Before installing, fill turbocharger with engine oil at connection for oil supply pipe. |
| q | 22 Nm |
| q | Note installation sequence: |
| – | First attach both ends of pipe loosely. |
| – | Then tighten connections to final torque. |
| – | Finally, secure bracket. |
| 14 - | Square nut |
| 15 - | Union nut |
| q | 22 Nm |
| q | Note installation sequence: |
| – | First attach both ends of pipe loosely. |
| – | Then tighten connections to final torque. |
| – | Finally, secure bracket. |
| 16 - | Gasket |
| q | Renew |
| q | Coating (bead) faces intake manifold |
| q | Installation position: straight edge of gasket faces downwards |
| 17 - | Washer |
| 18 - | Nut |
| q | Renew |
| q | 25 Nm |
| 19 - | Heat shield |
| 20 - | Nut |
| q | Renew |
| q | 22 Nm |
| 21 - | Bracket |
| q | For heat shield |
| 22 - | Washer |
| 23 - | Nut |
| q | Renew |
| q | 22 Nm |
| 24 - | Seal |
| q | Renew |
| 25 - | Connection |
| q | 40 Nm |
| 26 - | Oil return pipe |
| q | To cylinder block |
| q | 30 Nm |