audi Workshop Repair Guides

Audi Workshop Service and Repair Manuals

Removing and installing track rod ball joints > < Removing
Installing
Installing
  Caution
After installation of steering box, check position of steering wheel by test-driving vehicle, or check wheel alignment.
  Note!
t  For tightening torques, refer to → Chapter onwards.
t  When securing pipe connections, make sure pipes to not contact or rub against other components.
t  New steering boxes are supplied complete with track rods and rubber boots.
t  Before installing the power steering box, check the centre position of the rack and adjust if necessary.
t  Do not attach universal joint of steering column to steering box pinion until vehicle is standing on ground and wheels are set to straight-ahead position.
   
–  Measure distance -a- to check whether steering box is in centre position.
a - = 67 mm for vehicles with 1.2 TDI running gear; if necessary adjust by turning steering box pinion.
a - = 72.5 mm for vehicles with basic running gear; if necessary adjust by turning steering box pinion.
1 - Power steering box
2 - Track rod
–  Place steering box on subframe and install new bolts hand-tight.
–  Check correct positioning of sealing collar at steering box pinion.
–  Align subframe with pins from -T10096- installed in the body.
–  Raise the subframe enough to allow the expansion hose, return line and wiring for power steering sensor -G250- (if fitted) to be installed on the power steering box without tension.
–  Install power steering sensor -G250- (if fitted) in the steering box.
–  Connect return line to rotary slide valve housing with a new O-ring.
–  Connect expansion hose to rotary slide valve housing with new seals.
–  Raise subframe and, at the same time, guide steering box pinion into opening in floor of vehicle.
–  Install subframe → Chapter.
  A48-0350
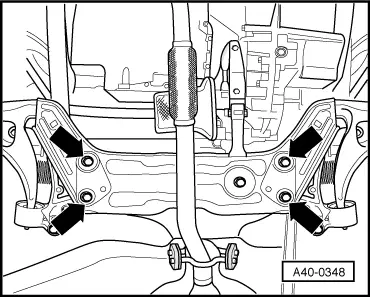
–  Tighten hexagon bolts for steering box to specified tightening torque and then turn through specified angle -arrows-.
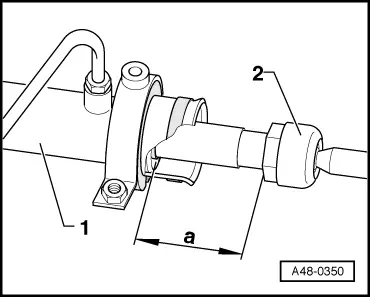
–  Insert track rods in steering arms and secure in place. If the joint pin turns when tightening, counterhold with 6 mm hexagon key.
–  Install swivel joints → Chapter.
–  Install front left wheel housing liner → General body repairs, exterior; Rep. Gr.66.
–  Fit and secure wheels → Chapter.
–  Install noise insulation → General body repairs, exterior; Rep. Gr.50.
–  Push universal joint onto steering pinion and secure with new bolt (tighten to 20 Nm, then turn through a further 90°).
–  Install cover.
–  Install floor mat on driver's side → General body repairs, interior; Rep. Gr.70.
–  Connect battery → Electrical system; Rep. Gr.27.
–  Fill up with hydraulic fluid and bleed steering system → Chapter.
–  Test-drive vehicle.
  Caution
If, after the test drive, the steering wheel is misaligned with the wheels in the straight-ahead position, wheel alignment must be checked and adjusted if necessary.
–  Check and adjust wheel alignment → Chapter.
  A40-0348

Removing and installing track rod ball joints > < Removing