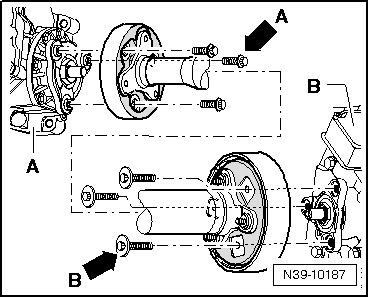
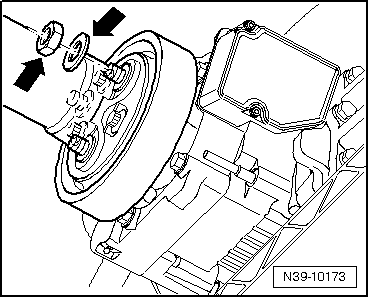
audi Workshop Repair Guides

Audi Workshop Service and Repair Manuals

Removing and installing flexible coupling (rear) > < Removing propshaft with detachable centre bearing (up to 05.07)
Installing propshaft with detachable centre bearing (up to 05.07)
Installation is carried out in reverse sequence; note the following:
  Note
t  All parts of the propshaft marked in relation to each other must be reinstalled in the same position.
   
t  The seals -arrow- in flanges of the propshaft must not be damaged when removing and installing. If seals are damaged, the propshaft must be renewed.
t  Ensure propshaft is horizontal when pushing it onto centring pin.
Installation position:
t  Three projecting sleeves on the gearbox flange / rear final drive flange and propshaft flange engage in mounting holes of flexible coupling.
  V39-1817
–  Attach propshaft to rear final drive so that the markings -arrows- align.
  N39-0836
Take note of the correct fitting locations for the various flange bolts.
  N39-10187
Flange bolt withFitting location
small collar -arrow A-Propshaft to front final drive -A-. Tightening torque → Item
large collar -arrow B-Propshaft to rear final drive -B-. Tightening torque → Item
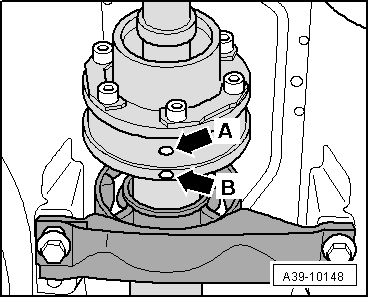
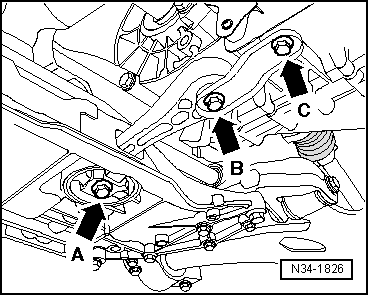
   
Make sure that the markings on the constant velocity joint/propshaft -arrow A- and -arrow B- are in line.
  A39-10148
–  Secure front propshaft tube to rear propshaft tube -arrows-. Tightening torque → Item
  A39-0290
Stress-free installation of centre bearing:
l  Make sure that all propshaft bolts have been tightened.
–  Position the centre bearing in its elongated holes so that the propshaft and centre bearing are not under stress.
–  Tighten bolts with washers -1-. Make sure the bolts with washers -1- are within the four centring tabs on heat shield -2-. Tightening torque → Item
  A37-10006
–  First secure pendulum support to gearbox -arrows B and C-, then on subframe -arrow A-.
  N34-1826
Component Nm
Pendulum support to:Gearbox -arrows B and C-40 Nm + 90° 1)
 Subframe -arrow A-100 Nm + 90° 1)
1) Renew bolts

   
–  Install exhaust system and perform stress-free alignment → Rep. gr.26.
–  If fitted, install cross member on underbody -arrows- → Rep. gr.26.
–  Install noise insulation → Rep. gr.66.
  Note
  A26-0734
t  If droning noises occur during driving, note the following:
t  Remove balancing nut and balancing washer -arrows-.
t  Then, if necessary, unbolt propshaft with flexible coupling from flange for propshaft on rear final drive, rotate one hole further and screw in again.
t  If the droning noises can still be heard, the propshaft must again be rotated and screwed back on.
  N39-10173

Removing and installing flexible coupling (rear) > < Removing propshaft with detachable centre bearing (up to 05.07)