audi Workshop Repair Guides

Audi Workshop Service and Repair Manuals

Exploded view of sun blind > < Removing and installing cap
Removing and installing rear shelf
Special tools and workshop equipment required
   
t  Removal lever -80 - 200-
  W00-0353
Removing
–  Equipment version with folding rear seat backrest: Fold down rear seat backrest.
–  Equipment version with fixed rear seat backrest: Remove fixed rear seat backrest → Chapter.
–  Equipment version with fixed rear seat backrest: Remove centre belt guide (rear) → Chapter.
–  Equipment version with fixed rear seat backrest: Remove centre belt end fitting (rear) → Chapter.
–  Remove D-pillar trim panels → Chapter.
–  Remove loudspeaker trim → Chapter.
–  Equipment version with loudspeaker: Unscrew bolts -1 ... 4-.
  A70-10823
–  Equipment version with additional fastening: Remove bolt -arrow- on left of rear shelf (beneath loudspeaker trim).
  A70-10909
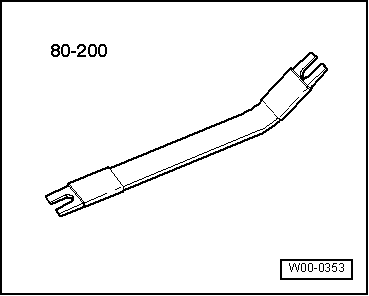
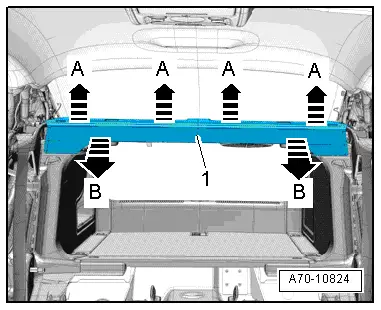
–  Unclip rear shelf at front with removal lever -80 - 200--arrows A-.
–  Disengage rear shelf on left and right at belt guides (rear).
–  Equipment version with sun blind: Disengage rear shelf from rear of sun blind.
–  Pull rear shelf forwards -arrows B- and take out.
Installing
Installation is carried out in the reverse order; note the following:
  Note
t  If there are still clips for the rear shelf in the body mounting points, they must be removed and inserted in the rear shelf during installation.
t  Check the clips for damage or deformation and renew them if necessary.
–  Insert rear shelf at rear in rear window frame.
–  Equipment version with sun blind: Engage rear shelf at sun blind.
–  Press on rear shelf at front until it engages audibly.
For tightening torque see → Chapter, → Fig. and → Rep. gr.91.
  A70-10824

Exploded view of sun blind > < Removing and installing cap