
A4 Mk3
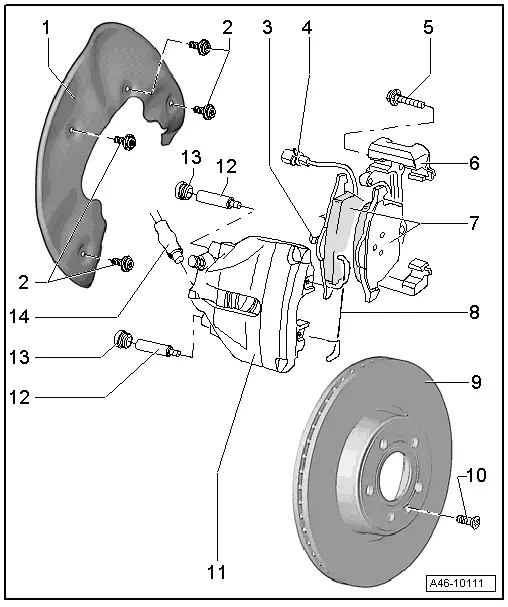
| 1 - | Splash plate for brakes |
| 2 - | Bolt |
| q | 18 Nm |
| 3 - | Spring |
| q | Must be seated in brake piston |
| 4 - | Connector |
| q | When renewing pads, remove from bracket |
| 5 - | Bolt |
| q | 196 Nm |
| 6 - | Brake carrier |
| q | Bolt to wheel bearing housing |
| 7 - | Brake pads |
| q | Wear limit → Chapter |
 Note
Note| The inner pad (with spring) has an arrow. The arrow must point in direction of brake disc rotation when moving forwards. May create noises if incorrectly installed. |
| q | Before inserting pads, clean guide surfaces and apply a thin coating of polycarbamide grease -G 052 142 A2-. |
Note| If fitted, pull off adhesive foil on back of brake pad before installation. |
| q | Brake pad wear indicator at front left |
| q | Warning lamp in instrument cluster comes on when wear limit is reached |
| q | Always renew on both sides of axle |
| q | Removing and installing → Chapter |
| q | Checking pad thickness → Booklet811 |
| q | Different versions available → ETKA |
Note| Clean the brake calipers thoroughly (grease-free) before inserting new brake pads. When doing this, make sure that all adhesive foil residue on the contact surfaces for the outer brake pad is removed. |
| 8 - | Retaining spring |
| q | Before inserting pads, clean guide surfaces and apply a thin coating of polycarbamide grease -G 052 142 A2-. |
| q | Insert in both holes in brake caliper housing |
Note| The retaining spring must be pressed under the brake carrier after inserting into both holes. If incorrectly installed, the wear of the outer pad cannot be adjusted, and the pedal travel will be increased as a result. |
| 9 - | Brake disc |
| q | Wear limit → Chapter |
| q | Always renew on both sides of axle |
| q | Detach brake caliper prior to removing |
| q | Removing and installing → Chapter |
| 10 - | Bolt |
| q | 5 Nm |
| 11 - | Brake caliper housing |
| q | Unscrew from brake carrier to renew brake pads |
| q | Servicing brake caliper → Chapter |
| 12 - | Guide pin |
| q | 30 Nm |
| 13 - | Protective cap |
| q | Detach when removing guide pins |
| q | Re-install after fitting guide pins |
| 14 - | Brake hose |
| q | Do not disconnect brake hose when changing brake pads |
| q | Screw into brake caliper housing |
| q | Connection to brake caliper, 20 Nm |