
A4 Mk3
 Note
Note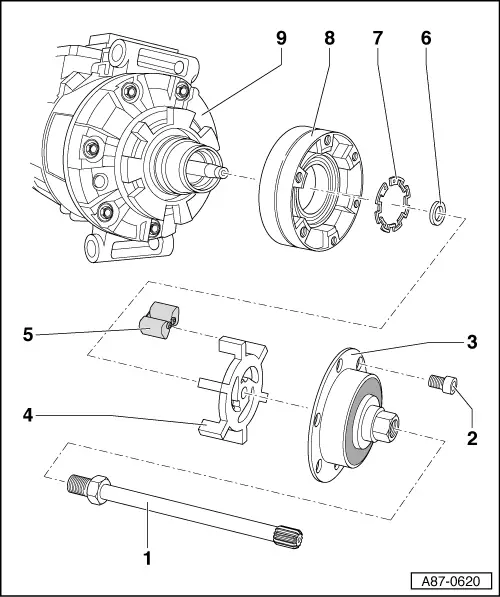
| 1 - | Air conditioner compressor drive shaft |
| q | Check; after tightening the screw connection, the drive shaft must engage snugly in the splines of the drive gear → Chapter. |
| q | Tightening torque 60 Nm |
| q | Unfastening and tightening → Chapter |
| q | Removing and installing → Chapter |
| q | Lubricate the drive gear splines with grease -G 000 100- for example → Electronic parts catalogue. |
| 2 - | Hexagon socket head bolt |
| q | Tightening torque 10 Nm |
| 3 - | Drive plate |
| q | With overload safeguard; this is tripped in the event of excessive torque (e.g. stiff air conditioner compressor) and the drive shaft just free-wheels without driving the air conditioner compressor. |
| q | Checking concentricity and adjusting → Chapter |
| q | Detaching/attaching → Chapter |
| 4 - | Drive plate |
| q | Screwed to the air conditioner compressor drive shaft |
| q | With overload safeguard; this is tripped in the event of excessive torque (e.g. stiff air conditioner compressor) and the drive shaft just free-wheels without driving the air conditioner compressor. |
| q | Tightening torque 30 Nm |
| q | Detaching/attaching → Chapter |
| 5 - | Rubber element |
| q | Isolates the drive unit and thus damps vibration and noise |
| q | On installation, moisten rubber elements slightly with soap solution for example to provide lubrication |
| q | Detaching/attaching → Chapter |
| 6 - | Spacer |
| q | Genuine spacer must be fitted |
| q | Dimensions: 17.5 x 10 x 3 mm |
| 7 - | Circlip |
| q | Replace |
| q | Ensure correct positioning (flat side facing air conditioner compressor) |
| q | Removing and installing → Chapter |
| 8 - | Drive plate |
| q | With rolling bearing |
| q | Detaching/attaching → Chapter |
| q | Clean the air conditioner compressor flange before fitting the drive plate. |
| 9 - | Air conditioner compressor |
| q | Different models may be fitted depending on engine and country version → Electronic parts catalogue |