audi Workshop Repair Guides

Audi Workshop Service and Repair Manuals

Cylinder head - exploded view > < Removing and installing cylinder head cover (left-side)
Removing and installing cylinder head cover (right-side)
   
Removing and installing cylinder head cover (right-side)
Special tools and workshop equipment required
t  Removal lever -80 - 200-
t  Open end spanner insert, AF 17 -V.A.G 1331/6-
t  Puller -T10055- with -T10055/1-
t  Socket -T40055-

   
Removing
–  Remove engine cover panel -arrows-.
–  Disconnect vacuum line -1-.
  A10-10890
–  Remove air cleaner housing → Rep. gr.23.
–  Unplug electrical connector at glow plug for cylinder 1.
  A10-10821
–  Unplug electrical connectors -1 ... 7- and use removal lever -80 - 200- to move electrical wiring clear.
  A15-10421
–  Mark high-pressure pipes to ensure they are re-connected to the same injectors.
  Caution
Protect fuel system against contamination.
Rules for cleanliness when working on the injection system → Chapter.
–  Loosen union nuts for high-pressure pipes -1 ... 6- using tool insert, AF 17 -V.A.G 1331/6- and socket -T40055- and detach high-pressure pipes.
  A15-10422
–  Pull release pins upwards -arrow- and pull return line connections off injectors.
–  Remove pressure retention valve -1- from retainer and move clear to one side with fuel hoses connected.
  Note
  A15-10425
The next illustrations show the left-side cylinder head cover.
–  Remove bolts -arrows- for cover plates for injectors.
–  Pull cover plates upwards and turn through 90°.
  A15-10031
–  Remove bolts -arrows- for injectors.
  A15-10032
  Caution
Used injectors must always be re-installed on the same cylinder.
Identify cylinder numbers on corresponding injectors.
–  Pull out injectors using puller -T10055- with adapter -T10055/1-.
  A15-10033
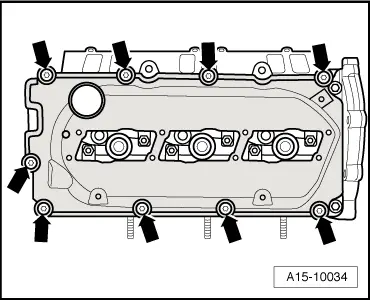
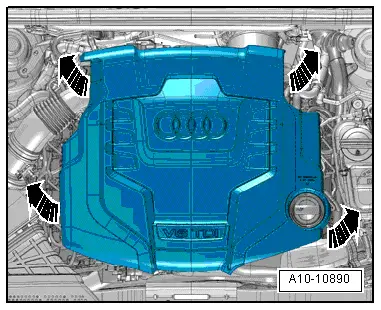
–  Loosen bolts -arrows- on cylinder head cover in diagonal sequence.
–  Remove bolts and take off cylinder head cover.
Installing
Installation is carried out in the reverse order; note the following:
l  Tightening torque → Chapter „Cylinder head cover - exploded view“
  Note
t  Renew gasket for cylinder head cover if damaged.
t  Renew bolts for cylinder head cover if seals on bolts are damaged.
t  Hose connections and air pipes and hoses must be free of oil and grease before assembly.
t  Secure all hose connections with the correct type of hose clips (same as original equipment) → Electronic parts catalogue.
t  To ensure that the air hoses can be properly secured at their connections, spray rust remover onto the worm thread of used hose clips before installing.
–  Clean sealing surfaces; they must be free of oil and grease.
–  Tighten bolts for cylinder head cover in diagonal sequence and in stages.
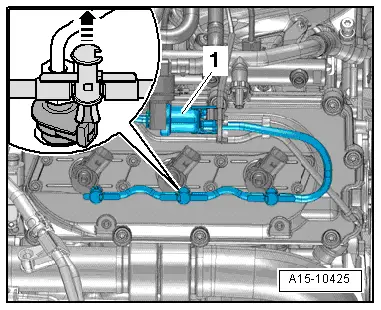
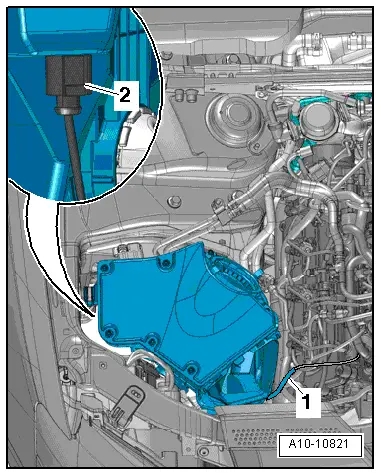
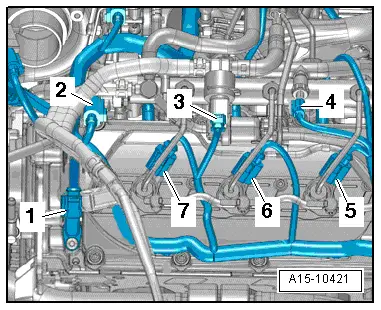
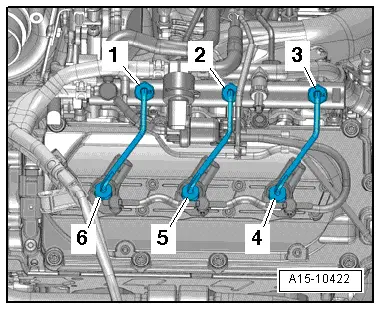
–  Install injectors, high-pressure pipes, air cleaner housing and exhaust gas pressure sensor 1 -G450- → Rep. gr.23.
–  Check fuel system for leaks → Chapter.
  A15-10034

Cylinder head - exploded view > < Removing and installing cylinder head cover (left-side)