Audi Workshop Service and Repair Manuals
HOME
FEATURES
MENU
INDEX
ABOUT US
Removing and installing 4-position relay and fuse carrier with screw connection >
< Removing and installing fuse carrier in dash panel (left-side)
A4 Mk3
Vehicle electrics
Electrical system
Wiring
Relay carriers, fuse carriers (vehicle interior)
Removing and installing 3-position relay and fuse carrier
Removing and installing 3-position relay and fuse carrier
Removing and installing 3-position relay and fuse carrier
Removing
–
Switch off ignition and take out ignition key.
–
Remove dash panel trim (driver's side)
→ Rep. gr.68
.
–
Press retaining springs in direction of
-arrow-
, disengage 3-position relay and fuse carrier
-1-
and detach.
–
Unclip fuse holders at relay and fuse carrier.
–
Pull out relays and control units.
–
Release retaining clips
-arrows-
and press out relay carrier
-2-
towards rear out of holder
-1-
.
Note
Exact assignment of contacts in 3-position relay and fuse carrier can be found in relevant current flow diagram
→ Current flow diagrams, Electrical fault finding and Fitting locations
.
Installing
Installation is carried out in the reverse order; note the following:
–
Install dash panel trim (driver's side)
→ Rep. gr.68
.
Vehicle electrics
Electrical system
Wiring
Relay carriers, fuse carriers (vehicle interior)
Removing and installing 3-position relay and fuse carrier
Removing and installing 4-position relay and fuse carrier with screw connection >
< Removing and installing fuse carrier in dash panel (left-side)

 Note
Note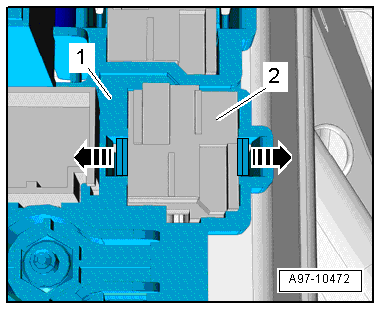
 Note
Note