audi Workshop Repair Guides

Audi Workshop Service and Repair Manuals

Brakes, hydraulics, regulator, servo > < Front brakes (PR 1LM)
Removing and installing brake pads for ceramic brakes (PR 1LW)
Removing
  Note
t  The brake caliper does not have to be detached in order to remove the brake pads.
t  Mark brake pads when removing them if they are to be reinstalled. Reinstall in their original position to prevent uneven braking.
The ceramic brake discs must always be checked for damage and wear when renewing the brake pads.
t  Checking ceramic brake discs for damage → Chapter
t  Assessing degree of wear on ceramic brake discs → Chapter
–  Raise the vehicle.
–  Remove wheels.
  Caution
On vehicles with ceramic brakes the wheel must not be allowed to drop onto the brake disc. This would cause irreparable damage to the disc. Screw two assembly pins (from vehicle tool kit) into the wheel bolt holes when removing and fitting a wheel. Insert the long assembly pin into the top hole.
–  Secure brake disc with one wheel bolt.
   
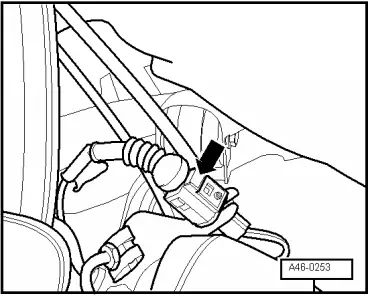
–  Unplug connector for brake pad wear indicator as shown in illustration.
  A46-0253
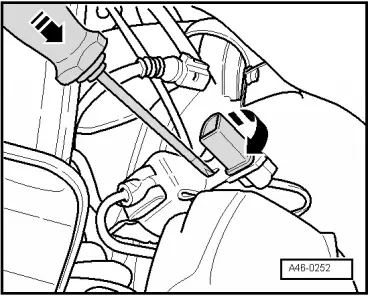
–  Turn connector 90° while using a screwdriver to release connector from bracket.
–  Pull connector upwards out of bracket and detach wire.
  Note
The brake caliper does not have to be detached in order to remove the brake pads.
  A46-0252
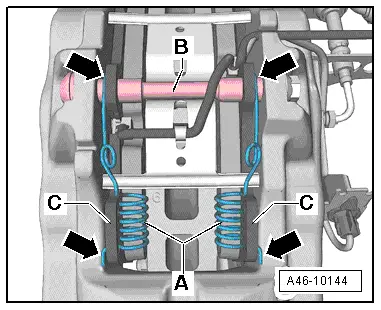
–  First disengage damper springs -A- (left and right) from guide pin -B- using commercially available pliers.
–  Then pull damper springs -A- out of brake pads -C-.
–  Remove bolt for guide pin -B-.
–  Pull guide pin out of brake pads and brake caliper.
  WARNING
Retaining spring is under tension and could cause injury when pulling out the guide pin if suitable precautions are not taken.
  A46-10144
–  Disengage pad wear indicator wire from retaining spring -2-.
  Note
Before removing old brake pads, press pistons back into cylinders with resetting appliance. Before pressing the pistons back, draw off brake fluid from the reservoir with a bleeder bottle. Otherwise, fluid can overflow and cause damage, particularly if the reservoir has been topped up.
  WARNING
Brake fluid is poisonous and must NOT be drawn off by sucking through a hose.
–  Remove retaining spring -2-.
–  Remove brake pads from brake caliper housing.
Use only methylated spirits to clean the brake caliper housing.
Installing
–  Insert brake pads into brake caliper.
  Note
The brake pad with the wear indicator wire is located on the inside.
  A46-10143
–  Insert retaining spring in brake caliper housing -2-.
–  Press guide pin -3- through brake caliper and brake pads.
  WARNING
After introducing the guide pin, the retaining spring must be pressed underneath the guide pin so that it is under tension. If the retaining spring is fitted incorrectly, the brake pads will be out of position and the function of the brakes will be impaired.
–  Tighten bolt -18- for guide pin to specified torque.
  A46-10143
–  First engage damper springs -A- (left and right) in bottom hole in corresponding brake pads -C-.
–  Then engage damper springs -A- (left and right) in guide pin -B- using commercially available pliers.
  Caution
Make sure that the damper springs are fitted correctly at the guide pin and brake pads.
  A46-10144
Installation position of damper springs at guide pin and brake pads -arrows-
–  Connect wear indicator connector and insert wire in dust cap and protective cap.
  Note
  A46-10144
It is important to ensure that the pad wear indicator wire is inserted in the retaining spring -2-.
–  Insert pad wear indicator wire in retaining spring -2-.
–  Fit wheels → ELSA/ Wheels and Tyres Guide → Rep. gr.44.
–  Check brake fluid level and top up if necessary.
  Caution
After installing the brake pads and before driving the vehicle, depress brake pedal firmly several times with the vehicle stationary, so that the brake pads are properly seated in their normal operating position.
  Caution
Before driving vehicle for the first time, make sure function of brakes is OK.
  A46-10143

Brakes, hydraulics, regulator, servo > < Front brakes (PR 1LM)