
Alternator - r+r
- Make
- Fiat
- Model
- Doblò Factory Service Manual
- Year
- 2000–2010
- Section
- Current generator › Alternator - r+r
Alternator - r+r
Removing
Disconnect the battery negative terminal.
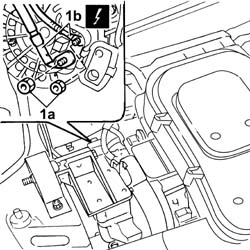
1. Undo the fixing nuts (1a) and disconnect the alternator wiring (1b).
| Name | Connector | |
|---|---|---|
| 1b | Alternator | See A010 ALTERNATOR |
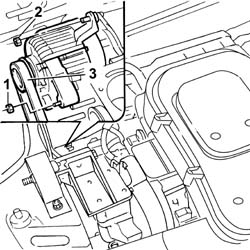
1. Loosen the alternator bottom nut.
2. Loosen the alternator upper nut.
3. Rotate the alternator in a clockwise direction and remove the auxiliary shaft drive belt.
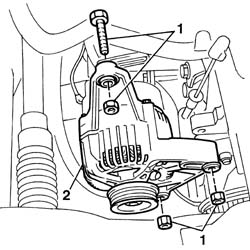
1. Unscrew the retaining bolts and nut.
2. Remove the complete alternator from the top of the engine compartment.
Refitting
Position the complete alternator in its housing and secure it by tightening the fixing bolts.
Check belt condition. In particular, check for tears, cracks, surface wear and dry or hard parts that could lead to loss of grip. Change the belt if one of these defects is noted.
Fit the new alternator drive belt on the pulleys.
Rotate the alternator in an anti-clockwise direction and secure it using the bolts.
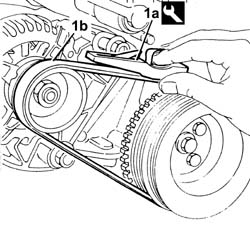
1. Use tool (1a) and check that the tension of new belt (1a) is within the recommended values.
| Name | Country | |
|---|---|---|
| 1a | Torque wrench | 1.895.762.000 |
| Measurement | Value | ||
|---|---|---|---|
| Alternator drive belt tensioning (daNm) | 30 - 35 | ||
| New belt (-) | |||
Tighten the alternator bolts to torque.
| Fastening | Component | Ø | Value (daNm) | |
|---|---|---|---|---|
| Bolt | ALTERNATOR ASSEMBLY | M10 | 5 |
| Fastening | Component | Ø | Value (daNm) | |
|---|---|---|---|---|
| Bolt | ALTERNATOR ASSEMBLY | M12 | 8 |
Connect the alternator wiring and tighten the fixing nuts.
| Name | Connector | |
|---|---|---|
| Alternator | See A010 ALTERNATOR |
| Fastening | Component | Ø | Value (daNm) | |
|---|---|---|---|---|
| Nut | ALTERNATOR ECU LEAD/S | M8 | (Cable B+) 2.4 |
Connect the negative battery terminal and close the bonnet lid.
Removing
Place the car on a ramp.
Disconnect the battery negative terminal.
| Name | Connector | |
|---|---|---|
| Battery | See A001 BATTERY |
Op. 4450B04 RIGHT FRONT WHEEL - R.R.
Op. 7055B54 PROTECTION/GUARD UNDER ENGINE - R.R.
Op. 1092B50 ALTERNATOR/WATER PUMP DRIVE BELT - R.R.
Op. 1092C10 POWER STEERING AND/OR SELF-LEVELLING SUSPENSION PUMP DRIVE BELT - R + R
Op. 1080B94 FRONT LAMBDA SENSOR AT CATALYTIC CONVERTER - R.R.
Op. 1072C44 EXHAUST MANIFOLD HEAT SHIELD R+R
Op. 1088C10 WATER PUMP - R + R
Op. 1092B82 AUXILARY BELT MOVING TENSIONER (ONE) -R+R
1. Raise the lift, undo the fixing nuts (1a) and disconnect the alternator cables (1b).
| Name | Connector | |
|---|---|---|
| 1b | Alternator | See A010 ALTERNATOR |
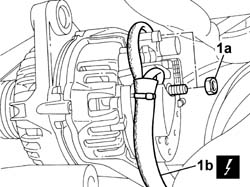
1. Undo and remove the alternator bottom bolt, then rest the alternator on the half shaft.
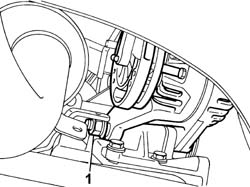
1. Lower the lift and remove the alternator from the engine compartment.
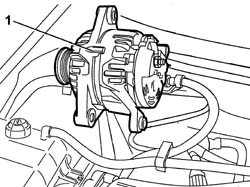
Refitting
Fit the alternator in its seating and secure it with the fixing bolt then tighten it to the specified torque.
| Fastening | Component | Ø | Value (daNm) | |
|---|---|---|---|---|
| Bolt | ALTERNATOR ASSEMBLY | M12 x 1.25 | 8.5 |
Raise the lift, connect the alternator cables and tighten the nuts.
| Name | Connector | |
|---|---|---|
| Alternator | See A010 ALTERNATOR |
Op. 1092B82 AUXILARY BELT MOVING TENSIONER (ONE) -R+R
Op. 1088C10 WATER PUMP - R + R
Op. 1072C44 EXHAUST MANIFOLD HEAT SHIELD R+R
Op. 1080B94 FRONT LAMBDA SENSOR AT CATALYTIC CONVERTER - R.R.
Op. 1092C10 POWER STEERING AND/OR SELF-LEVELLING SUSPENSION PUMP DRIVE BELT - R + R
Op. 1092C12 POWER STEERING PUMP DRIVE BELT - ADJUST TENSION
Op. 1092B50 ALTERNATOR/WATER PUMP DRIVE BELT - R.R.
Op. 1092B54 ALTERNATOR/WATER PUMP DRIVE BELT - ADJUST TENSION
Op. 0010T20 ENGINE COOLANT - CHANGE
Op. 7055B54 PROTECTION/GUARD UNDER ENGINE - R.R.
Op. 4450B04 RIGHT FRONT WHEEL - R.R.
Connect the battery negative terminal.
| Name | Connector | |
|---|---|---|
| Battery | See A001 BATTERY |
Remove the car from the ramps.
Removing
Place the car on a lift.
Disconnect the battery negative terminal.
Op. 7055B54 PROTECTION/GUARD UNDER ENGINE - R.R.
Op. 4450B04 RIGHT FRONT WHEEL - R.R.
Op. 1092G10 SINGLE ENGINE BELT - R.R.
1. Undo the top retaining bolt joining the alternator to the reinforcement bracket.
2. Undo the lower engine block retaining bolt.
3. Remove the rear alternator reinforcement bracket.
3. Undo the lower alternator retaining bolt.
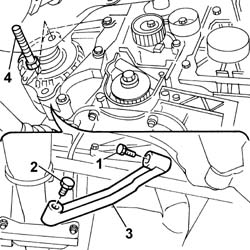
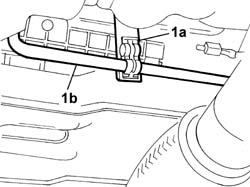
1. Open retaining band(1a) and place the rigid power steering pipes (1b) to one side.
Take care not to damage the rigid pipe.
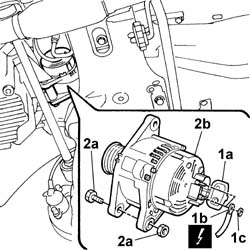
1. Open the protective cover (1a) and disconnect the alternator electrical leads(1b) by undoing nuts (1c).
| Name | Connector | |
|---|---|---|
| 1b | Alternator | See A010 ALTERNATOR |
2. Undo the bottom bolt (2a) and remove the alternator (2b).
Refitting
Fit the alternator in its housing and connect the electrical leads. Secure leads using the nuts.
| Name | Connector | |
|---|---|---|
| Alternator | See A010 ALTERNATOR |
| Fastening | Component | Ø | Value (daNm) | |
|---|---|---|---|---|
| Nut | ALTERNATOR ASSEMBLY | M8 | (recharging cable B+) 2.4 |
Close the protective cover for the alternator connections.
Tighten the lower alternator retaining bolt.
| Fastening | Component | Ø | Value (daNm) | |
|---|---|---|---|---|
| Nut | ALTERNATOR ASSEMBLY | M12 x 1.25 | (lower bolt) 7 |
Fit the power steering rigid pipe and secure it to the retaining band.
Tighten the upper alternator retaining bolt.
| Fastening | Component | Ø | Value (daNm) | |
|---|---|---|---|---|
| Nut | ALTERNATOR ASSEMBLY | M10 x 1.25 | (upper bolt) 5 |
Position the rear alternator reinforcement bracket and tighten the retaining bolts.
Op. 1092G10 SINGLE ENGINE BELT - R.R.
Op. 4450B04 RIGHT FRONT WHEEL - R.R.
Op. 7055B54 PROTECTION/GUARD UNDER ENGINE - R.R.
Connect the negative battery terminal and rmove the vehicle from the lift.
Removing
Ensure that the ignition key is in the stop position, then disconnect the battery negative terminal.
| Name | Connector | |
|---|---|---|
| Battery | See A1B BATTERY ( BATTERY POSITIVE ) |
Proceed with removal
Op. 7055B54 PROTECTION/GUARD UNDER ENGINE - R.R.
Proceed with removal
Proceed with removal
Op. 1076B50 EXHAUST PIPE ATTACHMENT TO ENGINE/MANIFOLD - R + R
1. Remove the bevel and undo the nut fixing the right driveshaft to the wheel hub.
Op. 4450B04 RIGHT FRONT WHEEL - R.R.
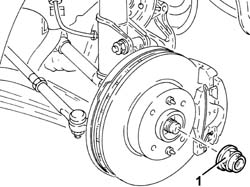
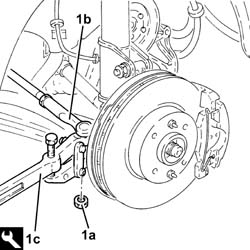
1. Undo the nut (1a) and disconnect the track rods (1b) from the steering knuckles usiing the tool (1c).
| Name | Country | |
|---|---|---|
| 1c | Head extractor | 1.847.035.000 |
1. Undo the bolts fixing the intermediate driveshaft to the support.
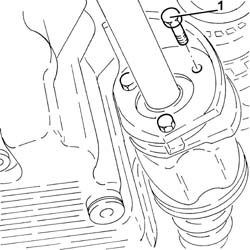
1. Release the right driveshaft (1a), complete with intermediate driveshaft (1b) and remove it.
2. Remove the dust excluder.
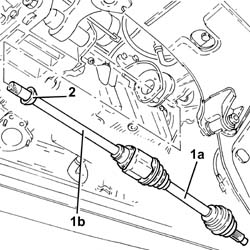
Proceed with removal
Op. 1092G10 SINGLE ENGINE BELT - R.R.
1. Disconnect the electrical connections from the alternator.
| Name | Connector | |
|---|---|---|
| 1 | Alternator | See A010 ALTERNATOR |
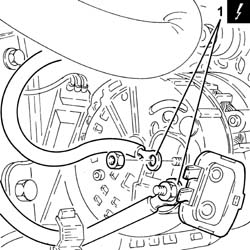
1. Undo the bolt (1a) and remove the electrical wiring mounting bracket (1b) from the intermediate shaft support.
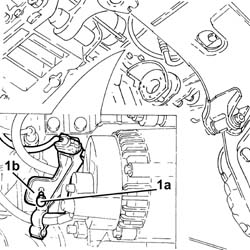
1. Undo the upper alternator fixing bolt.
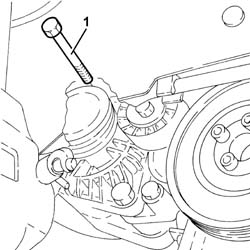
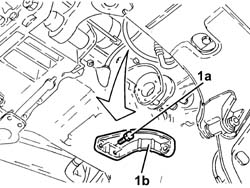
1. Undo bolts (1a) and remove the upper alternator mounting bracket (1b).
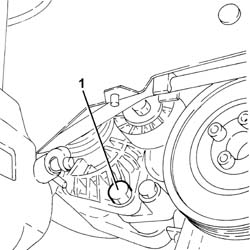
1. Loosen the lower alternator fixing bolt, then partly release the bolt.
1. Undo the bolts (1a) and remove the intermediate driveshaft mounting (1b).
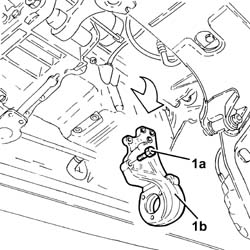
1. Completely release the lower bolt (1a) and remove the alternator (1b).
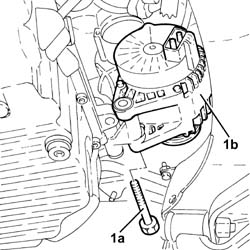
Refitting
Place the alternator back in its housing and support it using the lower bolt partly inserting it in its housing.
1. Place the intermediate driveshaft support (1a) back in its housnig and fix it tightening the bolts (1b) to the recommended torque.
| Fastening | Component | Ø | Value (daNm) | |
|---|---|---|---|---|
| 1b | Bolt | FRONT DRIVE SHAFT BEARING MOUNT | M10 | (Crankcase side) 4.5 ÷ 5.5 |
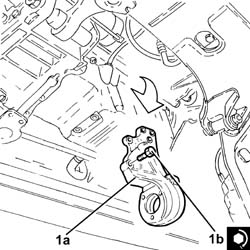
Completely fit the lower alternator fixing bolt and screw in the nut but do not fully tighten it.
Place the upper alternator mounting bracket back in its housing and fix it using the bolts.
Tighten the bolts fixing the alternator to the recommended torque.
| Fastening | Component | Ø | Value (daNm) | |
|---|---|---|---|---|
| Bolt | ALTERNATOR ASSEMBLY | M10 | (Support side) 4.5 ÷ 5.5 |
Connect the electrical connections to the alternator.
Place the electrical wiring mounting bracket in its housing on the intermediate shaft support and secure it using the bolt.
Proceed with refitting
Op. 1092G10 SINGLE ENGINE BELT - R.R.
Place the right driveshaft, complete with intermediate driveshaft and dust excluder back in its housing.
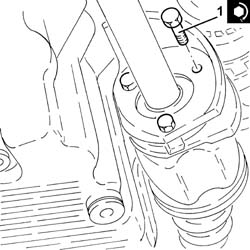
1. Tighten the bolt fixing the intermediate driveshaft to the support to the recommended torque.
| Fastening | Component | Ø | Value (daNm) | |
|---|---|---|---|---|
| 1 |
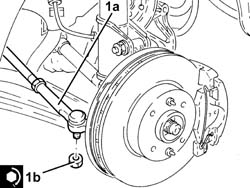
1. Connect the steering links (1a) to the front steering knuckles and tighten the nuts (1b) to the recommended torque.
| Fastening | Component | Ø | Value (daNm) | |
|---|---|---|---|---|
| 1b | Nut | POWER STEERNG BOX LINKS | M10 | (Wheel damper side) 4.5 ÷ 5.5 |
1. Tighten the nuts (1a) securing the front wheel hub to the right driveshaft to the recommended torque, using the angular tightening tool (1b).
| Fastening | Component | Ø | Value (daNm) | |
|---|---|---|---|---|
| 1a | Nut | DRIVESHAFT | M22 | (Wheel hub side) 7.0 + 55° |
| Name | Country | |
|---|---|---|
| 1b | Protractor | 1.860.942.000 |
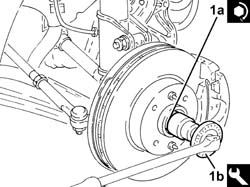
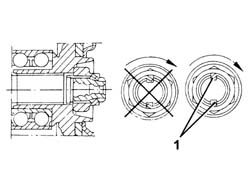
1. Bevel the collar of the nut in two places as shown in the figure.
Proceed with refitting
Op. 4450B04 RIGHT FRONT WHEEL - R.R.
Proceed with refitting
Proceed with refitting
Op. 1076B50 EXHAUST PIPE ATTACHMENT TO ENGINE/MANIFOLD - R + R
Connect the negative (-) battery terminal
Op. 7055B54 PROTECTION/GUARD UNDER ENGINE - R.R.
Removing
Position the car on the ramp.
Make sure that the ignition is OFF, then loosen the bolt and disconnect the battery negative (-) terminal.
| Name | Connector | |
|---|---|---|
| Battery | See A1H BATTERY ( ENGINE ) |
Proceed with removal
Op. 4450B04 RIGHT FRONT WHEEL - R.R.
Proceed with removal
Proceed with removal
Proceed with removal
Op. 1092C10 POWER STEERING AND/OR SELF-LEVELLING SUSPENSION PUMP DRIVE BELT - R + R
1. Undo the nuts (1a) and disconnect the electrical connections (1b) from the alternator.
Op. 1092G10 SINGLE ENGINE BELT - R.R.
| Name | Connector | |
|---|---|---|
| 1b | Alternator | See A010 ALTERNATOR |
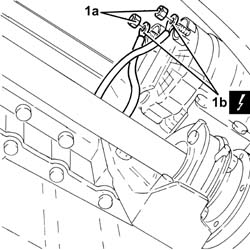
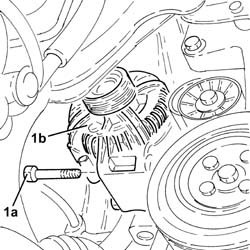
1. Undo the bolts (1a) and remove the alternator (1b).
Refitting
1. Place the alternator(1a) back in its housing and secure it tightening the bolts (1b) to the recommended torque.
| Fastening | Component | Ø | Value (daNm) | |
|---|---|---|---|---|
| 1b | Bolt | ALTERNATOR ASSEMBLY | M8 | (Support side) 2.3 ÷ 2.8 |
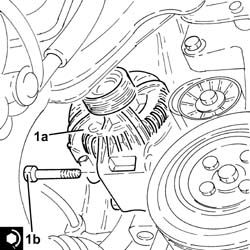
Connect the electrical connections to the alternator and fix them using the nuts.
| Name | Connector | |
|---|---|---|
| Alternator | See A010 ALTERNATOR |
Proceed with refitting
Op. 1092G10 SINGLE ENGINE BELT - R.R.
Proceed with refitting
Proceed with refitting
Op. 1092C10 POWER STEERING AND/OR SELF-LEVELLING SUSPENSION PUMP DRIVE BELT - R + R
Proceed with refitting
Connect the battery negative terminal.
Remove the vehicle from the ramp.
Op. 4450B04 RIGHT FRONT WHEEL - R.R.
| Name | Connector | |
|---|---|---|
| Battery | See A1H BATTERY ( ENGINE ) |
Parts & tools for this job For 2000 Fiat Doblò
- TOOLBattery testerSearch: car battery tester
- TOOLDigital multimeterSearch: automotive digital multimeter
- TOOLBattery terminal cleanerSearch: battery terminal cleaner
Links open Amazon search results in a new tab. As an Amazon Associate I earn from qualifying purchases.