
Introduction - EXTERIOR LIGHTING
- Make
- Fiat
- Model
- Doblò Factory Service Manual
- Year
- 2000–2010
- Section
- Exterior lighting › Introduction - EXTERIOR LIGHTING
Introduction - EXTERIOR LIGHTING
LOCATION OF COMPONENTS ON VEHICLE
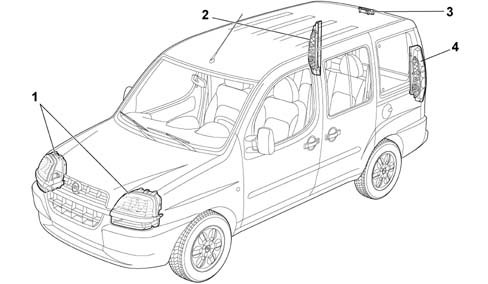
1 Front light cluster
2 Right tail-light cluster
3 Top third brake light
4 Left tail-light cluster
FUNCTIONS
The vehicle''s exterior lighting system has been designed with two aims in mind:
- ensuring maximum efficiency in terms of complying with international regulations which define the illumination specifications of the various components
- to blend with the design of the vehicle so that the various components enhance the overall image.
In particular, the front light cluster includes the separate function of the side light, dipped headlamp, main beam headlamp, fog light and direction indicators ina single unit.
The clear element is made out of one piece of plastic.
PERFORMANCE
The nominal operating voltage for the system can vary from 9 to 16 volts.
STRUCTURE
The front light cluster consists of the following components:
A light unit which includes:
- A housing for the fog light and the lens cover which focuses the light beam.
- A housing for the dipped headlamp and the lens cover which focuses the light beam and an internal element for adjusting the light beam geometry to meet standards.
- A housing for the direction indicator with an orange reflector lens cover.
- A housing for the main beam headlamp and parabola with mirrored surface.
- A housing for the side light and the reflector lens cover.
Light beam vertical adjustment device inside the light cluster operated by means of two buttons on the left of the instrument panel.
The following are also present:
- A fog light bulb 12 Volt - 55 Watt (1)
- A dipped headlamp bulb 12 Volt - 55 Watt (2)
- A direction indicator bulb 12 Volt - 5 Watt (3)
- A main beam headlamp bulb 12 Volt - 55 Watt (4)
- A side light bulb 12 Volt - 5 Watt
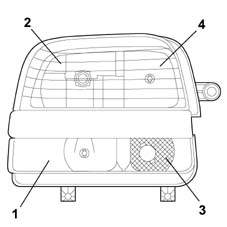
1 Fog lamp
2 Dipped headlamps
3 Turn signal
4 Main beam headlamps
OPERATING PRINCIPLES
The user can operate a ring at the end of the left steering wheel stalk to turn on the side lights, dipped beams and main beams (fixed or flashing position).
The same stalk also controls turns signals for lane changes and foglamp/rear foglamp enablement (for further details, see stalk unit 5550A and Body Computer description)
FOLLOW ME HOME FUNCTION
This is a strategy available on the SX trim level which allows the dipped headlamps to remain on, even with the ignition switched off, for a pre-set time.
This function is particularly useful, for example, after parking the car in a garage or in poorly lit areas.
The function is activated, after the key off, for a maximum of 2 minutes; within this period, pulling the left steering column switch unit lever in the direction of the steering wheel activates the dipped headlamps for 30 seconds; each time the lever is operated, the time increases by a further 30 seconds, up to a maximum of 5 minutes.
Pins
A connection on the light cluster casing controls the side lights, dipped headlamps, main beam headlamps, direction indicators and light beam vertical adjustment
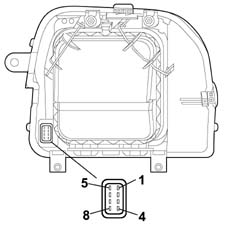
1 cross/corrector (+)
2 Depth (+)
3 Position (+)
4 Direction (+)
5. Fog lamp (+)
6. Corrector control (+)
7. Cross/position/corrector (-)
8 Direction/fog lamp/depth (-)
HEADLAMP ALIGNMENT ADJUSTMENT
LOCATION OF HEADLAMP ALIGNMENT ADJUSTMENT COMPONENTS ON VEHICLE
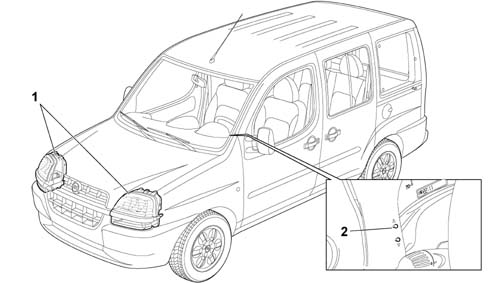
1 Front light cluster
2 Light beam adjustment buttons
Operation
The headlamp alignment adjustment device is designed to correctly position the dipped headlamp light beam, in a vertical direction, irrespective of the load on the axles.
Operating methods
It is possible to vary the angle of the light clusters with 4 standard positions by acting on the two switches on the left hand side of the instrument panel.
The positions are shown in a special display in the instrument panel.
The table below illustrates the three positions which can be selected according to the vehicle load conditions:
| Headlamp alignment position | Panorama version | Cargo version |
|---|---|---|
| Load status | Load status | |
| 0 | empty, driver, driver + front passenger | empty, driver |
| relay | all seats occupied | |
| relay | all seats occupied + luggage compartment loaded to the maximum technically permissible limit (180 kg) | |
| 3 | driver + luggage compartment loaded to maximum limit on the rear axle (430 kg) | driver + luggage compartment loaded to maximum technically permissible limit and max on the rear axle (550 kg) |
The various positions refer to a full fuel tank and an initial vertical adjustment of the light cluster of -1%.
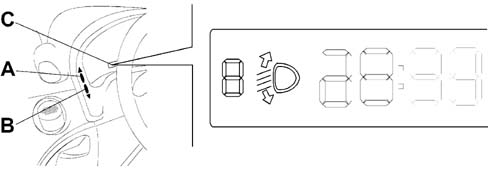
Operating methods
To carry out the headlamp alignment adjustment, proceed as described below:
- Press button A and keep it pressed until there is an increase by one position (e.g. 0>1, 1>2)
- Press button B and keep it pressed until there is an increase by one position (e.g. 2>1, 1>0)
The display C will show the positions whilst the adjustment is being made.
TAIL-LIGHT CLUSTER
View of tail-light cluster
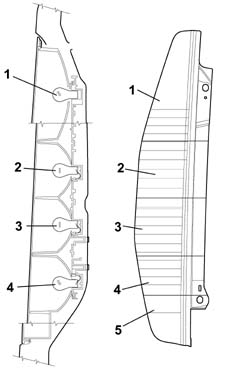
1 Side light + brake light (red lens)
2 Turn signal (colourless lens)
3 Reversing light (colourless lens)
4 Rear fog lamp (left) (red lens)
5. Reflector indicators (red lens)
TAIL-LIGHT CLUSTER
View of connectors and internal diagram
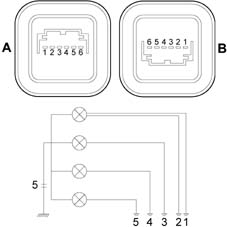
A. Right light
B. Left light
1 Position
2 Brake lights
3 Turn signal
4 Reverse gear
5. Rear fog lamp
6. Earth
TAIL-LIGHT CLUSTER
Vehicle side view
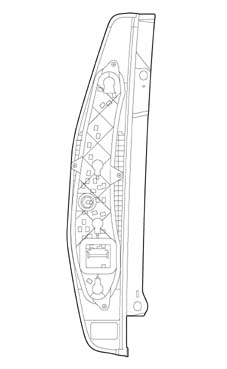
TAIL-LIGHT CLUSTER
The vehicle''s exterior lighting system has been designed with two aims in mind:
- Ensuring maximum efficiency in terms of complying with international regulations which define the illumination specifications of the various components
- To blend in with vehicle design so that the various components enhance the image.
The clear element is made out of one piece of plastic.
PERFORMANCE
The nominal operating voltage for the system can vary from 9 to 16 volts.
Power of bulbs for brake light, direction indicator, reversing light, rear fog lamp 21 Watt - 12 Volt.
Power of bulb for side light 10 Watt - 12 Volt
STRUCTURE
The right rear light cluster consists of the following components:
- A light unit which includes:
- A housing for the side light (1) with a reflector lens cover and brake light.
- A housing for the direction indicator (3) with a reflector lens cover.
- A housing for the reversing light (4) with a reflector lens cover.
The left rear light cluster consists of the following components:
- A light unit which includes:
- A housing for the side light (1) with a reflector lens cover.
- A housing for the direction indicator (3) with a reflector lens cover.
- A housing for the rear fog lamp (4) with a reflector lens cover.
- A housing for the reversing light
PINS
There is a connection on the rear light cluster casing:
Connection
| PIN | Operation |
|---|---|
| relay | Side light control |
| relay | Brake light control |
| 3 | Turn signal control |
| 4 | Reversing light control |
| 5 | Rear fog lamp earth (left) |
| 6 | Earth |
OPERATING PRINCIPLES
See the steering column switch unit for the operation of the direction indicators and the side lights
See the specific assembly for the operation of the brake lights and the reversing light
INTRODUCTION
The vehicle exterior lighting has been designed with two main objectives in mind:
- Guaranteeing maximum efficiency with regard to the international regulations that define the lighting technology specifications for the various components.
- Being integrated with the design of the vehicle so that the various components enhance the image.
In particular the front light cluster incorporates the separate functions of the side light, dipped headlight, main beam headlight and direction indicators in a single unit.
The plastic lens cover is in one piece.
The geometry of the HCR lamp is an asymmetric crossover beam
LOCATION OF COMPONENTS ON VEHICLE
The exact location of the components on the vehicle is illustrated in the diagram below.
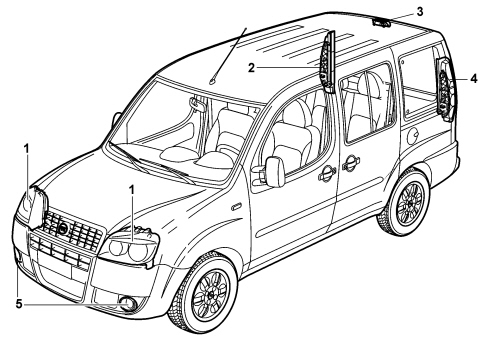
1 - Front light cluster
2 - Right rear light cluster
3 - Third brake light
4 - Left rear light cluster
5 - Fog lights
STRUCTURE
The front light cluster comprises the components described below.
An optical assembly including:
- A compartment for the dipped headlamp with the parabola and obstacle adjusted to the standards.
- A compartment for the direction indicator and orange reflector lens cover.
- A compartment for the main beam headlamp and parabola.
- A compartment for the side light and reflector lens cover.
A headlamp alignment adjustment device makes it possible to alter the angle of the headlamp parabolas with the driver adjusting the light beam direction at will.
This device is operated by two buttons located on the left side of the instrument panel.
The headlamp contains the following bulbs:
- A dipped headlamp bulb 12 Volt - 55 Watt (1)
- A bulb for the direction indicator 12 Volt - 21 Watt PY (2)
- A main beam headlamp bulb 12 Volt - 55 Watt (3)
- A side light bulb 12 Volt - 5 Watt (4)
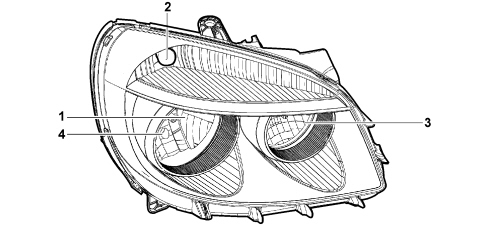
1 - Dipped headlamp
2 - Direction indicator
3 - Main beam headlamp
4 - Side light
OPERATING PRINCIPLE
The side lights, dipped headlamps and main beam headlamps (in a stable position or flashing) can be switched on using the ring nut at the end of the left steering column switch unit lever.
The same lever also controls the direction indicators for changing lane.
Pin out and functional wiring diagram
The functional wiring diagram, connector for the control and pin out are illustrated below.
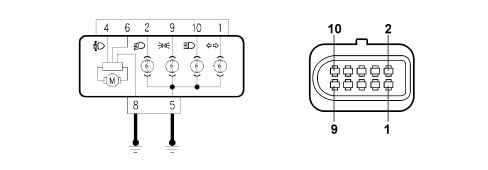
Pin Out
| PIN | DESCRIPTION |
|---|---|
| 1 | Direction indicator |
| 2 | Dipped headlight |
| 3 | N.C. |
| 4 | Headlamp alignment corrector motor positive |
| 5 | Bulb earth |
| 6 | Headlamp alignment corrector motor control |
| 7 | N.C. |
| 8 | Headlamp alignment corrector motor negative |
| 9 | Position |
| 10 | Main beam headlight |
Follow me home function
This is a strategy that makes it possible to keep the dipped headlamps on even with the ignition switched off for a pre-set time.
This function is particularly useful, for example, after parking the vehicle in a garage or poorly-lit places/areas.
The function is activated, after the Key off, for a maximum period of 2 minutes, keeping the left steering column switch unit lever pulled towards the steering wheel activates the dipped headlamps for 30 seconds, each time the lever is operated increases the time by another 30 seconds up to a maximum of 5 minutes.
Headlamp alignment corrector
LOCATIN OF HEADLAMP ALIGNMENT CORRECTOR COMPONENTS ON VEHICLE
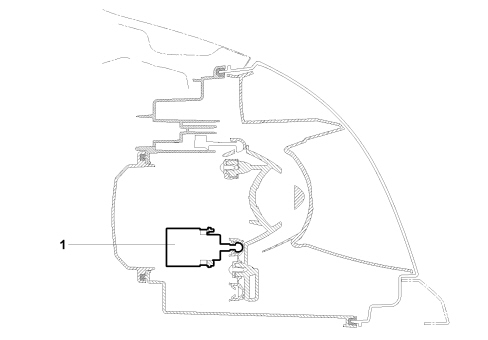
1 - Headlamp alignment corrector motor
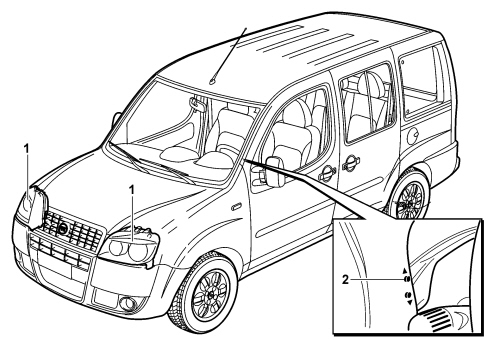
1 - Headlamps
2 - Light beam adjustment buttons
Operating procedure
The headlamp alignment adjustment device is designed to direct the light beam for the dipped headlamp correctly in a vertical direction thanks to a motor that adjusts the parabola irrespective of the load on the axles. The two switches on the left side of the instrument panel can be used to vary the angle of the light cluster into 4 standard positions. The positions are shown in the instrument panel in a special display.
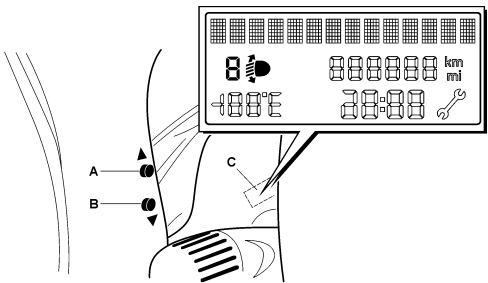
To carry out the headlamp alignment adjustment, proceed as described below:
- Press button A and keep it pressed until there is an increase of one position (e.g. 0>1, 1>2).
- Press button B and keep it pressed until there is a decrease of one position (e.g. 2>1, 1>0).
The display C will give a visual reading of the positions whilst the adjustment is being carried out.
The table below highlights the three positions that can be selected depending on the vehicle load conditions:
| Headlamp alignment position | Panorama version | Cargo version |
|---|---|---|
| Load condition | Load condition | |
| 0 | empty, driver, driver + front passenger | empty, driver |
| 1 | all the seats occupied | |
| 2 | all the seats occupied + load (180kg) in the luggage compartment up to the maximum permitted limit | |
| 3 | driver + load (430kg) in the luggage comaprtment up to the max permitted on the rear axle | driver + load (500 kg) in the load carrying cmopartment up to the maximum technically permitted and the maximum on the rear axle |
The various positions refer to a full fuel tank and initial light cluster vertical adjustment of -1%.
REAR LIGHT CLUSTER
The vehicle exterior lighting system has been designed and produced with two objectives in mind:
- Guaranteeing maximum efficiency with regard to the international regulations that define the lighting technology specifications for the various components.
- Being integrated with the design of the vehicle so that the various components enhance the image.
The lens cover is made from darkened plastic.
View of right rear light cluster.
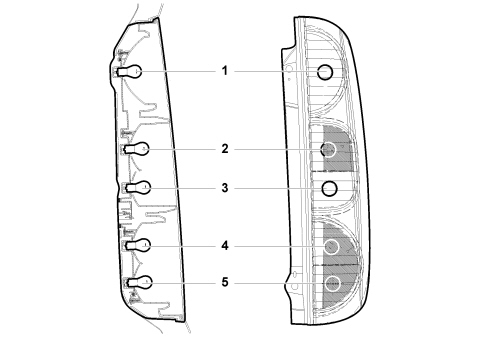
1 - Brake light
2 - Direction indicator
3 - Reversing light
4 - Side light
5 - Side light or rear fog lamp for right hand drive or left hand drive version respectively.
The right rear light cluster contains the following bulbs:
- A brake light bulb 12 Volt -21 Watt (1)
- A bulb for the direction indicator 12 Volt - 21 Watt PY (2)
- A reversing light bulb 12 Volt -21 Watt (3)
- A side light bulb 12 Volt -21/4 Watt (4)
- A side light or rear fog lamp bulb 12 Volt -21/4 Watt (5)
Pin out and functional wiring diagram
The functional wiring diagram, the connectors for the control and the pin out for the right rear light cluster are illustrated below.
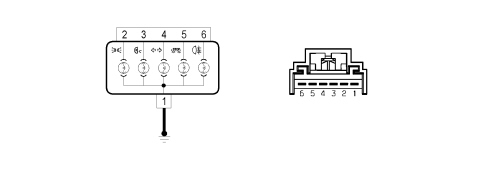
Pin Out
| PIN | DESCRIPTION |
|---|---|
| 1 | Earth |
| 2 | Position |
| 3 | Reverse gear |
| 4 | Direction indicator |
| 5 | Stop |
| 6 | Rear fog lamp (right hand drive version only) |
The functional wiring diagram, the connectors for the control and the pin out for the left rear light cluster are illustrated below.
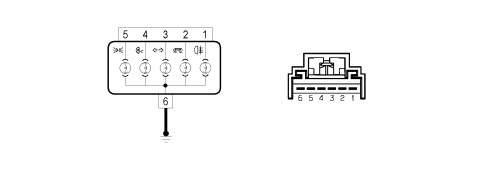
Pin Out
| PIN | DESCRIPTION |
|---|---|
| 1 | Rear fog lamp (left hand drive version only) |
| 2 | Brake light |
| 3 | Direction indicator |
| 4 | Reverse gear |
| 5 | Position |
| 6 | Earth |
FOG LIGHT
The two fog lights are housed in the lower part of the bumper.
The following bulbs make up the fog lights:
- two 12 Volt - 55 Watt bulbs
This device is activated through the special button housed in the centre of the dashboard to the right of the steering wheel.
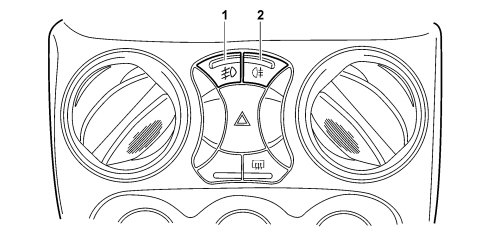
1 - Fog lights button
2 - Rear fog lamp button
Parts & tools for this job For 2000 Fiat Doblò
- PARTReplacement bulbsSearch: Fiat Doblò 2000 bulbs
- TOOLDigital multimeterSearch: automotive digital multimeter
Links open Amazon search results in a new tab. As an Amazon Associate I earn from qualifying purchases.