
5.3. Automatic charger
- Make
- Fiat
- Model
- Ducato Mk3 (250) Factory Service Manual
- Year
- 2006–2017
- Section
- Starting battery: charge › 5.3. Automatic charger
corrosive acid could leak.
In the case of batteries with topping of up of the electrolyte only :
- Connect the battery to the charger starting with the positive cable
- Check the level ( 15 mm above the plates) and top up with distilled water (if necessary)
CAUTION : In the case of batteries which do not require maintenance, removal of the caps and topping up with fluid is strictly prohibited.
5.3. Automatic charger
Use the normal charging programme (Rapid charging prohibited).
5.4. Charger with limited voltage
Adjust the charging current to 1/20 of the capacity (example: 45Ah provides a charging current of 2,25A) for a charging time of 6 to 12 hours.
5.5. Limited voltage charger
Charge with a voltage limited to 14,8 V for 12 hours with a current limited to 1/4 of the capacity.
5.6. Precautions to be taken (Battery charge)
Monitor the progress of the charge regularly, ensuring in particular that the battery does not get excessively warm or does not start to bubble. When the charge is complete, first switch off the charger and then disconnect the battery.
6. Check following charging
Check the colour of the hydrometer :
- If it is green : The battery is correct
- Refit the battery on the vehicle
- If it is not green : An additional charge is necessary, until the hydrometer turns green, without exceeding the times defined
- After 2 unsuccessful charging cycles, the battery is faulty
- Replace the battery
7. Fast starting
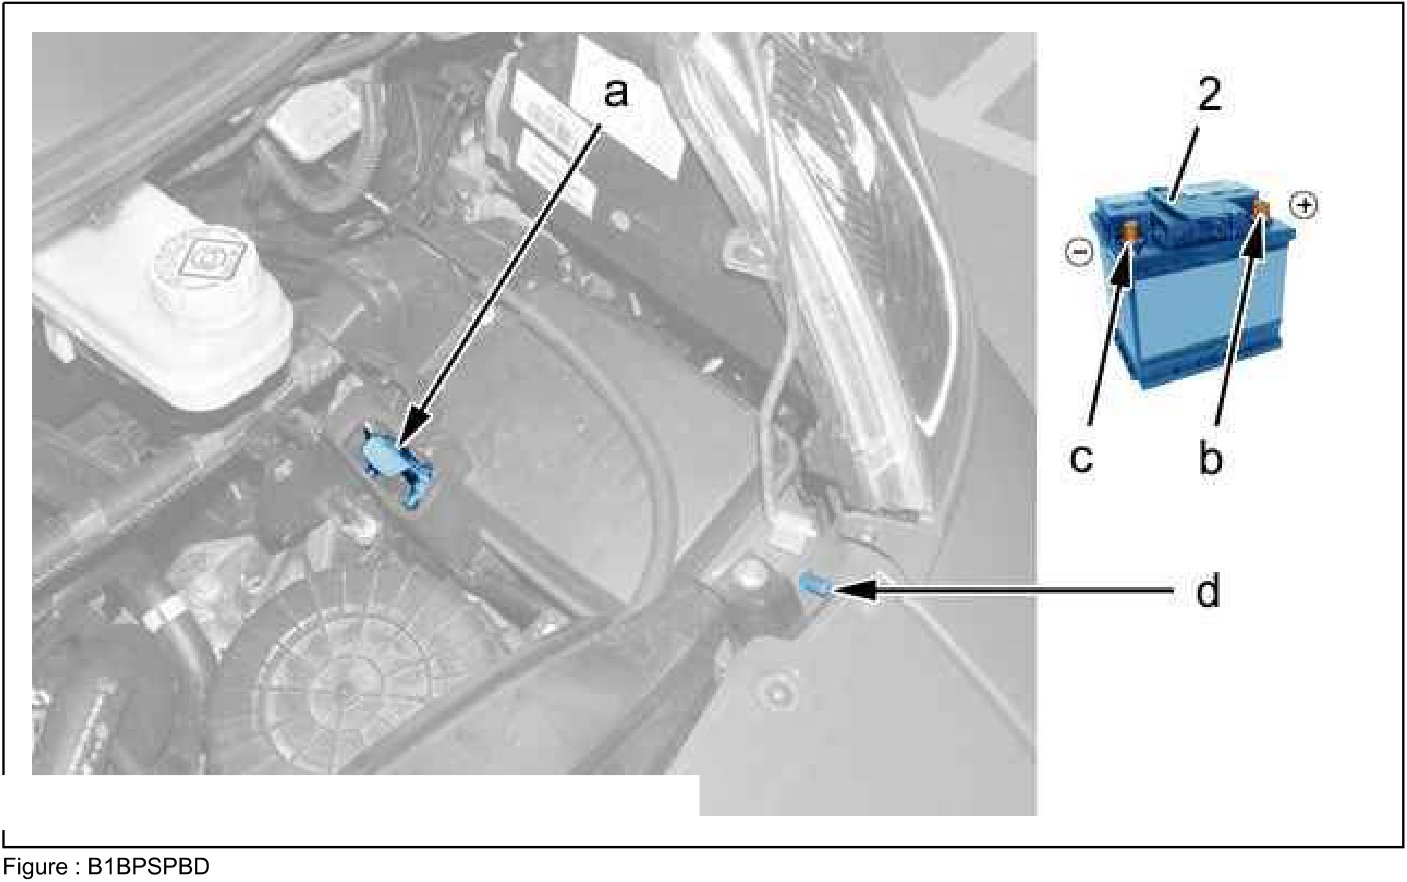
- Figure: B1BPSPBD
Open the bonnet.
CAUTION : Scrupulously comply with the order of the following instructions.
Connect the red cable to the metal part of the positive terminal (+) (in "a") on the jump battery (2) ( as "b").
Connect the black or green cable to the metal part of the negative terminal (-) (in "d") of the jump battery (2) ( as "c").
Operate the starter; Let the engine turn over.
Wait until it returns to idle and disconnect the cables.
Parts & tools for this job For 2006 Fiat Ducato
- TOOLBattery testerSearch: car battery tester
- TOOLDigital multimeterSearch: automotive digital multimeter
- TOOLBattery terminal cleanerSearch: battery terminal cleaner
Links open Amazon search results in a new tab. As an Amazon Associate I earn from qualifying purchases.