
Camshaft in cylinder head - r r on vehicle
- Make
- Fiat
- Model
- Ulysse Factory Service Manual
- Year
- 2002–2010
- Section
- Timing system › Camshaft in cylinder head - r r on vehicle
CAMSHAFT IN CYLINDER HEAD - R R ON VEHICLE
Removing
Op. 4450B04 RIGHT FRONT WHEEL R R
Op. 7055B91 RIGHT FRONT WHEEL ARCH LINER - R.R.
Op. 7055B54 UNDER-ENGINE GUARD - R R
See in Op. 1048B10
Op. 5530B56 BATTERY DRIP TRAY COVER - R.R.
Op. 5010B18 CLIMATE CONTROL UNIT AIR INTAKE - R.R.
Op. 5050B34 WINDSCREEN WIPER ARM/S COMPLETE WITH BLADE - R+R
Op. 7055A18 L/H OR R/H SIDE RUBBING STRIP DECORATIVE SEAL - R+R
Op. 5050B38 WINDSCREEN WIPER ASSEMBLY - R+R OR REPAIR
See in Op. 1008C10
See in Op. 1092G10
See in Op. 1024B54
See in Op. 1092A10
See in Op. 1032D12
See in Op. 1008A46
See in Op. 1032B10
- Fit the timing side power unit rigid support and tighten the fixing bolts.
See in Op. 1048A10
See in Op. 1048B22
See in Op. 1048A50
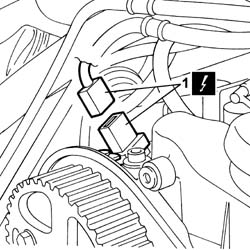
1. Disconnect the electrical connection for the cam angle sensor.
- Carry out the same operation on all the injectors.
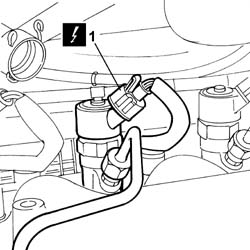
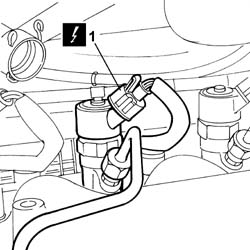
1. Disconnect the electrical connection for the injector.
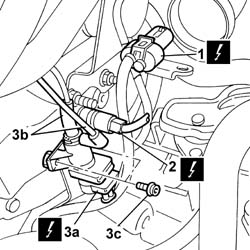
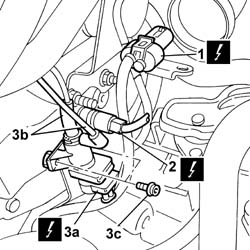
1. Disconnect the electrical connection for the heater plugs wiring.
2. Disconnect the electrical connection for the engine coolant temperature sensor.
3. Disconnect the electrical connection (3a), disconnect the vacuum intake pipes (3b) and undo the fixing bolts (3c), then remove the intake manifold actuator solenoid valve.
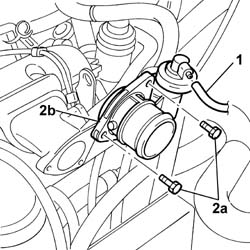
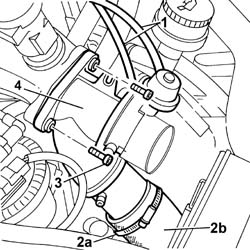
1. Disconnect the vacuum pipe.
2. Undo the bolts (2a) and detach the throttle assembly (2b).
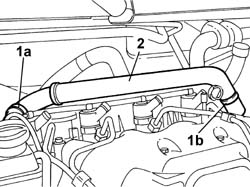
1. Open the securing band (1a) using special pliers and disposable band (1b).
2. Remove the oil vapour pipe.
| Description | Code | Function | |
|---|---|---|---|
| Caliper | 1.881.138.000 | Open the retaining bands |
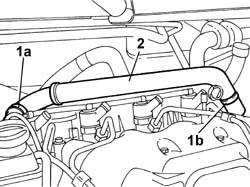
See in Op. 1080C54
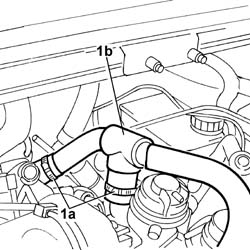
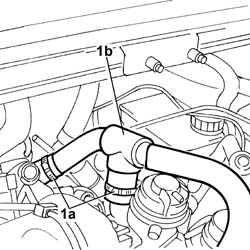
1. Open the fastening bands (1a), disconnect the oil vapour pipe (1b) and move it away from the work area.
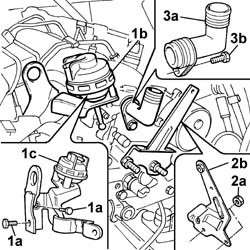
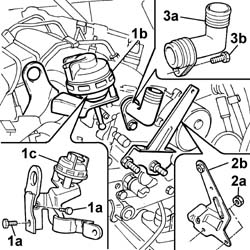
1. Undo the fixing bolts (1a), release the head (1b) and remove the swirl valve (1c).
2. Undo the fixing nuts (2a), remove the mounting bracket (2b) and release it from any clips.
3. Undo the fixing bolt (3a) and remove the filler (3b).
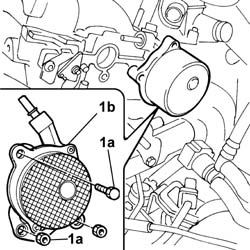
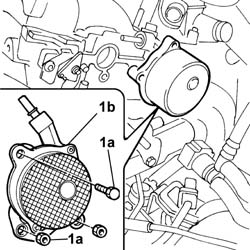
1. Undo the fixing nuts and bolts (1a) and remove the vacuum unit (1b).
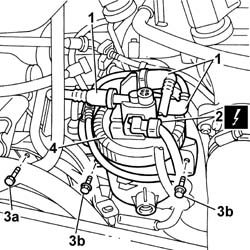
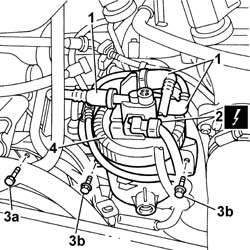
1. Acting on the rapid connectors, disconnect the fuel pipes.
2. Disconnect the electrical connection.
3. Undo the bolt (3a) fixing the wiring holder duct and move it away from the work area, then undo the bolts (3b) fixing the fuel filter.
4. Remove the fuel filter assembly.
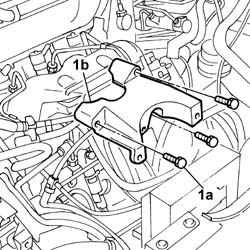
1. Undo the fixing bolts (1a) and remove the fuel filter mount (1b).
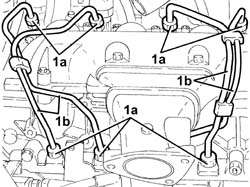
1. Undo the connectors (1a) and remove the rigid fuel supply pipes from the single fuel supply pipe (1b) to the injectors.
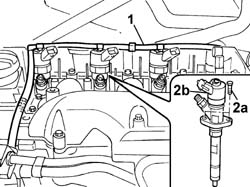
1. Disconnect the fuel return pipe from the injectors and move it away from the work area.
2. Undo the fixing bolts (2a) and remove the injector (2b) using the special tool.
- Carry out the same operation on all the injectors.
| Description | Code | Function | |
|---|---|---|---|
| Extractor | 1.870.870.000 | Injector extractor |
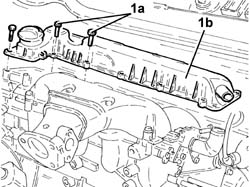
1. Undo the fixing bolts (1a) and remove the oil cover/separator (1b).
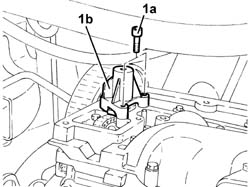
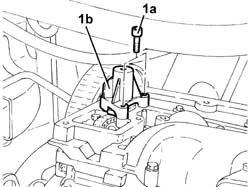
1. Undo the fixing bolts (1a) and remove the camshaft drive chain pretensioner (1b).
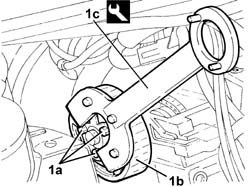
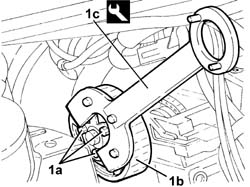
1. Loosen the bolts (1a) fixing the toothed driven pulley and the flange (1b) using the tool (1c) for counter-torque.
| Description | Code | Function | |
|---|---|---|---|
| 1c | Counter-torque | 1.860.831.000 | Counter-torque for exhaust side camshaft toothed driven pulley |
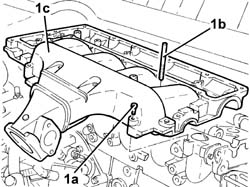
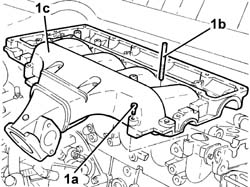
1. Undo the fixing bolts (1a) and the studs (1b) and remove the single camshaft housing (1c).
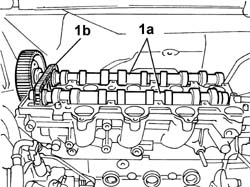
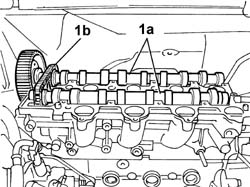
1. Remove the camshafts (1a) complete with chain (1b).
Refitting
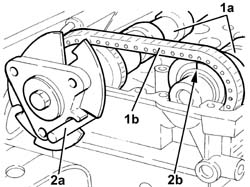
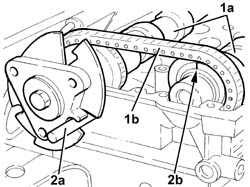
1. Position the camshafts (1a) complete with chain (1b).
2. Use the 8 mm calibrated pin (2a) for timing the exhaust side camshaft and position the TIMING REFERENCE (2B) for the inlet side camshaft UPWARDS.
- Apply silicon sealant to the matching surface between the single camshaft housing and the cylinder head.
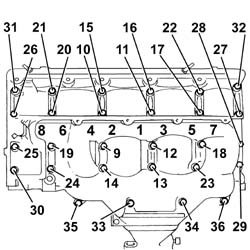
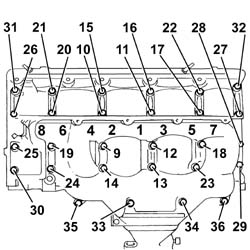
1. Fit the single camshaft housing in position and tighten to torque following the order illustrated in the diagram.
references 1 to 8 indicate the studs and references 9 to 36 indicate the bolts.
| Value - daNm | Fastening | Component | Ø | |
|---|---|---|---|---|
| (Cylinder head extension) 1 | Stud | CYLINDER HEAD EXTENSION |
| Value - daNm | Fastening | Component | Ø | |
|---|---|---|---|---|
| (Cylinder head extension) 0,5 | Pretightening, Bolt | CYLINDER HEAD EXTENSION |
| Value - daNm | Fastening | Component | Ø | |
|---|---|---|---|---|
| (Cylinder head extension) 1 | Tightening, Bolt | CYLINDER HEAD EXTENSION |
- Position the camshaft drive chain tensioner and tighten the fixing bolts.
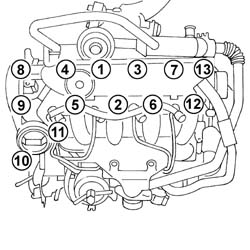
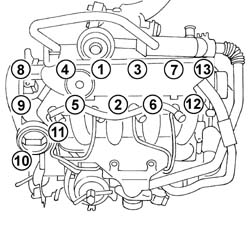
1. Place the oil vapour separator/cover in position and tighten the fixing bolts to torque following the order illustrated in the diagram.
- Remove the 8 mm calibrated pin.
- Undo the bolt and remove the exhaust side camshaft flange using a special counter-torque tool.
| Description | Code | Function | |
|---|---|---|---|
| Counter-torque | 1.860.776.000 | Counter-torque |
- Remove the exhaust side camshaft oil seal; the oil seal itself is destroyed during the removal operation, but care should be taken not to damage the oil seal housing.
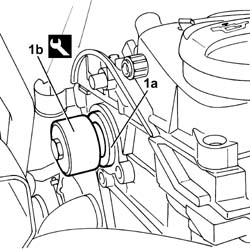
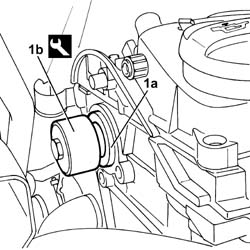
1. Fit the a new oil seal on the exhaust side camshaft (1a) using a special fitting tool (1b).
| Description | Code | Function | |
|---|---|---|---|
| 1b | Fitting tool | 1.870.821.000 | Fit the oil seal on the camshaft |
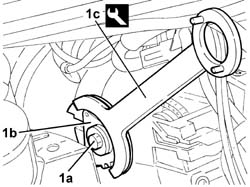
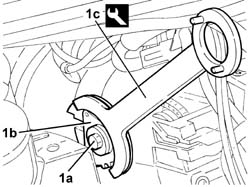
1. Fit the flange (1a) in the housing in the exhaust side camshaft and tighten the fixing bolt (1b) to torque using the tool (1c) for counter-torque.
| Description | Code | Function | |
|---|---|---|---|
| 1c | Counter-torque | 1.860.776.000 | Counter-torque |
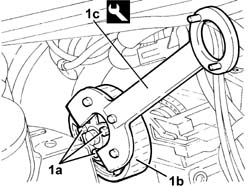
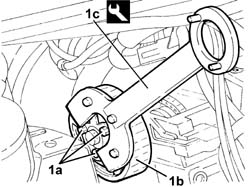
1. Fit the toothed driven pulley (1a) in the correct housing in the exhaust side camshaft flange and tighten the fixing bolts (1b) to torque using the tool (1c) for counter-torque.
| Description | Code | Function | |
|---|---|---|---|
| 1c | Counter-torque | 1.860.831.000 | Counter-torque for exhaust side camshaft toothed driven pulley |
- Place the injectors in position and tighten the fixing bolts to torque.
- Fit the new rigid fuel supply pipes from the single fuel manifold to the single injectors in place and tighten the connectors to the recommended torque.
- Position the fuel filter mounting and tighten the fixing bolts.
- Fit the fuel filter on the mounting and tighten the fixing bolts.
- Connect the rapid connectors for the fuel pipes to the filter.
- Connect the electrical connection for the sensor on the fuel filter.
- Fit the vacuum unit in place and tighten the fixing nuts and bolts.
- Position the oil vapour recovery filler and tighten the fixing bolt.
- Fit the swirl valve in place.
- Tighten the fixing bolts and secure the ball joint in its housing.
- Fit the oil vapour pipes in place and renew the retaining bands.
| Description | Code | Function | |
|---|---|---|---|
| Caliper | 1.881.138.000 | Open the retaining bands |
See in Op. 1080C54
- Fit the throttle casing in place with the fixing bolts and connect the vacuum pipe to the valve on the throttle casing.
- Connect the electrical connection for the heater plugs wiring.
- Connect the electrical connection for the engine coolant temperature sensor.
- Position the intake manifold actuator solenoid valve and tighten the fixing bolts.
- Connect the vacuum pipes to the intake manifold actuator solenoid valve.
- Connect the electrical connections for the injectors.
- Connect the connection for the cam angle sensor.
See in Op. 1048A50
See in Op. 1048B22
See in Op. 1048A10
See in Op. 1032B10
See in Op. 1008A46
See in Op. 1032D12
See in Op. 1092A10
See in Op. 1024B54
See in Op. 1092G10
See in Op. 1008C10
Op. 5050B38 WINDSCREEN WIPER ASSEMBLY - R+R OR REPAIR
Op. 7055A18 L/H OR R/H SIDE RUBBING STRIP DECORATIVE SEAL - R+R
Op. 5050B34 WINDSCREEN WIPER ARM/S COMPLETE WITH BLADE - R+R
Op. 5010B18 CLIMATE CONTROL UNIT AIR INTAKE - R.R.
Op. 5530B56 BATTERY DRIP TRAY COVER - R.R.
See in Op. 1048B10
Op. 7055B54 UNDER-ENGINE GUARD - R R
Op. 7055B91 RIGHT FRONT WHEEL ARCH LINER - R.R.
Op. 4450B04 RIGHT FRONT WHEEL R R
- Check the engine fluid levels and top up, where necessary.
Removing
Op. 4450B04 RIGHT FRONT WHEEL R R
Op. 7055B91 RIGHT FRONT WHEEL ARCH LINER - R.R.
Op. 7055B54 UNDER-ENGINE GUARD - R R
See in Op. 1048B10
Op. 5530B56 BATTERY DRIP TRAY COVER - R.R.
Op. 5010B18 CLIMATE CONTROL UNIT AIR INTAKE - R.R.
Op. 5050B34 WINDSCREEN WIPER ARM/S COMPLETE WITH BLADE - R+R
Op. 7055A18 L/H OR R/H SIDE RUBBING STRIP DECORATIVE SEAL - R+R
Op. 5050B38 WINDSCREEN WIPER ASSEMBLY - R+R OR REPAIR
See in Op. 1008C10
See in Op. 1092G10
See in Op. 1024B54
See in Op. 1092A10
See in Op. 1032D12
See in Op. 1008A46
See in Op. 1032B10
- Fit the timing side power unit rigid support and tighten the fixing bolts.
See in Op. 1048A10
See in Op. 1048B22
See in Op. 1048A50
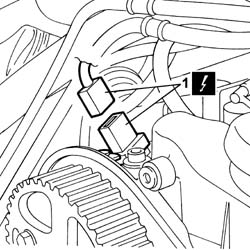
1. Disconnect the electrical connection for the cam angle sensor.
- Carry out the same operation on all the injectors
1. Disconnect the electrical connection for the injector.
1. Disconnect the electrical connection for the heater plugs wiring.
2. Disconnect the electrical connection for the engine coolant temperature sensor.
3. Disconnect the electrical connection (3a), disconnect the vacuum intake pipes (3b) and undo the fixing bolts (3c), remove the intake manifold actuator solenoid valve.
1. Disconnect the vacuum pipes.
2. Open the retaining band (2a) and disconnect the air hose (2b).
3. Undo the bolts fixing the throttle casing.
4. Remove the throttle casing.
1. Open the retaining band (1a) using special pliers and the disposable band (1b).
2. Remove the oil vapour pipe.
| Description | Code | Function | |
|---|---|---|---|
| Caliper | 1.881.138.000 | Open the retaining bands |
See in Op. 1080C54
1. Open the retaining bands (1a) and disconnect the oil vapour pipe (1b) and move it away from the work area.
1. Undo the fixing bolts (1a) and release the head (1b) and remove the swirl valve (1c).
2. Undo the fixing nuts (2a) and remove the mounting bracket (1b) and realse it from any clips.
3. Undo the fixing bolt (3a) and remove the filler (3b).
1. Undo the fixing nuts and bolts (1a) and remove the vacuum unit (1b).
1. Disconnect the fuel pipes acting on the rapid connectors.
2. Disconnect the electrical connection.
3. Undo the bolt (3a) fixing the wiring duct and move it away from the work area and undo the bolts (3b) fixing the fuel filter.
4. Remove the fuel filter assembly.
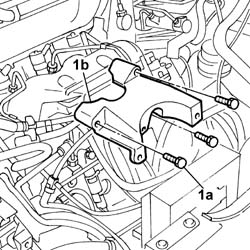
1. Undo the fixing bolts (1a) and remove the fuel filter mount (1b).
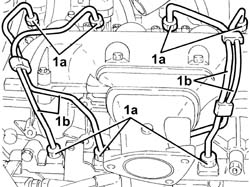
1. Undo the connectors (1a) and remove the rigid fuel supply pipes from the single fuel injector supply pipe (1b).
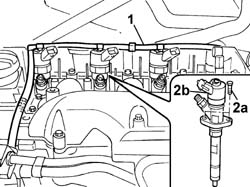
1. Disconnect the fuel return pipe from the injectors and move it away from the work area.
2. Undo the fixing bolts (2a) and remove the injector (2b) using the special tool.
- Carry out the same operation on all the injectors
| Description | Code | Function | |
|---|---|---|---|
| Extractor | 1.870.870.000 | Injector extractor |
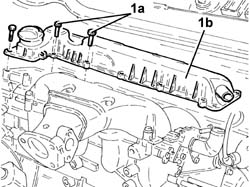
1. Undo the fixing bolts (1a) and remove the oil separator/cover (1b).
1. Undo the fixing bolts (1a) and remove the camshaft drive chain pretensioner (1b).
1. Loosen the bolts (1a) fixing the toothed driven pulley and the flange (1b) using the tool (1c) for counter-torque.
| Description | Code | Function | |
|---|---|---|---|
| Counter-torque | 1.860.831.000 | Counter-torque for exhaust side camshaft toothed driven pulley |
1. Undo the fixing bolts (1a) and the studs (1b) and remove the single camshaft housing (1c).
1. Remove the camshafts (1a) complete with chain (1b).
Refitting
1. Position the camshafts (1a) complete with chain (1b).
2. Use the 8 mm calibrated pin (2a) for timing the exhaust side camshaft and position THE TIMING REFERENCE (2B) AT THE TOP when timing the inlet side camshaft.
- Apply silicon sealant to the surface where the single camshaft housing and the cylinder head meet.
1. Fit the single camshaft housing in place and tighten to torque following the order illustrated.
references 1 to 8 indicate the studs and references 9 to 36 indicate the bolts.
| Value - daNm | Fastening | Component | Ø | |
|---|---|---|---|---|
| (Cylinder head extension) 1 | Stud | CYLINDER HEAD EXTENSION |
| Value - daNm | Fastening | Component | Ø | |
|---|---|---|---|---|
| (Cylinder head extension) 0,5 | Pretightening, Bolt | CYLINDER HEAD EXTENSION |
| Value - daNm | Fastening | Component | Ø | |
|---|---|---|---|---|
| (Cylinder head extension) 1 | Tightening, Bolt | CYLINDER HEAD EXTENSION |
- Position the camshaft drive chain tensioner and tighten the fixing bolts.
1. Place the oil vapour separator/cover in position and tighten the fixing bolts to torque following the order illustrated.
- Remove the 8 mm calibrated pin.
- Undo the bolt and remove the exhaust side camshaft flange using a special tool for counter-torque.
| Description | Code | Function | |
|---|---|---|---|
| Counter-torque | 1.860.776.000 | Counter-torque |
- Remove the exhaust side camshaft oil seal; this operation destroys the actual oil seal, but take care not to damage the oil seal housing.
| Description | Code | Function | |
|---|---|---|---|
| Fitting tool | 1.870.821.000 | Fit the oil seal on the camshaft |
| Description | Code | Function | |
|---|---|---|---|
| 1c | Counter-torque | 1.860.776.000 | Counter-torque |
| Description | Code | Function | |
|---|---|---|---|
| 1c | Counter-torque | 1.860.831.000 | Counter-torque for exhaust side camshaft toothed driven pulley |
- Fit the injectors in place and tighten the fixing bolts to torque.
- Fit the new rigid fuel supply pipe from the single fuel manifold pipe to the individual injectors in place and tighten the connectors to the recommended torque.
- Place the fuel filter mounting in position and tighten the fixing bolts.
- Fit the fuel filter on the mounting and tighten the fixing bolts.
- Connect the rapid connectors for the fuel pipes to the filter.
- Connect the electrical connection for the sensor on the fuel filter.
- Fit the vacuum unit in place and tighten the fixing nuts and bolts.
- Place the oil vapour recovery filler in position and tighten the fixing bolt.
- Fit the swirl valve in place.
- Tighten the fixing bolts and secure the ball joint in its housing.
- Fit the oil vapour pipes in place and renew the retaining bands.
| Description | Code | Function | |
|---|---|---|---|
| Caliper | 1.881.138.000 | Open the retaining bands |
See in Op. 1080C54
- Fit the throttle casing in place with the fixing bolts and connect the vacuum pipes to the valves on the throttle casing and fit the air hose and renew the retaining band.
- Connect the electrical connection for the heater plugs wiring.
- Connect the electrical connection for the engine coolant temperature sensor.
- Position the intake manifold actuator solenoid valve and tighten the fixing bolts.
- Connect the vacuum pipes to the intake manifold actuator solenoid valve.
- Connect the electrical connections for the injectors.
- Connect the electrical connection for the cam angle sensor.
See in Op. 1048A50
See in Op. 1048B22
See in Op. 1048A10
See in Op. 1032B10
See in Op. 1008A46
See in Op. 1032D12
See in Op. 1092A10
See in Op. 1024B54
See in Op. 1092G10
See in Op. 1008C10
Op. 5050B38 WINDSCREEN WIPER ASSEMBLY - R+R OR REPAIR
Op. 7055A18 L/H OR R/H SIDE RUBBING STRIP DECORATIVE SEAL - R+R
Op. 5050B34 WINDSCREEN WIPER ARM/S COMPLETE WITH BLADE - R+R
Op. 5010B18 CLIMATE CONTROL UNIT AIR INTAKE - R.R.
Op. 5530B56 BATTERY DRIP TRAY COVER - R.R.
See in Op. 1048B10
Op. 7055B54 UNDER-ENGINE GUARD - R R
Op. 7055B91 RIGHT FRONT WHEEL ARCH LINER - R.R.
Op. 4450B04 RIGHT FRONT WHEEL R R
- Check the engine fluid levels and top up, if necessary.
Parts & tools for this job For 2002 Fiat Ulysse
- PARTEngine gasket setSearch: Fiat Ulysse 2002 engine gasket set
- TOOLTorque wrenchSearch: 3/8 inch torque wrench
- TOOLFeeler gauge setSearch: feeler gauge set
Links open Amazon search results in a new tab. As an Amazon Associate I earn from qualifying purchases.