
Camshaft in cylinder head - r r on vehicle
- Make
- Fiat
- Model
- Ulysse Factory Service Manual
- Year
- 2002–2010
- Section
- Timing system › Camshaft in cylinder head - r r on vehicle
CAMSHAFT IN CYLINDER HEAD - R R ON VEHICLE
Removing
Position the vehicle on the lift.
Disconnect the negative battery terminal.
| Description | Connector | |
|---|---|---|
| Battery |
See
Op. 1016A10 SOUND-PROOFING COVER - R.R
See
Op. 1036C39 PHASE TRANSFORMER ON INLET CAMSHAFT IN CYLINDER HEAD - R.R.
Fit the retaining tools in the special housings in the camshaft pullies.
| Description | Code | Function | |
|---|---|---|---|
| Pins | Crankshaft and timing pullies mounting. |
1. Loosen the bolts fixing the camshaft pullies.
Remove the camshaft pullies.
Undo the pulley fixing bolts in a clockwise direction.
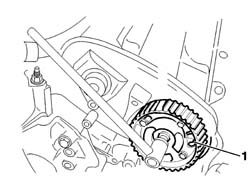
Undo the bolts fixing the timing casings on the cylinder heads, then remove them.
1. Remove the supports.
Gradually loosen the bolts fixing the head covers starting from the outside.
2. Remove the head covers for the front head (2a) and the head covers for the rear head (2b).
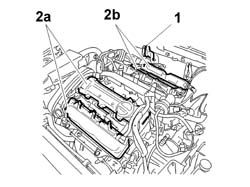
1. Undo the bolts fixing the tappet covers gradually, starting from the outside, then remove the tappet covers.
Loosen the bolts fixing the tappet covers gradually, starting from the outside, in order to detach them by a few millimetres from the surface of the gasket.
2. Remove the camshafts from the supports on the cylinder head.
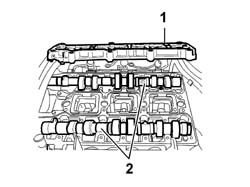
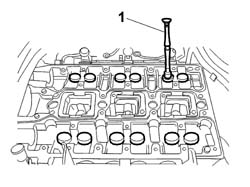
Mark the tappet housings before removing them.
1. Remove the tappets from the cylinder head.
Remove the oil from the tappet cover fixing bolts tapping.
Refitting
Lubricate the tappet casings using the specific product.
| Description | Q.ty | Component | Type | Classification | |
|---|---|---|---|---|---|
| MOLYDAL GB SP 370G | TAPPET CASES CYL. HEADS |
Clean the surfaces of the gaskets using the specific, homologated product.
Fit the tappets in the special housings in the cylinder head.
Check that the tappets rotate freely in the head.
Lubricate the cam housings and the supports for the shafts on the cylinder head using the specific product.
| Description | Q.ty | Component | Type | Classification | |
|---|---|---|---|---|---|
| MOLYDAL GB SP 370G | TAPPET CASES CYL. HEADS |
Fit the camshafts.
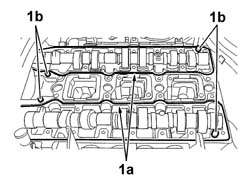
1. Apply sealant to the surfaces of the gaskets (1a) and check that the pins (1b) are fitted.
| Description | Q.ty | Component | Type | Classification | |
|---|---|---|---|---|---|
| CATEGORY 2 SILICON | CYLINDER HEAD INLET AND EXHAUST SHAFTS |
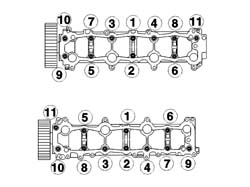
Fit the tappet covers.
The tappet covers have a composite seal which can be removed and refitted several times. If the seal shows signs of tears, apply a bead of CATEGORY 2 SILICON sealant to the surrounds of the seal.
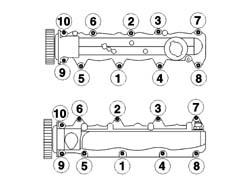
1. Tighten the bolts fixing the tappet covers for the right head, following the procedure described below and bearing in mind that the order illustrated in the diagram applies for each tightening stage.
Pre-tighten the tappet cover fixing bolts to the value given in the table.
| Value daNm | Fastening | Component | dia | |
|---|---|---|---|---|
| 0.2 | Bolt | TAPPET COVERS |
Tigthen the bolts fixing the tappet covers for the right head to the recommended torque.
| Value daNm | Fastening | Component | dia | |
|---|---|---|---|---|
| 0.8 | Bolt | TAPPET COVERS |
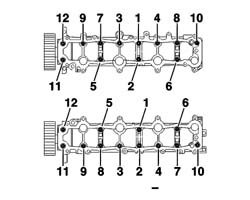
1. Tighten the bolts fixing the tappet covers for the left head, following the procedure described below and bearing in mind that the order illustrated in the diagram applies for each tightening stage.
Pre-tighten the tappet cover fixing bolts to the value given in the table.
| Value daNm | Fastening | Component | dia | |
|---|---|---|---|---|
| 0.2 | Bolt | TAPPET COVERS |
Tighten the bolts fixing the tappet covers for the left head to the recommended torque.
| Value daNm | Fastening | Component | dia | |
|---|---|---|---|---|
| 0.8 | Bolt | TAPPET COVERS |
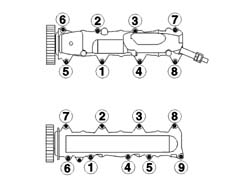
Position the right head covers.
1. Tighten the right cylinder head head cover fixing bolts, following the procedure described below bearing in mind that the tightening order illustrated in the diagram should be followed for each stage.
Pre-tighten the tappet cover fixing bolts to the value given in the table.
| Value daNm | Fastening | Component | dia | |
|---|---|---|---|---|
| 0.5 | Bolt | TAPPET COVERS |
Tighten the right head cover fixing bolts to the recommended torque.
| Value daNm | Fastening | Component | dia | |
|---|---|---|---|---|
| 0.8 | Bolt | TAPPET COVERS |
Before fitting the camshafts, check that there is no sealing compound at the base of the housing.
Apply grease to the area between the edges.
There should be no trace of oil on the outer part of the seal.
Position the head covers on the left head.
1. Tighten the left cylinder head head cover fixing bolts, following the procedure described below bearing in mind that the tightening order illustrated in the diagram should be followed for each stage.
Pre-tighten the tappet cover fixing bolts to the value given in the table.
| Value daNm | Fastening | Component | dia | |
|---|---|---|---|---|
| 0.5 | Bolt | TAPPET COVERS |
Tighten the left head cover fixing bolts to the recommended torque.
| Value daNm | Fastening | Component | dia | |
|---|---|---|---|---|
| 0.8 | Bolt | TAPPET COVERS |
Before fitting the camshafts, check that there is no sealing compound at the base of the housing.
Apply grease to the area between the edges
There should be no trace of oil on the outer part of the seal.
1. Fit the camshaft oil seal (1a) using the tool (1b).
| Description | Code | Function | |
|---|---|---|---|
| 1b | Fitting tool | front seal of l/h overhead camshaft - r + r |
Repeat the operation for the remaining camshafts.
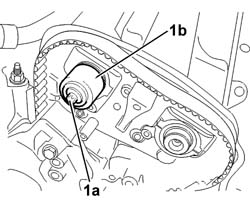
1. Position the camshaft pullies in the correct position. Inlet pulley outside (1a); exhaust pulley inside (1b).
Tighten the bolt fixing the camshaft pullies to the recommended torque, immobilizing the camshafts using the special angular tightening tool.
| Value daNm | Fastening | Component | dia | |
|---|---|---|---|---|
| (exhaust side) 2 + 57° | Bolt | TIMING DRIVEN PULLIES |
| Description | Code | Function | |
|---|---|---|---|
| Torque wrench | Angular tightening |
See
Op. 1036C39 PHASE TRANSFORMER ON INLET CAMSHAFT IN CYLINDER HEAD - R.R.
See
Op. 1016A10 SOUND-PROOFING COVER - R.R
Connect the negative battery terminal.
| Description | Connector | |
|---|---|---|
| Battery |
Remove the vehicle from the lift.
Parts & tools for this job For 2002 Fiat Ulysse
- PARTEngine gasket setSearch: Fiat Ulysse 2002 engine gasket set
- TOOLTorque wrenchSearch: 3/8 inch torque wrench
- TOOLFeeler gauge setSearch: feeler gauge set
Links open Amazon search results in a new tab. As an Amazon Associate I earn from qualifying purchases.