| Removal and Installation Special Tool(s) | | Alignment pins, subframe 205-316 (15-097A) | Removal All Vehicles | | -
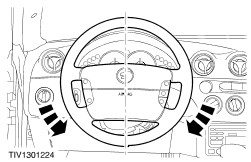
Center the steering wheel and lock in position. | | | -
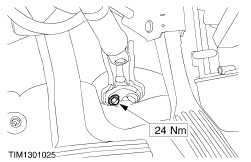
Disconnect the steering column shaft from the flexible coupling. - Rotate the clamp plate to disengage.
| | | -
CAUTION:When removing the floor seal do not damage the sealing clips. Remove the floor seal from the bulkhead. - Release the retaining clips.
- Disconnect the upper retaining clip.
- Remove the floor seal.
| | | -
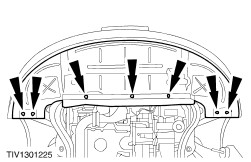
Remove the radiator splash shield. | | | -
Remove the splash shields. | Vehicles with 2.5L engine | | -
CAUTION:Over bending of the flexible pipe may cause damage resulting in failure. Remove the exhaust flexible pipe. - Support the flexible pipe with a support wrap or suitable splint assembly.
- Remove the nuts.
- Detach the exhaust hanger insulator.
| Vehicles with manual transaxle | | -
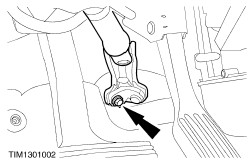
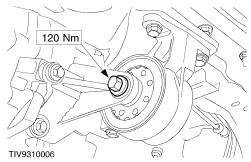
Remove the rear support insulator center bolt. | Vehicles with automatic transaxle | | -
Detach the rear support insulator. | All Vehicles | | -
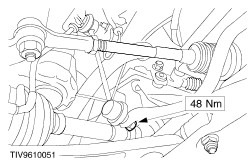
Detach the stabilizer bar connecting links. | | | -
Using a suitable transmission jack support the subframe assembly. | | | -
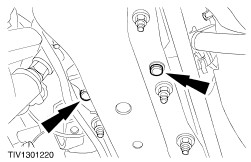
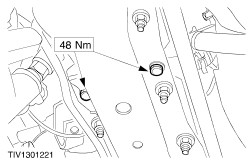
Detach the subframe. - Loosen the front bolts by five turns.
- Remove the rear bolts.
| | | -
Lower the subframe to gain access to the stabilizer bar retaining clamp bolts. | | | -
Remove the stabilizer bar (two clamp bolts each side). | Installation All Vehicles | | -
Install the stabilizer bar (two clamp bolts each side). | | | -
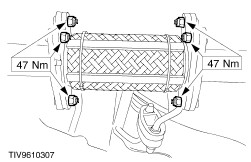
Using the special tools, align the subframe. - Install the alignment pins in the subframe alignment holes (one each side).
- Install the locking pins.
- Tighten the alignment pin sleeves.
| | | -
Raise the subframe engaging the special tools in the alignment holes. | | | -
Install the subframe bolts. | | | -
Remove the special tools (reverse the installation procedure). | | | -
Install the stabilizer bar connecting links. | Vehicles with automatic transaxle | | -
Install the rear support insulator. | Vehicles with manual transaxle | | -
Install the rear support insulator center bolt. | Vehicles with 2.5L engine | | -
CAUTION:Over bending of the flexible pipe may cause damage resulting in failure. NOTE:Install new gaskets. Install exhaust flexible pipe. - After, installation, remove the flexible pipe support.
| All Vehicles | | -
Install the splash shields. | | | -
Install the radiator splash shield. | | | -
WARNING:Install a new pinch bolt. Failure to follow these instructions may result in personal injury. Install the steering column shaft to the flexible coupling with a new bolt. | |