Ford Cougar Workshop Service and Repair Manuals
HOME
FEATURES
MENU
INDEX
ABOUT US
Brake Pedal and Bracket - RHD, Vehicles With: Manual Transaxle >
< Hydraulic Brake Actuation
Removal and Installation of Brake Pedal Bracket for LHD 1999 Cougar with Manual Transmission
Mechanical Repairs
2 Chassis
206 Brake System
206-06 Hydraulic Brake Actuation / Description and Operation
Diagnosis and Testing
Removal and Installation
Brake Pedal and Bracket - LHD, Vehicles With: Manual Transaxle
Hydraulic Brake Actuation - Brake Pedal and Bracket—LHD, Vehicles With: Manual Transaxle
Cougar 1999 (08/1998-01/2001)
Removal and Installation
Removal
Disconnect the battery ground cable.
Remove the instrument panel lower panel.
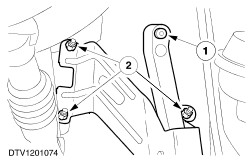
Remove the screw covers.
Remove the screws.
Remove the steering column support bracket.
Remove the pedal switches.
Disconnect the electrical connectors.
Remove the switches.
Remove the brake booster actuator rod retaining clip.
Remove the accelerator pedal and bracket.
Disconnect the accelerator cable.
Remove the nuts.
Remove the clutch master cylinder to clutch pedal retaining clip.
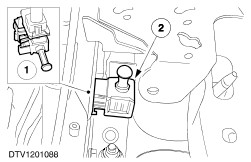
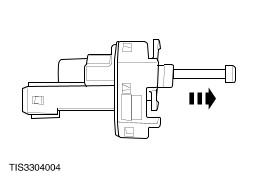
Remove the start inhibitor switch.
Depress the lug and detach the switch.
Disconnect the electrical connector.
Loosen the clutch master cylinder bolts.
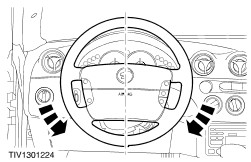
Center the steering wheel and lock in position.
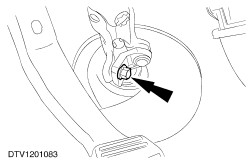
Remove the steering column shaft to flexible coupling clamp plate bolt.
Rotate the clamp plate to disengage.
Remove the pedal bracket assembly.
Remove the nut.
Remove the bolts.
Detach the clutch master cylinder from the pedal bracket.
Remove the clutch pedal return spring.
Remove the brake pedal.
Remove the pivot shaft retaining clip.
Push the pivot shaft through the brake pedal towards the clutch pedal.
Remove the spacer.
Remove the brake pedal.
Remove the actuator rod support and pedal bushing.
Remove the support.
Remove the bushings.
Remove the pedal rubber.
Installation
Install the pedal rubber.
Install the actuator rod support and pedal bushing.
Install the support.
Install the bushings.
Install the brake pedal.
Locate the pedal.
Install the spacer.
Push the pivot shaft through the brake pedal.
Install the pivot shaft retaining clip.
Install the clutch pedal return spring.
Install the pedal bracket assembly.
Install the clutch master cylinder to the pedal bracket.
Install the nut.
Install the bolts.
WARNING:
Install a new pinch bolt. Failure to follow these instructions may result in personal injury.
Install the steering column shaft to flexible coupling clamp plate bolt.
Rotate the clamp plate to engage.
Install the start inhibitor switch.
Connect the electrical connector.
Install the switch.
Install the clutch master cylinder to clutch pedal retaining clip.
Install the accelerator pedal and bracket bracket.
Install the nuts.
Connect the accelerator cable.
Install the brake booster actuator rod retaining clip.
Install the brake and clutch pedal position switches.
Install the pedal switches.
Connect the electrical connectors.
Install the stop lamp switch.
Pull the switch plunger out to its full extent.
Depress the brake pedal.
Install the stop lamp switch.
Slowly release the brake pedal.
Connect the electrical connector.
Install the instrument panel lower panel.
Install the screws.
Install the screw covers.
Connect the battery ground cable.
Mechanical Repairs
2 Chassis
206 Brake System
206-06 Hydraulic Brake Actuation / Description and Operation
Diagnosis and Testing
Removal and Installation
Brake Pedal and Bracket - LHD, Vehicles With: Manual Transaxle
Brake Pedal and Bracket - RHD, Vehicles With: Manual Transaxle >
< Hydraulic Brake Actuation