| In-vehicle Repair Name Specification Silicone gasket and sealant (F7AZ-19562-EA) WSE-M4G323-A4 Metal surface cleaner (F4A2-19A536-RA) WSE-M5B392-A Removal | | -
Remove the right-hand valve cover. For additional information, refer to RH Valve Cover in this section. | | | -
Remove the left-hand valve cover. For additional information, refer to LH Valve Cover in this section. | | | -
Remove the oil pan. For additional information, refer to Oil Pan in this section. | | | -
Disconnect the crankshaft position (CKP) sensor electrical connector. | | | -
Disconnect the camshaft position (CMP) sensor and left hand heated oxegen sensor (HO2S) electrical connectors. - Detach the wiring harness retainer and position the harness aside.
| | | -
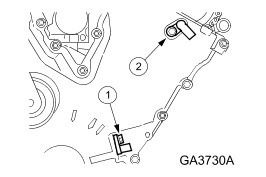
Remove the sensors. - Remove the CKP sensor.
- Remove the CMP sensor.
| | | -
NOTE:Remove the bolts and studs in the indicated sequence. Remove the engine front cover and discard the gaskets. | Installation | | -
Prior to applying sealer, clean the front cover to cylinder block and cylinder head sealing surfaces. | | | -
NOTE:Install the engine front cover within four minutes of applying the sealant. Apply a 6 mm dot of sealant to the indicated locations. | | | -
NOTE:The engine front cover must be installed in a two step sequence. NOTE:Locating dowels and the locations of the studs. Install the engine front cover. - Install the bolts and studs in the indicated sequence and tighten in two steps.
- First tighten the seven bolts and studs one quarter turn (90 degrees) after the engine front cover contacts the cylinder block and the cylinder heads.
| | | -
NOTE:Tighten the bolts and studs in the indicated sequence. Install the remaining bolts and studs. | | | -
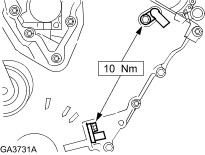
NOTE:Lubricate the new O-ring seals with light engine oil before installation. Install the CMP and CKP sensors. | | | -
Connect the CMP sensor and left hand heated oxegen sensor (HO2S) electrical connectors. - Position wiring harness and attach the retainer.
| | | -
Connect the CKP sensor electrical connector and attach the retainer. | | | -
Install the oil pan. For additional information, refer to Oil Pan in this section. | | | -
Install the right-hand valve cover. For additional information, refer to RH Valve Cover in this section. | | | -
Install the left-hand valve cover. For additional information, refer to LH Valve Cover in this section. | | |