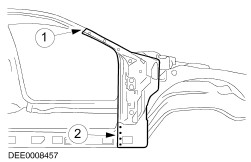
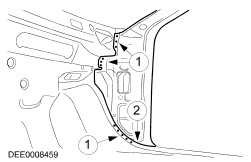
ford Workshop Repair Guides

Ford Workshop Service and Repair Manuals

Door Half Hinge > < Roof Rear Frame
Side Panel Sheet Metal Repairs - A-Pillar Outer Panel Section and Reinforcement Cougar 1999 (08/1998-01/2001)
Removal and Installation

Name
Specification
A-pillar outer panel
 
A-pillar reinforcement
 
A-pillar inner panel
 
Fender panel reinforcement
 

Removal

  1. General notes
    • This repair is only possible if the fascia crash pad is undamaged.
    • Necessary removal work: Front seat, cladding components from rocker panel and A-pillar, cross member to A-pillar bolts, windscreen trim, coolant expansion tank, power steering reservoir and door sealing rubber.
    • Fold back the carpets and move the wiring back away from the working area.
    • There may be a water drain hose and/or wiring loom routed near the area to be cut.
    • Choose the area to cut depending on the damage.

  1. A-pillar reinforcing plate
    • Grind out the weld seams.

  1. A-pillar
    1. Separation area.
    1. Preliminary separating cut.

  1. A-pillar reinforcement
    • Preliminary separating cut.

  1. A-pillar with reinforcement
    1. Preliminary separating cut (two sheet metal layers).
    1. Preliminary separating cut (one sheet metal layer).
    1. Grind out the spot welds.

  1. A-pillar with reinforcement
    • Grind out the weld seams.

  1. A-pillar reinforcement
    • Offset separating cut.

Installation

  1. Connection between A-pillar and rocker panel
    • Fix in place the plastic cover for the noise damping material in the rocker panel area.

  1. A-pillar inner panel
    1. MIG weld a continuous bead.
    1. Puddle weld.

  1. A-pillar reinforcing plate
    1. MIG weld a continuous bead.
    1. Puddle weld.

  1. A-pillar outer panel
    1. Spot weld a backing strip under the cut edge and produce a continuous bead of MIG weld.
    1. MIG weld a continuous bead.
    1. Puddle weld.

  1. Inner A-pillar
    1. Puddle weld.
    1. MIG weld a continuous bead.

  1. Fender panel reinforcement
    • Offer up and fix in position.
    1. MIG weld a continuous bead.
    1. Puddle weld.

  1. Retaining pins for trim strip clips
    • Weld into position.
  1. CAUTION:
    CAUTION:First install the drain hose on vehicles with a sliding roof.
    Sound insulation
    • Foam fill between A-pillar and rocker panel

Door Half Hinge > < Roof Rear Frame