| Description and Operation General Because of their various constructions, repair work to plastic parts involves various repair methods: - Thermoplastic straightening
- Plastic welding technology (PC, PP/EPDM etc.)
- Plastic bonding technology (all plastic parts)
- Plastic laminating technology (GRP parts with polyester resin only)
In repair work, the material characteristics of plastics are highly significant. Two main groups can be distinguished: - Thermoplastics (plastomers)
- Duroplastics (duromers)
Thermoplastics (plastomers) - Heat causes thermoplastics to change from solid state to thermoelastic state and then to thermoplastic state.
- When thermoplastics are cooled, they return to solid state.
Duroplastics (duromers) - Duroplastics are much harder and more brittle than thermoplastics.
- Their strength remains largely unchanged when they are heated. - Duroplastics are destroyed when the critical temperature point is exceeded. - Cooling down will not restore the original state. Plastics used by Ford | Abbreviation | Description | | ABS | Acrylonitrile butadiene styrene (polymer) | | PA | Polyamide | | PC | Polycarbonate | | PP | Polypropylene | | PP/EPDM | Polypropylene/ethylene propylene rubber | | PC/PBT | Polycarbonate/polybutylene terephthalate | | PBT/PC | Polybutylene terephthalate/polycarbonate | | PUR | Polyurethane | | GF | Glass fiber reinforced | Plastic identification If a plastic has no identifying marks, the type can be established using two different procedures/methods: - Visual Inspection
- Mechanical Check
The identification of a type of plastic is required for the plastic welding process in order to determine the correct allocation of the respective welding rod. Visual Inspection Visual inspections mainly serve to identify PUR and GRP materials. Thermoplastic components (e.g. bumpers) are often painted and are therefore difficult to identify. Identification characteristics: - PUR: if cracks form or similar damage occurs, visible pores of foam.
- GRP: identifiable glass fiber structure on the inside.
Mechanical Check - Degree of hardness; the higher-pitched the tone, the harder the plastic.
- Elasticity; the more muffled the tone, the higher the elasticity of the plastic.
NOTE:Mechanical checks can identify the plastics group, but not the plastic type. According to damage statistics, plastic bumper bars are most often subject to repairs. NOTE:The PUR foam must not be removed for repair purposes if the foam polyurethane on the inside is bonded to the outer shell of the bumper bar. If there is serious damage such as cracking or fracturing (splitting) to the outer shell, do not perform any repairs to the foam area. The rule is this case is: renew the part. The outer shell of plastic bumper bars is mainly comprised of thermoplastic materials. Depending on the degree of damage and accessibility, the following repair procedures can be applied: - Thermoelastic straightening
- Bonding
- Welding
Thermoelastic straightening Bumper bars often have deformations which occur in the elastic area. These normally take the form of dents, indentations and bends. Many of these deformations (e.g. to bumper bars) correct themselves of their own accord immediately or after a certain period of time. This self-correction depends on the extent of the damage and the temperature. Most flat deformations in the elastic area revert to their original form when heated with a hot air blower. Flat elastic deformations -
NOTE:The necessary application of heat varies according to the type of plastic. The application of heat must not go beyond the elastic area. Deformation to plastic cannot be reversed. Never use a naked flame! Flat indentations or dents should be heated evenly to approx. 200°C using a hot air blower, if possible apply heat to both sides in turn. Provided there is no overstretching, the deformation reverts to its original form. - To an extent, the "straightening" can be supported using mechanical tools such as the handle of a hammer, a plastic wedge, etc.
Stretch cracks and kinks If there are stretch cracks or even kinks in the damage area, then the possibilities of thermoelastic straightening are limited. Bonding repairs are most suited to this kind of damage. - To prevent tension in the material, cut off the cracked or kinked areas (using a hacksaw).
- Heat the depression to approx. 200°C (evenly, both outside and inside) and adjust to the original form using a narrow spatula or hammer handle.
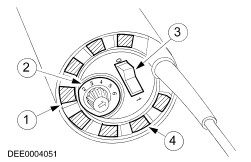
Plastic welding NOTE:Do not carry out plastic welding in the area of fixed foam backing. Plastic welding is the most suitable repair method for cracks to plastic bumper bars, where the rear side of the damaged area is unsuited to repairs by bonding. Examples: Ribbed section, box section, narrow rounded sections in reinforced areas. Required tools and materials - In addition to the tools available in the workshop (such as scrapers, grinders, etc.) the following tools are required for plastic welding:
- Hot air blower (approx. 1500 W) - Face cutter Ø 5.5 mm for processing the welding groove. - Scraper (heart-shaped). Plastic welding gun 3 - Wedge nozzle (fixed nozzle) Preparing the repair location (crack) Prepare cracking for the welding process in V-formation. V-groove weld seam Preparing the V-groove weld seam: - Form the welding groove using the scraper (face cutter).
- Keep the angle of the joint at 60° - 70°.
-
NOTE:Boring out the end of the cracked (3mm drill bit) prevents further cracking. Where the edge alignment is uneven, fix the start of the crack using clamp pliers before starting welding. Finally, bore out the end of crack. Preparing the hot air blower and welding rod Convert the hot air blower into a plastic welding gun (extension nozzle and rapid welding nozzle). - Set the weld temperature (200°C -700°C) according to the prescribed values.
Weld temperature Two factors determine the weld temperature: - Plastic material
- Thickness of the welding rod
Values for the most important materials and conventional welding rod thickness (5.7 mm x 3.7 mm) | Thermoplastic | Weld temperature in °C (guide value) | Potentiometer control setting for plastic welding gun | | | | Wedge nozzle | Rapid welding nozzle 5.7mm | | ABS | 350 | 4,5 | 5,3 | | PP | 300 | 3,8 | 4,5 | | PP/EPDM | 300 | 3,8 | 4,5 | | PBT/PC | 300 | 3,8 | 4,5 | | PA | 400 | 5,1 | 5,6 | | PC | 350 | 4,5 | 5,3 | | PC/PBTP | 350 | 4,5 | 5,3 | - Only weld PBT/PC plastic using a PP welding rod.
- Glass fiber reinforced plastics cannot be welded.
- Blue-dyed plastic parts on the Ford Ka cannot be painted and are therefore not suited to plastic repairs.
Rear side of the plastic welding gun 2 - Temperature control unit - The temperatures given are air temperatures for the plastic welding gun. The temperature of the material is much lower.
- Observe the manufacturer's instructions when setting the temperature.
- Preheat the welding equipment to the preselected welding temperature for 3-4 minutes.
- Bevel the welding rod at the front to ensure gradual filling at the start of the crack groove.
Carrying out the welding The following requirements must be met for plastic welding: - Correct temperature setting
- Even welding speed
- Even operating pressure
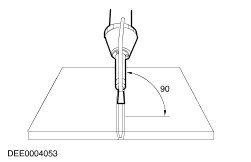
Push the beveled welding rod through the heated pre-heating chamber of the rapid welding nozzle until the tip of the welding rod emerges from the underside. Aligning the rapid welding nozzle The underside of the rapid welding nozzle must run parallel to the repair surface in a lengthways direction. Parallel alignment in a lengthways direction is achieved with the welding equipment at the appropriate inclination. Position of the plastic welding gun - Move the plastic welding gun in such a way that the welding rod is exactly vertical to the welding groove.
- The welding procedure can be started when the welding rod and the plastic to be welded are in a plastic state.
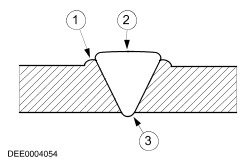
Weld seam 2 - Heightening of weld seam -
NOTE:The optimal connection is achieved when a small and even bead of weld has formed along the edge of the weld seam. It is essential to weld through the crack seam. Check the weld seam from the rear side and re-weld if necessary. The operating pressure when welding is only exerted across the welding rod. Welding errors Deformation: - Repair area was overheated.
- Material tension present when welding parts.
- Plastic material too thin.
Poor welded joint: - Weld temperature too low.
- Weld speed too fast.
- Welding together differing materials.
Weld seam sinks: - Crack groove too wide
- Weld temperature too high.
Re-working the weld seam - After cooling down, the raised part of the weld seam can be sanded down using an angle sander and abrasive paper of P80 grit.
- Surface grinding is then carried out using the orbital sander and abrasive paper of P120 - P220 grit.
- Clean the ground repair surface using plastic cleaner.
- Apply plastic primer thinly to the repair surface.
Plastic reciprocal welding Reciprocal welding is the preferred method for crack damage in hard-to-reach areas. - The welding rod is moved freely in reciprocal welding.
- The preparation of the crack groove is the same.
Carrying out the welding - The plastic welding gun is only fitted with the extension nozzle.
- The welding rod and the crack groove are brought into plastic state by means of vertical reciprocating movements.
- The welding rod is pressed into the crack groove vertically in a plastic state.
Reciprocal welding The following requirements must be met for reciprocal welding: - Equal heating of welding rod and welding groove.
- Even welding speed.
- Vertical positioning and even pressure on the welding rod.
All other repair steps are described in the chapter Plastic Welding - Re-working the Weld Seam. Plastic bonding General Bonding technology has some advantages over welding technology: - Within the group of thermoelastics, all semi-rigid ancillary components (such as bumper bars, front grilles, etc.) can be repaired without identification.
- A two-component adhesive with a polyurethane basis must be used for all thermoplastic parts.
- Reinforcement strips can be attached to crack grooves (cracks up to max. 100mm) and fractures to ensure the original tensile properties.
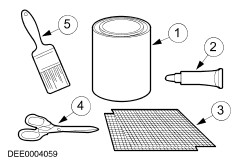
Required tools and equipment Tools and equipment from the paint shop can be used to carry out bonding repairs to thermoplastic parts. Angle grinders and belt sanders can be used to grind out scratches and crack damage. Orbital sanders with extractors are used for fine sanding. An infrared heater ensures fast and effective drying. Plastic repair set - Plastic cleaner
- Plastic primer
- Adhesive repair set
- Three double cartridges - Metal reinforcement strips
- Reinforcing fiber
Tools and auxiliary equipment 1 - Angle grinder with speed control Preparing the repair location (scratch) Before the repair, clean plastic parts on both sides using a high-pressure cleaner, and then dry. - Clean the repair surface using plastic cleaner.
Grinding out the scratch 1 - Preparation of the scratch 2 - Preparation of the crack - Grind out the scratches thoroughly flat using an orbital sander. Abrasive paper, P80 - P120 grit
- Fine sanding with orbital sander: Abrasive paper, P120 grit
-
NOTE:Wear protective gloves for cleaning. Thoroughly clean the repair location using plastic cleaner and paper towels. - Spray plastic primer evenly onto the repair location.
Preparing the repair location (crack) - Grind out the crack on the front side so that it is flat using an angle grinder or belt sander. Grinding surface 40-60mm wide
- Regrind with an orbital sander. Abrasive paper: P120 grit.
- Bore out the end of the crack (Ø 3 mm) to prevent further cracking.
- Rub down the rear side along the crack.
- Clean the repair location on both sides using plastic cleaner and paper towels.
- Spray plastic primer evenly onto the repair location.
Preparation for bonding - The two-component adhesive is applied to the cleaned and primed repair location using a hand gun.
- Operating the gun lever pushes the resin and hardener components from the double cartridge into the attached emulsion tube.
Scratch bonding Even slight depressions such as cracks require preparation. The surface of the repair area also has to be processed to provide sufficient priming for the adhesive. This also prevents the repair area from subsequently sinking. - After cleaning and priming, over-fill the ground out scratch cavity with adhesive.
- Dip the end of the emulsion tube in adhesive during the material application to prevent the ingress of air.
- Spread and smooth the adhesive using a flexible plastic stopper.
- Set using an infrared heater or in a drying oven.
Crack bonding with reinforcement The repair location is reinforced to increase torsional strength in the case of cracking and fracture damage over a large area. To this end, suitable reinforcement materials (metal strips, reinforcement fibers) are affixed to the rear side. - Cover the crack on the front side with a PE sheet and with adhesive tape.
- From the rear side, fill the ground out crack groove with plastic adhesive.
- A wide strip of reinforcing fiber is fixed over the crack groove in the bead of adhesive.
- The ends of the crack are reinforced by affixing a metal strip that is fastened to the plastic part using pliers.
- Then level out the reinforcement material over the whole surface.
- Dry using an infrared heater or in a drying oven.
- The PE sheet prevents the adhesive from overflowing at the front side of the crack.
- Pull off the PE sheet after drying the adhesive.
- Spread adhesive over the repair location on the front side.
- Set using an infrared heater or in a drying oven.
- Cool the adhesive to room temperature to prevent the adhesive being pulled off when sanding, and to prevent the abrasive paper becoming worn.
Sanding -
NOTE:In the case of dry sanding, use an extraction unit and wear a dust mask. Sand down protruding adhesive using an orbital sander. Abrasive paper: P120 - P220 grit. - Re-work sags and curved areas manually.
- Use an abrasive pad to roughen painted surfaces.
- Thoroughly clean the plastic part using plastic cleaner and paper towels.
-
NOTE:Thoroughly dry out the plastic primer (matt surface). Spray plastic primer for the subsequent 2K filler application thinly onto the repair areas and sanded-through areas. Two-component filler application To prevent porosity at the edges and to smooth out uneven areas, it is advisable to apply 2K filler (MS, HS) with an elasticising additive. - After drying, cool the 2K filler to room temperature and sand down using an orbital sander and fine abrasive paper.
- Re-work sags and curved areas manually (wet) using fine abrasive paper.
- Check the contour of the repair location and re-work if the contours are uneven.
- Perform painting in accordance with the manufacturer's instructions.
GRP repairs General GRP material is hard and brittle in its tensile properties. Because of these material properties, cracks and fractures often result in cases of serious damage. The stability and safety of GRP parts is impaired if the glass fiber reinforcement is cracked. This must be replaced in cases of serious damage that affect the structure of the part. Minor damage (such as abrasion, cracks up to 80mm, holes up to approx. 60mm diameter, etc.) can be repaired to a technically and visually perfect standard, provided that the damage does not occur in heavily used or hard-to-reach areas. To ensure excellent repairs, observe the following points: - The room temperature should be at least 15°C and the air should be as dry as possible.
-
NOTE:Fingerprints leave behind a film that prevents a proper joint. The repair location must be thoroughly dry and clean. - Before the repair, the GRP part being repaired must be dried using an infrared heater or in a drying oven.
- In cases of large cracks and fractures, the strength of the outer skin can be re-established by backing with a reinforcement material.
Required tools and auxiliary equipment - Hacksaw (body saw) for separating cracks.
- Axial grinder, angle grinder or belt sander for grinding out repair locations.
- Orbital sander for grinding out and grinding down the repair surface.
- Hand sanding block for grinding small surfaces.
Grinding the repair location - Grind out the edge of the hole, in a V form and flat, using an angle grinder - abrasive paper P80 - P120 grit.
- Remove layers of filler and paint.
- If cracks have formed, these are ground out at the base of the crack by 3mm. This eliminates any tension.
- Careful, flat grinding is important for the subsequent adhesion of the repair material.
-
NOTE:The surface must be re-ground by hand. Grinding with the angle grinder creates heat that causes a change in the surface structure of the resin. This results in reduced adhesive properties. GRP repair material GRP repair components Apply polyester resin - The polyester resin is mixed with hardener and applied thinly to the clean repair location with a brush.
Insert the glass fiber mat - Cut the glass fiber mat to size and insert it into the applied polyester resin.
- Applied more polyester resin over the glass fiber mat, and add a second or third mat if necessary.
-
NOTE:Completely soak the glass fiber mat in polyester resin. No air may be trapped in the repair area. Apply polyester resin using a brush. - Allow the polyester resin to dry at room temperature.
- Back larger cracks and fractures with reinforcement material to restore the strength of the outer skin.
Apply stopper - The depression on the front side is filled with polyester fiber stopper to achieve a smooth, flat surface.
- Repeat the procedure if necessary.
Apply stopper 1 - GRP part being repaired 2 - Polyester fiber stopper Final application of stopper - Re-create the surface contours by applying stopper or polyester filler.
Grinding with the orbital sander - Sand down protruding polyester material using an orbital sander. Abrasive paper, P120 - P220 grit.
- The repair surface can be painted after grinding.
Safety measures - Polyester resin, adhesive, solvents and thinners are inflammable and must be kept away from naked fire or flames.
- Sawing and grinding operations must only be carried out in rooms equipped with extraction systems.
- If no rooms with extraction systems are available, only use tools with extraction systems.
- Protective equipment such as gloves, protective goggles, aprons and breathing masks are essential.
For additional information, refer to Section 501-25A Body Repairs - General Information / 501-25B Body Repairs - Corrosion Protection / 501-25C Body Repairs - Plastic Repairs / 501-25D Body Repairs - Water Leaks / 501-25E Body Repairs - Wind Noise / 501-25F Body Repairs - Paintless Dent Removal / 501-25G Body Repairs - Noise, Vibration and Harshness. It is also important to observe all applicable regulations, accident prevention legislation, information sheets, safety notices and guidelines for the processing of adhesives containing isocyanate, polyester resin, adhesives, solvent and thinners. |