| Removal and Installation Removal All Vehicles | | -
CAUTION:If brake fluid is spilt on the paintwork, the affected area must be immediately washed down with cold water. Disconnect the battery ground cable. | | | -
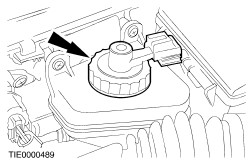
Disconnect the electrical connector from the filler cap. - Pull back the tab.
- Depress the clips.
- Disconnect the electrical connector.
| | | -
CAUTION:Make sure the filler cap does not become contaminated. Remove the brake fluid reservoir filler cap. | | | -
Loosen the wheel nuts of both front wheels. | | | -
Loosen the bleed nipple. - Remove the dust cap.
- Loosen the bleed nipple.
| | | -
NOTE:Carry out this process on both the front brake lines. Drain the brake fluid reservoir. - Connect a bleed tube to the bleed nipple and into a suitable container.
- Pump the brake pedal until no more fluid is expelled.
- Tighten the bleed nipple.
| | | -
Remove the air cleaner outlet tube. | | | -
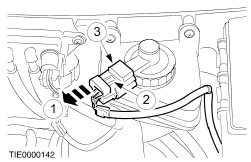
Disconnect the central electrical box electrical connector. | | | -
Remove the central electrical box retaining screw. | | | -
Detach the central electrical box. - Relocate to the air cleaner position.
| | | -
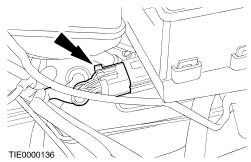
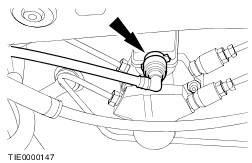
Disconnect the brake fluid feed tube. | Vehicles with Stability Assist | | -
Disconnect the brake pressure sensors electrical connector. | All Vehicles | | -
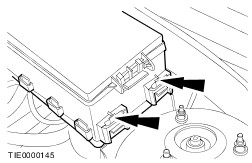
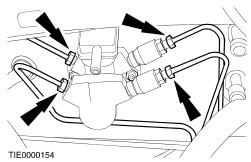
CAUTION:Cap the brake tube connections to prevent fluid loss or dirt contamination. Disconnect the brake tubes. | Vehicles with anti-lock brakes | | -
CAUTION:Cap the brake tube connection to prevent fluid loss or dirt contamination. Disconnect the brake tubes. | All Vehicles | | -
CAUTION:Before removing the master cylinder make sure that the booster vacuum is exhausted. This may be done by removing the vacuum pipe from the brake booster. Remove the brake booster vacuum hose. | | | -
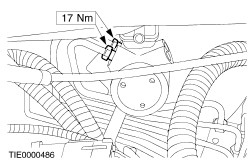
Remove the master cylinder. | Installation All Vehicles | | -
CAUTION:Before installing the master cylinder make sure that the vacuum seal is in place and that the mating faces are clean. To install, reverse the removal procedure. | Vehicles with anti-lock brakes All Vehicles |