| In-vehicle Repair Special Tool(s) | | Separator, Oil Pan 303-428 (21-179) | | | Alignment Gauge, TR Sensor 307-438 (17-087) | Materials Name Specification Metal Surface Cleaner WSE-M5B-392-A Automatic Transmission Fluid N052990VX00 Sealant WSE-M4G323-A4 Removal | | -
Remove the engine undershield. | | | -
Detach the ground cable from the transaxle. | | | -
Remove the secondary air injection (AIR) pump intake pipe and ball valve. | | | -
Detach the cable bracket from the fluid pan (three nuts). | | | -
Remove the transaxle oil filler tube plug (fluid pan shown removed for clarity). - Remove and discard the plastic snap ring.
| | | -
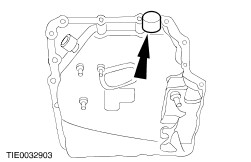
Remove the transaxle ventilation valve (fluid pan shown removed for clarity). | | | -
NOTE:If an internal transaxle concern is suspected, drain the fluid through a paper filter. A small amount of metal or friction particles may be found from normal wear. However, if excessive metal or friction particles are present, a detailed inspection of the transaxle will be required. Remove the transaxle drain plug. - Allow the fluid to drain into a suitable container.
| | | -
Remove the transaxle fluid pan bolts. | | | -
CAUTION:Do not distort the transaxle fluid pan. Using the special tool, remove the transaxle fluid pan. - Slide the special tool around the profile of the pan.
| Installation | | -
NOTE:Make sure that the mating surface of fluid pan and transaxle case are clean and oil free. NOTE:Install the fluid pan within 10 minutes of applying the sealant. Apply approximately a 3 mm diameter bead of sealant to the inside edge of the fluid pan mating face. | | | -
NOTE:Tighten the transaxle fluid pan retaining bolts in a diagonal sequence. Install the transaxle fluid pan. | | | -
Install the transaxle ventilation valve (fluid pan shown removed for clarity). | | | -
Attach the cable bracket to the fluid pan (three nuts). | | | -
Install the secondary air injection (AIR) pump intake pipe and ball valve. | | | -
Attach the ground cable to the transaxle. | | | -
NOTE:Install a new drain plug seal. NOTE:Clean the drain plug threads. Install the drain plug. | | | -
Install the engine undershield. | | | -
Attach the shift cable bracket to the transaxle fluid pan. | | | -
Install the front bumper cover. For additional information, refer to Section 501-19 Bumpers. | | | -
Check the transmission fluid level. For additional information, refer to Fluid Level Check in this section. | | |