| In-vehicle Repair Special Tool(s) | | Installer, Oil Seal 303-039 (21009B) | | | Alignment Plate, Camshaft - TDC position 303-376 (21162B) | Materials Name Specification Cable ties Sealer - Camshaft bearing cap WSK-M2G348-A2/A5 Engine oil WSS-M2C912-A1 Removal | | -
General Notes. - The position markings for the engine mountings and engine roll restrictors are described looking from the transmission towards the engine.
- Any steps which only apply to certain variants and not to all vehicles are clearly indicated.
| | | -
Standard preparatory measures - Request the radio keycode.
- Make a note of the pre-set radio stations.
| | | -
Detach the pulley cover (if equipped). | | | -
Remove the intake pipe. - Disconnect the mass air flow (MAF) sensor multiplug.
- Disconnect the intake air temperature (IAT) sensor multiplug (if equipped).
- Remove one bolt and two nuts.
- Release the retaining clips.
| | | -
Detach the cruise control cable (if equipped). - Cable from throttle valve
- Pull the cable out of the bush while gently moving it up and down.
- Press the bush out of the bracket.
| | | -
Detach the accelerator cable. - Pull off the plastic clip and lay the accelerator cable to one side.
| | | -
Remove the timing belt.
For additional information, refer to: Zahnriemen (303-01D Motor - gebaut ab 05/1998 1.6L/1.8L/2.0L, In-vehicle Repair).
| | | -
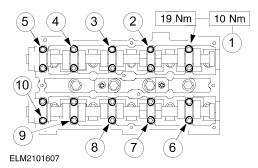
Unscrew the bolts of the camshaft bearing caps evenly and in several stages, two turns at a time. | Installation | | -
NOTE:The identification numbers are located on the outside of the camshaft bearing caps. Apply sealant to camshaft bearing caps nos. 0 and 5, in the areas shown. | | | -
Turn the crankshaft to approx. 60° BTDC. | | | -
NOTE:Lay the camshafts in place with none of the cams at full lift. Lubricate the camshaft and camshaft bearing caps with engine oil . | | | -
NOTE:Work through the tightening sequence several times and tighten the camshaft bearing caps evenly a half a turn at a time, and then tighten them down in two stages. Tighten the camshaft bearing caps. | | | -
Install the camshaft oil seals. - Lubricate the camshafts and the sealing lip of the oil seals with engine oil .
- Draw in the new oil seals using the special tool, a washer and an M10x70 bolt.
| | | -
NOTE:Do not tighten the bolts. The timing pulleys must be free to turn on the camshafts. Turn the camshafts to ignition point on cylinder no. 1 and insert the special tool into the camshafts. | | | -
Install the timing belt.
For additional information, refer to: Zahnriemen (303-01D Motor - gebaut ab 05/1998 1.6L/1.8L/2.0L, In-vehicle Repair).
| | | -
Attach the accelerator cable and adjust it. - Attach the cable in the bracket and slide on the plastic clip.
- Pull the clip off the accelerator cable.
- Pull the inner cable a few clicks out from the outer cable.
- Fully depress the accelerator pedal once and slide the clip back on.
- Check that the throttle plate opens fully when the accelerator pedal is depressed. If not, repeat the adjustment procedure.
| | | -
Install the cruise control system cable (if equipped). - Press the bush into the bracket.
NOTE:An audible click indicates proper engagement. - Cable in bush
- Cable on throttle valve
| | | -
Install the intake pipe. - Secure the retaining clips.
- Install a bolt and two nuts.
- Connect the plug for the IAT sensor (if equipped).
- Connect the MAF multiplug.
| | | -
Standard finishing operations. - Connect the battery ground cable.
- Check fluid levels and correct if necessary.
- Check the routing of vacuum hoses and the wiring and secure them with cable ties.
- Reprogram the pre-set radio stations.
- Carry out a road test to enable the PCM to collect data.
- Check the fluid levels again and correct as necessary.
| | |