| Removal and Installation Fein cutter blade No. 6 39 03 163 01 1 Fein cutter blade No. 6 39 03 157 01 1 Fein cutter blade No. 6 39 03 113 02 2 Fein oscillating cutter FDEP No. 2583391 Hot air gun Mixer/application gun Removal All Vehicles | | -
Disconnect the battery ground cable. | | | -
NOTE:Should the ambient temperature fall below 10°C, heat the cartridges for approximately 15 minutes by placing them on a warm radiator, or by using a hot air gun set at approximately 25°C. Heat the polyurethane (PU) adhesive if necessary. | | | -
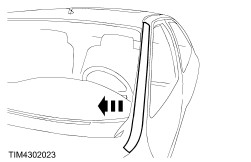
Remove the windshield trim panels on each side. | Vehicles with heated windshield | | -
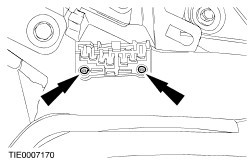
Disconnect the windshield electrical connectors. | All Vehicles | | -
Remove the windshield trim panel retaining clips on each side. | | | -
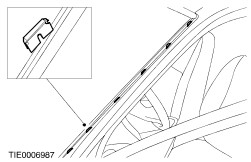
Remove the windshield top weatherseal. | | | -
Detach the door weatherstrip. | | | -
WARNING:Wear gloves and eye protection when working with the glass cutting tool as the cutting operation may produce splinters. When using the Fein cutter wear ear protection. Failure to follow these instructions may result in personal injury. NOTE:If a heated windshield is to be re-installed, make sure the cutter blade is kept low when cutting in the area of the heated windshield connectors. Cut around the windshield using the Fein oscillating cutter fitted with the Fein cutter blade number 6 39 03 163 01 1. | | | -
Cut the bottom edge of the windshield using the Fein oscillating cutter fitted with the Fein cutter blade number 6 39 03 157 01 1. | | | -
With the aid of another technician, use suction cups, to remove the windshield glass. | | | -
Drill out the rivets and remove the locator blocks. | Installation All Vehicles | | -
CAUTION:During the curing period of the PU adhesive, the door windows must be left open to avoid a build up of pressure when the doors are opened and closed. CAUTION:Avoid touching the trimmed surface as this will inhibit the bonding of the new adhesive. Remove the excess PU adhesive from the opening flange. - Carefully trim the remaining PU adhesive from the windshield opening to leave approximately 1 mm of trimmed PU adhesive adhered to the opening flange.
| | | -
If the original windshield is to be re-installed, remove the excess PU adhesive from the glass as described in the previous step. | | | -
Check the pinch weld sealing area for damaged sheet metal, rust or foreign material which may have caused, or may cause, glass breakage. | | | -
NOTE:Due to the possibility of the locator blocks creating a high pressure point, which may result in the windshield cracking, new locator blocks must not be installed. Seal the holes with waterproof rivets. | | | -
CAUTION:To make sure that the PU adhesive cures, it is essential that all bonding surfaces are free of all moisture. Using a hot air gun apply warm air (25°C) to the windshield opening flange and glass bond line to remove all traces of moisture. | | | -
Prepare the glass, windshield opening and trimmed PU adhesive in accordance with the instructions supplied with the adhesive kit. | | | -
Install the windshield top weatherstrip. | | | -
NOTE:Discard the first 100 mm of PU adhesive as this may have a reduced working time. NOTE:To avoid water leaks, any breakage in the continuous bead should be overlapped by 20 mm. Apply the PU adhesive in a continuous bead of between 8 and 10 mm height to the windshield flange along the bond line. | | | -
NOTE:Firmly and evenly press in position. With the aid of another technician, use suction cups to install the windshield glass. | | | -
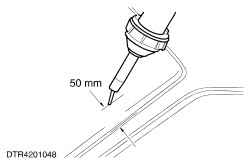
Should the ambient temperature fall below 10°C, use a hot air gun at a distance of approximately 50 mm from the surface and apply warm air (25°C) continuously for 15 minutes (inside or outside the vehicle). | | | -
Install the door weatherstrip. | Vehicles with heated windshield | | -
Connect the windshield electrical connectors. | All Vehicles | | -
Install the windshield trim retaining clips and install the windshield trims on each side. | | | -
Connect the battery ground cable. | |