| Disassembly and Assembly Disassembly All vehicles | | -
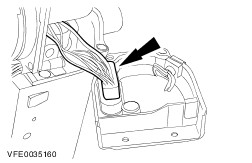
Remove the water cooling jacket cover. | | | -
Remove the combustion air blower cover. | | | -
Detach the overheat sensor and the temperature sensor. | | | -
Remove the electronic control unit and the air blower motor cover. - Disconnect the internal electrical connector.
| | | -
Remove the combustion air blower motor cover. | | | -
Remove the fuel fired booster heater module. - Disconnect the internal electrical connector.
| Vehicles built up to 02/2003 | | -
Disconnect the glow plug wire from the glow plug. | Vehicles built 02/2003 onwards | | -
Disconnect the cables from the fuel fired booster heater electrical connector (glow plug shown removed for clarity). | All vehicles | | -
Disconnect the cables from the fuel fired booster heater electrical connector (flame sensor shown removed for clarity). | | | -
CAUTION:Use an open-ended wrench to hold the pre-ignition chamber by the hexagon to prevent damages of the pre-ignition chamber. Remove the glow plug. | | | -
Remove the pre-ignition chamber. - Turn the pre-ignition chamber clockwise.
- Pull out the pre-ignition chamber.
| | | -
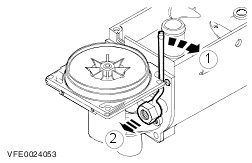
Remove the combustion air blower motor. | | | -
Remove the combustion chamber. | | | -
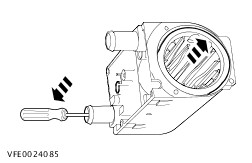
Using a screwdriver to remove the heat exchanger. | Assembly | | -
NOTE:Install new O-ring seals and seals before assembly. NOTE:Coat the O-ring seals in coolant fluid prior to installation. To assemble, reverse the disassembly procedure. | |