| Removal and Installation Special Tool(s) | | Remover/Installer, Ball Joint 204-288A (14-063A) | | | Installer Halfshaft 204-602 | General Equipment Removal | | -
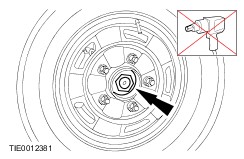
Remove the halfshaft retaining nut locking ring. | | | -
Loosen the halfshaft retaining nut. | | | -
Remove the wheel and tire.
For additional information, refer to: Wheel and Tire (204-04 Wheels and Tires, Removal and Installation).
| | | -
Remove the halfshaft retaining nut. | | | -
Loosen the lower arm ball joint retaining nut. | | | -
CAUTION:Protect the ball joint seal using a soft cloth to prevent damage. Using a suitable two leg puller, detach the lower arm from the wheel knuckle. - Use a soft faced hammer to strike the lower arm.
- Remove and discard the retaining nut.
| | | -
CAUTION:Support the halfshaft. The inner joint must not be bent more than 21 degrees. The outer joint must not be bent more than 45 degrees. Using a suitable two leg puller, detach the halfshaft from the wheel hub and secure it to one side. | | | -
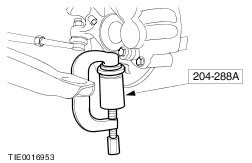
Using the special tool, remove the lower arm ball joint and heat shield. | Installation | | -
CAUTION:Make sure that the heat shield is correctly located to prevent damage to the ball joint. NOTE:Use only the special tool to install the lower arm ball joint to the wheel knuckle. Do not use any other tools if there is a gap between the lower arm ball joint and the wheel knuckle. Using the special tool, attach the lower arm ball joint and heat shield to the wheel knuckle. | | | -
Using the special tool and a suitable two leg puller, install the lower arm ball joint. | | | -
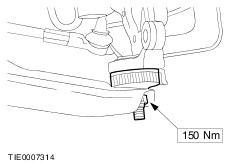
WARNING:Install a new lower arm ball joint retaining nut. Failure to follow this instruction may result in personal injury. Attach the lower arm to the wheel knuckle. | | | -
Attach the wheel hub and brake disc assembly to the halfshaft. | | | -
Install the wheel and tire.
For additional information, refer to: Wheel and Tire (204-04 Wheels and Tires, Removal and Installation).
| | | -
WARNING:Make sure that a new nut is installed. WARNING:Not following the work instruction leads to destruction of the components. NOTE:Make sure the halfshaft retaining nut washer is installed. Install the halfshaft retaining nut and washer. Tighten the halfshaft retaining nut in 5 stages: - Rotate the wheel 5 times.
- Tighten the halfshaft retaining nut to 250 Nm.
- Rotate the wheel 5 times.
- Fully tighten the halfshaft retaining nut to 500 Nm.
- Rotate the wheel 5 times.
| | | -
NOTE:Install a new cotter pin. Install the halfshaft retaining nut locking ring. | | | -
Check the toe setting and adjust as necessary.For additional information, refer to: (204-00 Suspension System - General Information) Specifications (Specifications), Front Toe Adjustment (General Procedures). | | |