| Removal and Installation Special Tool(s) | | 412-027 Disconnect Tool, Spring Lock Coupling (1/2" blue) | | | 412-038 Disconnect Tool, Spring Lock Coupling (5/8" black) | Materials Name Specification Refrigerant Oil WSH-M1C231-B Removal All vehicles NOTE:Removal steps in this procedure may contain installation details. | | -
Refer to: Supplemental Restraint System (SRS) Health and Safety Precautions (100-00 General Information, Description and Operation). | | | -
Disconnect the battery negative lead. Refer to: Battery Disconnect and Connect (414-01 Battery, Mounting and Cables, General Procedures). | Vehicles with air conditioning | | -
Drain the air conditioning system. Refer to: Air Conditioning (A/C) System Recovery, Evacuation and Charging (412-00 Climate Control System - General Information, General Procedures). | | | -
CAUTION:Make sure that all openings are sealed. | All vehicles | | -
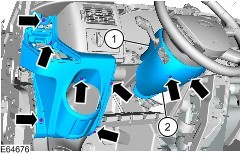
Remove the audio unit. Refer to: Audio Unit (415-01 Information and Entertainment System, Removal and Installation). | | | -
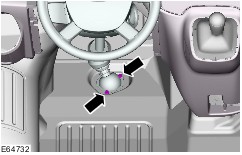
Remove the A-pillar trim on the right and left-hand sides. Refer to: A-Pillar Trim Panel (501-05 Interior Trim and Ornamentation, Removal and Installation). | | | -
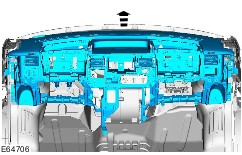
NOTE:Make sure the wheels are in the straight-ahead position. | | | -
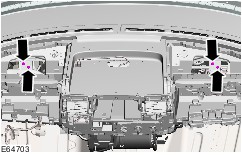
Raise the vehicle for access Refer to: Lifting (100-02 Jacking and Lifting, Description and Operation). | | | -
CAUTION:Make sure that new bolts are installed. | Vehicles with remote control for the audio unit All vehicles | | -
WARNING:Make sure that new self-locking nuts are installed. Torque: 20 Nm | Installation | | -
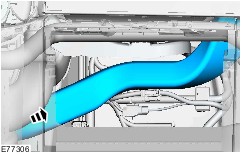
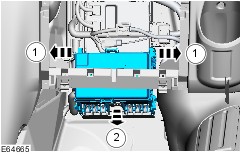
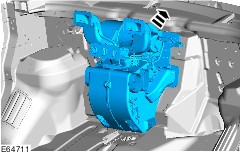
CAUTION:The water drain tube can easily be damaged while positioning the climate control housing. To install, reverse the removal procedure. | | | -
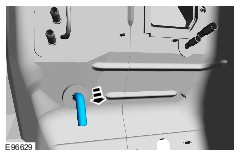
Coat the O-rings for the refrigerant line with clean refrigerant oil. | | | -
Loosen the bolts four turns. | | | -
Start the engine, turn the steering wheel from lock to lock. | | | -
Inspect the coolant level. Refer to: Cooling System Draining, Filling and Bleeding - 2.3L Duratec-HE (MI4), Vehicles Without: Fuel Fired Booster Heater (303-03 Engine Cooling, General Procedures). Refer to: Cooling System Draining, Filling and Bleeding - 2.3L Duratec-HE (MI4), Vehicles With: Fuel Fired Booster Heater (303-03 Engine Cooling, General Procedures). Refer to: Cooling System Draining, Filling and Bleeding - 2.2L Duratorq-TDCi (Puma) Diesel/2.4L Duratorq-TDCi (Puma) Diesel/3.2L Duratorq-TDCi (Puma) Diesel, Vehicles With: Fuel Fired Booster Heater (303-03 Engine Cooling, General Procedures). Refer to: Cooling System Draining, Filling and Bleeding - 2.2L Duratorq-TDCi (Puma) Diesel/2.4L Duratorq-TDCi (Puma) Diesel/3.2L Duratorq-TDCi (Puma) Diesel, Vehicles Without: Fuel Fired Booster Heater (303-03 Engine Cooling, General Procedures). | |