
VACUUM UNIT – Oil leaks - Service Solution
- Make
- Lancia
- Model
- Thesis Factory Service Manual
- Year
- 2002–2009
- Section
- Braking system › VACUUM UNIT – Oil leaks - Service Solution
VACUUM UNIT – Oil leaks - Service Solution
VACUUM UNIT
Oil leaks - Service Solution
FAULT COMPLAINED OF
Oil leaks from the vacuum unit attachment on the head.
TECHNICAL CAUSE
Deterioration of the tightening torque due to the bedding in of the seal and/or ridge in the join of the camshaft housing in the area of the vacuum unit flange plane.
OPERATIONS IN PRODUCTION
The elimination of the ridge in the join for the camshaft housing has been ensured by an improved fitting process for the parts, the adoption of a new seal between the vacuum unit and the head and a new tightening order for the fixing bolts.
IMPLEMENTATION OF MODIFICATION
| Version | Prod. date |
|---|---|
| all versions in question | 10/2002 |
OPERATIONS IN NETWORK
Network behaviour standards towards the Customer
- When the problem is reported and confirmed, reassure the Customer that it can be solved by replacing the vacuum unit seal with an improved one and by tightening the fixing bolts in a special way.
- After the operation illustrate what has been done and road test the vehicle to make sure that the Customer is satisfied.
Service Solution:If an oil leak between the vacuum unit and the head is reported and confirmed, replace the seal and tighten the vacuum unit fixing bolts, following the new tightening order as described in the Operating Cycle below.
OPERATING CYCLE
- Remove the sound insulation cover.
- Clean the engine thoroughly to eliminate all traces of engine oil leaks, especially in the area of the vacuum unit.
- Undo the bolts, detach the vacuum pipe and remove the vacuum unit.
- Remove the gasket.
- Thoroughly clean any further residues of traces of oil from both the vacuum unit and the head, in particular the area of the vacuum unit flange.
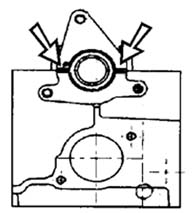
- Apply sealant no. 71720318 (LOCTITE 510) to the join line between the camshaft housing and the vacuum unit flange plane (see arrows in Fig. 1); do not apply excess sealant.
The recommended sealant should be used, not other products such as, for example, silicon sealants.
When using chemicals, closely follow the safety instructions given on the safety sheet which the supplier must give to the user (in Italy, in accordance with Legislative Decrees 52/97 and 285/98 and later modifications and inclusions).
Fig. 1
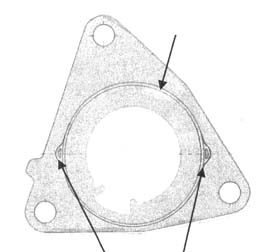
- Fit the new seal on the vacuum unit with the area that projects beyond the circumference (arrows in Fig. 2) facing the actual vacuum unit flange.
Fig. 2
- Fit the vacuum unit on the head, tightening the bolts to a torque of 1.5 daNm in the order shown in Fig. 3.
Fig. 3
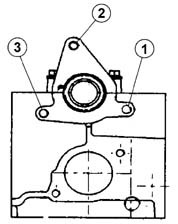
- Tighten the bolts to 2.5 daNm, in the same order as illustrated in Fig. 3.
- Repeat the tightening to 2.5 daNm after an hour in order to compensate for the bedding in of the seal, in the same order as previously.
- Refit the components removed previously reversing the order of the operations carried out for the removal.
AVAILABILITY OF PARTS
| Version | Description | Order n. | Qty. |
|---|---|---|---|
| all versions in question | Seal | 55192351 | 1 |
| all versions in question | Sealant | 71720318 | 1 |
CLAIM REPORT DATA
| Version | Operation | Piece | Fault | Position | Time allowance |
|---|---|---|---|---|---|
| all versions in question | 3330120 | 1 | EA | - | .50 |
Parts & tools for this job For 2002 Lancia Thesis
- PARTOil filterSearch: Lancia Thesis 2002 oil filter
- TOOLOil filter wrenchSearch: oil filter wrench
- FLUIDEngine oilSearch: Lancia Thesis engine oil
Links open Amazon search results in a new tab. As an Amazon Associate I earn from qualifying purchases.