Range Rover P38

BMW DIESEL
29
REPAIR
Refit
CAUTION: If crankshaft timing pin
LRT-12-108 has been removed, ensure that
FIP is on correct stroke, with dimple on
FIP sprocket visible, before refitting pin.
45. Ensure all mating faces are clean.
46. Check cylinder block ring dowels for condition
and correct location.
47. Apply 1.5mm bead of Unipart sealant STC 3373
to joint lines of cylinder block and timing cover.
48. Fit cylinder head gasket of correct thickness.
49. Fit tool LRT-12-112 to ensure camshaft is in
correct position. If necessary, turn camshaft
using spanner on cast hexagon.
CAUTION: Do not turn camshaft if cylinder
head is fitted to cylinder block.
NOTE: Fit a lightly oiled, new cylinder
head bolt in LH rear location.
50. Position cylinder head on cylinder block. Ensure
timing chain guide is not fouled and rear LH bolt
enters bolt hole in cylinder block. Locate cylinder
head on ring dowels.
51. Disconnect lifting chains. Remove lifting eye.
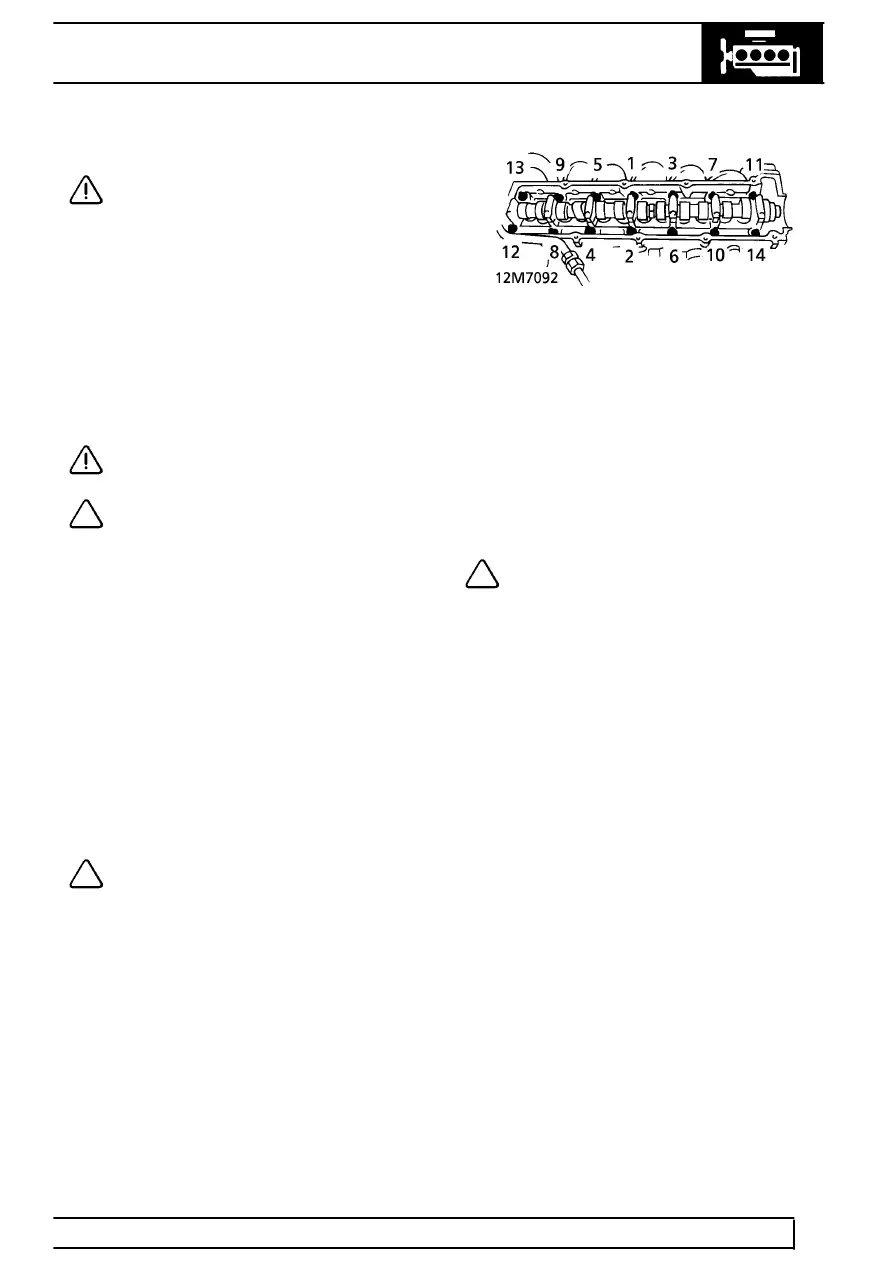
52. Lightly lubricate new cylinder head bolts. Fit
bolts. Tighten, in sequence shown, in the
following stages.
Stage 1 = 80 Nm (59 lbf.ft)
Stage 2 = Loosen by 180
°
Stage 3 = 50 Nm (37 lbf.ft)
Stage 4 = Tighten 90
°
Stage 5 = Tighten 90
°
Stage 6 = Run engine for 25 minutes
Stage 7 = Stop engine, allow to cool
Stage 8 = Tighten 90
°
NOTE: Tighten using angular torque
wrench.
53. Secure cylinder head to timing cover with bolts
and nut.
M7 -
15 Nm (11 lbf.ft)
M8 -
20 Nm (15 lbf.ft)
54. Fit camshaft timing chain tensioner rail.
55. Using new ’O’ rings, fit tensioner and guide rail
pins.
56. Engage timing chain with camshaft sprocket.
Position sprocket on camshaft.
57. Fit NEW camshaft sprocket bolt.
NOTE: Important; if engine has covered
more than 20,000 km (12,500 miles), insert
a feeler gauge of 4.61 mm (0.18 in)
thickness between cylinder head face and inlet
manifold side of LRT-12-112 prior to tightening
bolt.
58. With LRT-12-112 fitted to camshaft, tighten
camshaft sprocket bolt to
20 Nm (15 lbf.ft).
59. Using a suitable torque angle gauge, further
tighten bolt by 35
°
.
60. Remove LRT-12-112.
61. Using tool LRT-12-115, lever tensioner rail to
slack position. Remove LRT-12-114 from
tensioner plunger.
62. Using a new sealing washer, refit access plug.
