
Step 3
- Make
- Mazda
- Model
- MX-5 (NA) Factory Workshop Manual
- Year
- 1990–1992
- Section
- U Heater and air conditioner systems › Step 3
Heater and air conditioner systemsStep 3
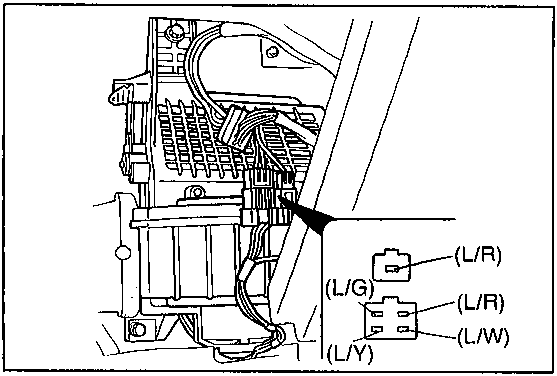
Step 3
- Turn the ignition switch ON.
- Turn the blower switch and A/C switch OFF.
- Measure the voltage at the terminal-wires of the resistor assembly.
| Wire | Voltage | Action |
|---|---|---|
| (L/R) (1-pin connector) | 12V | Next, check wire (L/W) |
| 0V | Replace blower motor | |
| (L/W) | 12V | Next, check wire (L/R) |
| 0V | Replace resistor assembly | |
| (L/R) (4-pin connector) | 12V | Next, check wire (L/G) |
| 0V | Replace resistor assembly | |
| (L/G) | 12V | Next, check wire (L/Y) |
| 0V | Replace resistor assembly | |
| (L/Y) | 12V | Go to Step 4 |
| 0V | Replace resistor assembly |
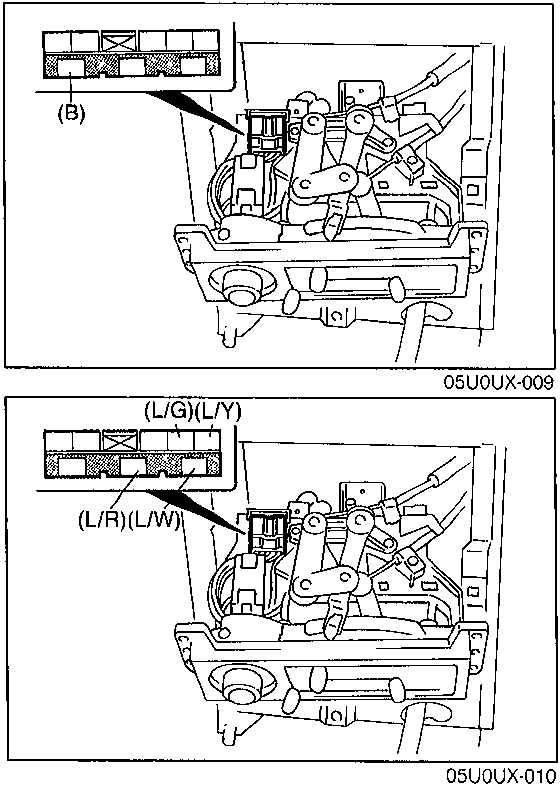
Step 4
- Turn the ignition switch ON.
- Turn the blower switch to the fourth position.
- Measure the voltage at terminal-wire (B) of the blower switch connector.
| Wire | Voltage | Action |
|---|---|---|
| (B) | 0V | Go to Step 5 |
| 12V | Repair wire harness (Blower switch—Body ground) |
Step 5
- Turn the ignition switch ON.
- Turn the blower switch and A/C switch OFF.
- Measure the voltage at the terminal-wires of the blower switch connector.
| Wire | Voltage | Action |
|---|---|---|
| (L/W) | 0V | Repair wire harness (Resistor assembly—Blower switch) |
| 12V | Next, check wire (L/R) | |
| (L/R) | 0V | Repair wire harness (Resistor assembly—Blower switch) |
| 12V | Next, check wire (L/G) | |
| (L/G) | 0V | Repair wire harness (Resistor assembly—Blower switch) |
| 12V | Next, check wire (L/Y) | |
| (L/Y) | 0V | Repair wire harness (Resistor assembly—Blower switch) |
| 12V | Replace blower switch |
Parts & tools for this job For 1990 Mazda MX-5
- TOOLA/C manifold gauge setSearch: AC manifold gauge set
- TOOLUV leak detection kitSearch: AC UV leak detection kit
- PARTCabin filterSearch: Mazda MX-5 1990 cabin filter
Links open Amazon search results in a new tab. As an Amazon Associate I earn from qualifying purchases.